Outdoor Kitchens & Entertaining Spaces

We use affiliate links in our posts and our site. This means if you make a purchase using these links, we may earn a small commission. You don’t pay a cent more than you would otherwise! Our full disclosure is available under About.

I’m sure now that Summer is almost over, you’ve had time to reflect over what you WISH you had built in your backyard. Yeah, me too!

On my recent trip to the Northwest, I had the opportunity to visit some home shows and look at the newest and greatest trends in housing design.  

What I really had my eye on was the outdoor kitchens and entertaining spaces!  I thought I’d share them with you. (I apologize for the picture quality, these were taken with my cellphone!)

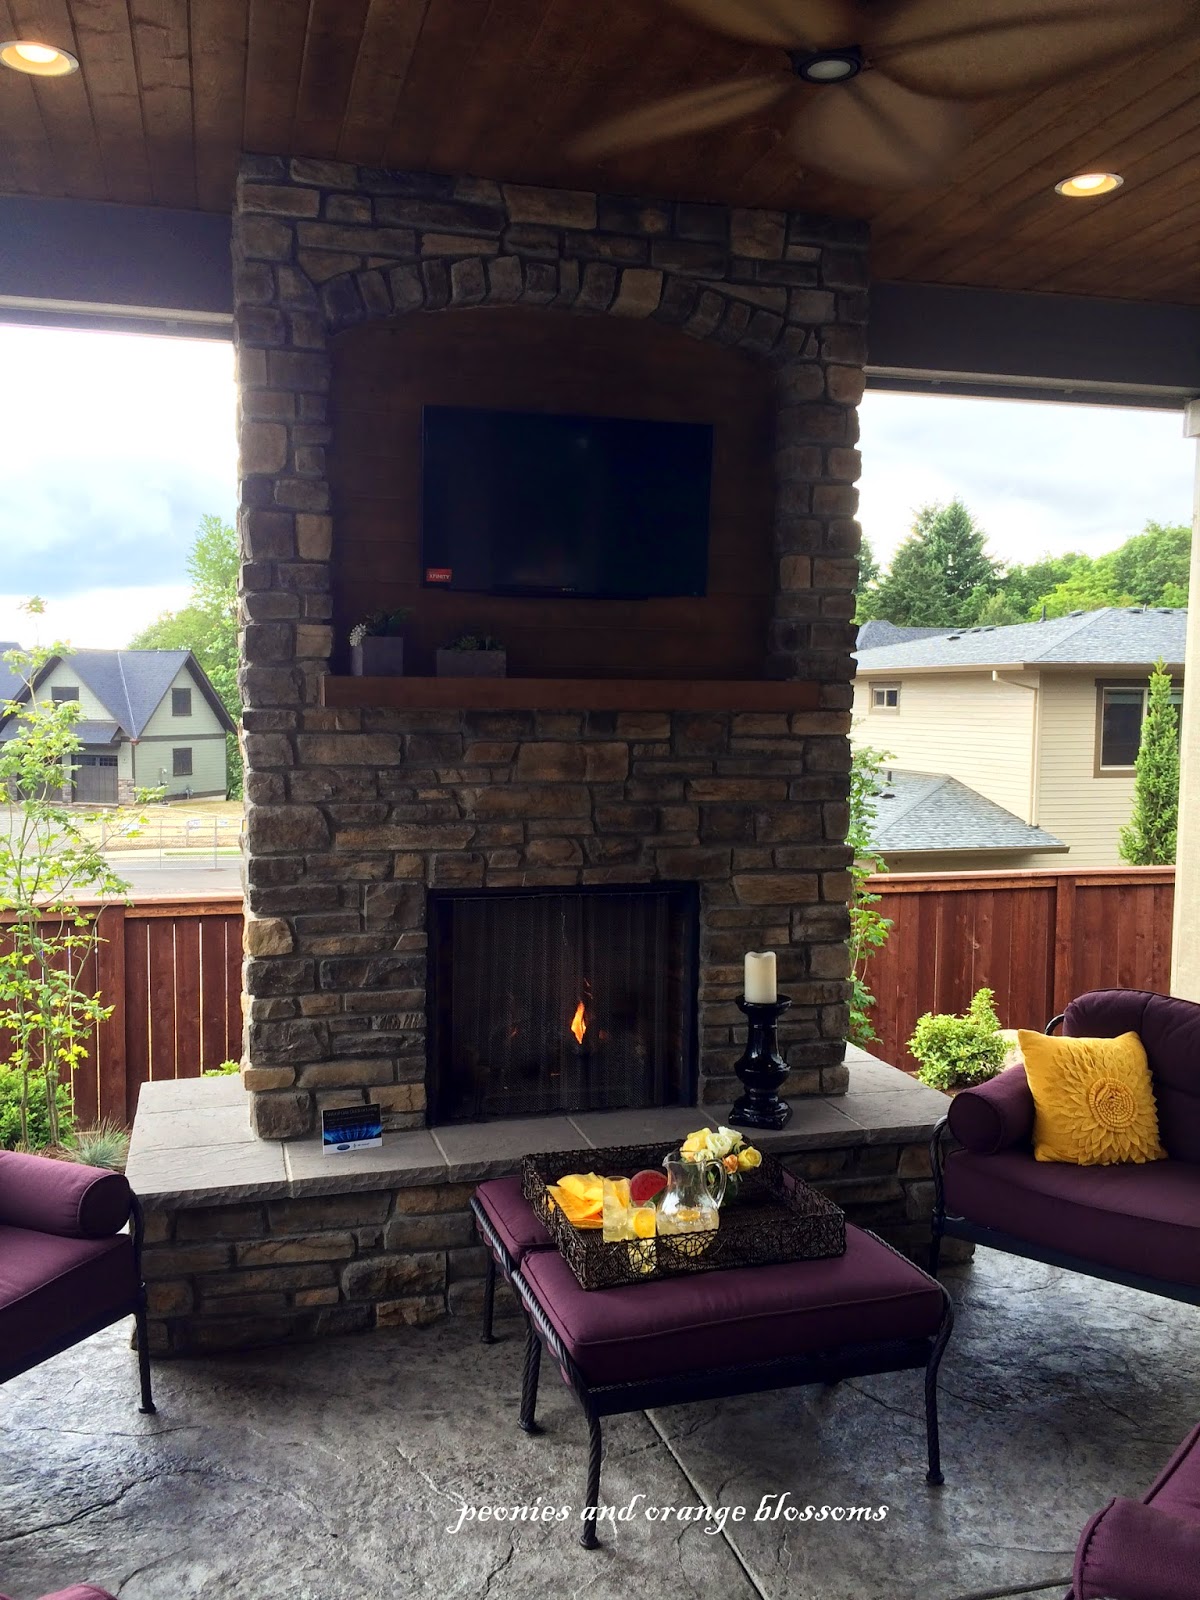
I liked this whole covered area along with the fireplace and the overhead fan.  Great for warmer Summer nights and cooler Fall nights!   

This next house had a nana door that opened up to a large covered area.  In the picture below, this was the grill and food prep area.

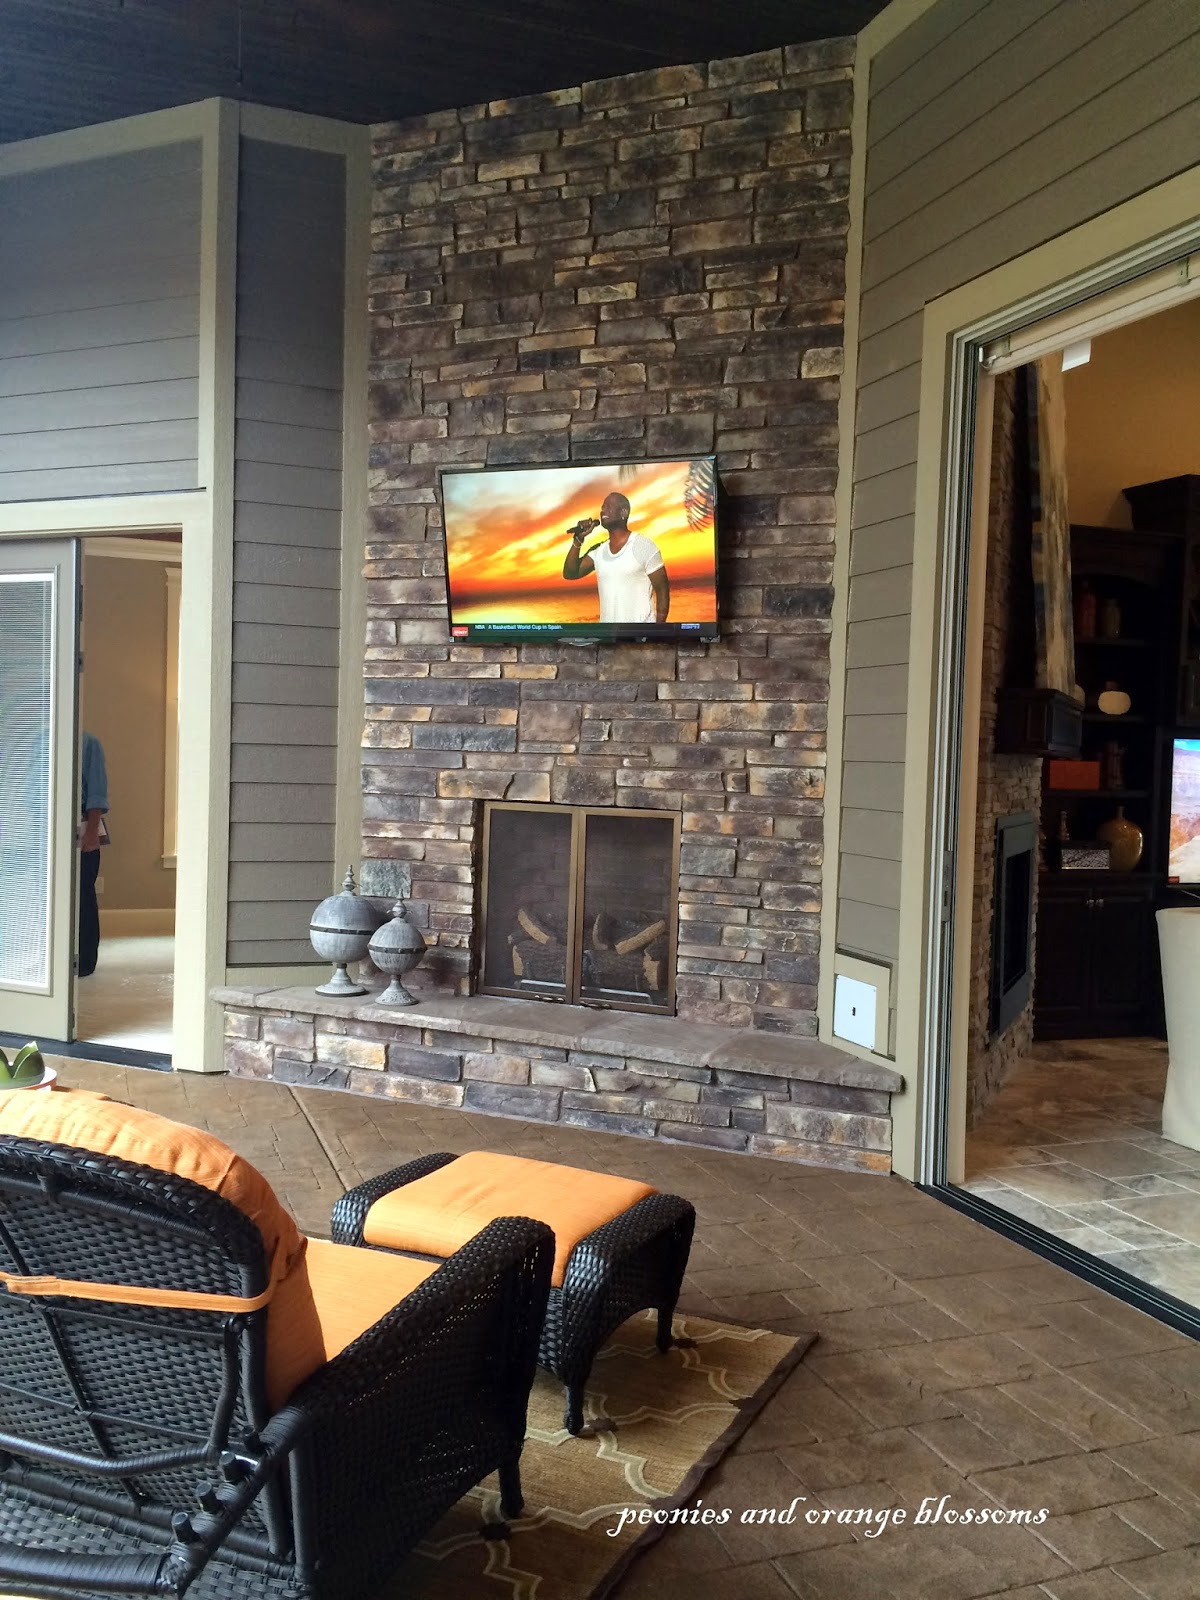
…which then if you turned around from the grill you were facing this seating area with a fire place and tv.  You can see on the right the big open wall which can be enclosed with the nana door.  The ceiling had ceiling fans which help keep the flies away!

Another house had this pizza oven.  Love it!  

What I liked about this next house below is the outdoor brick fireplace.  You don’t see brick fireplaces too frequently nowadays, so I’m kind of hoping it may make a comeback.  The area was also enclosed and had overhead heaters behind the seating area.

Okay, so this next picture isn’t an outdoor kitchen OR an entertaining space, but it was just too cute not to include!  How cute is this garden? Love the raised flowerbeds, hanging flower baskets on the gate, and the fence to keep pests away.

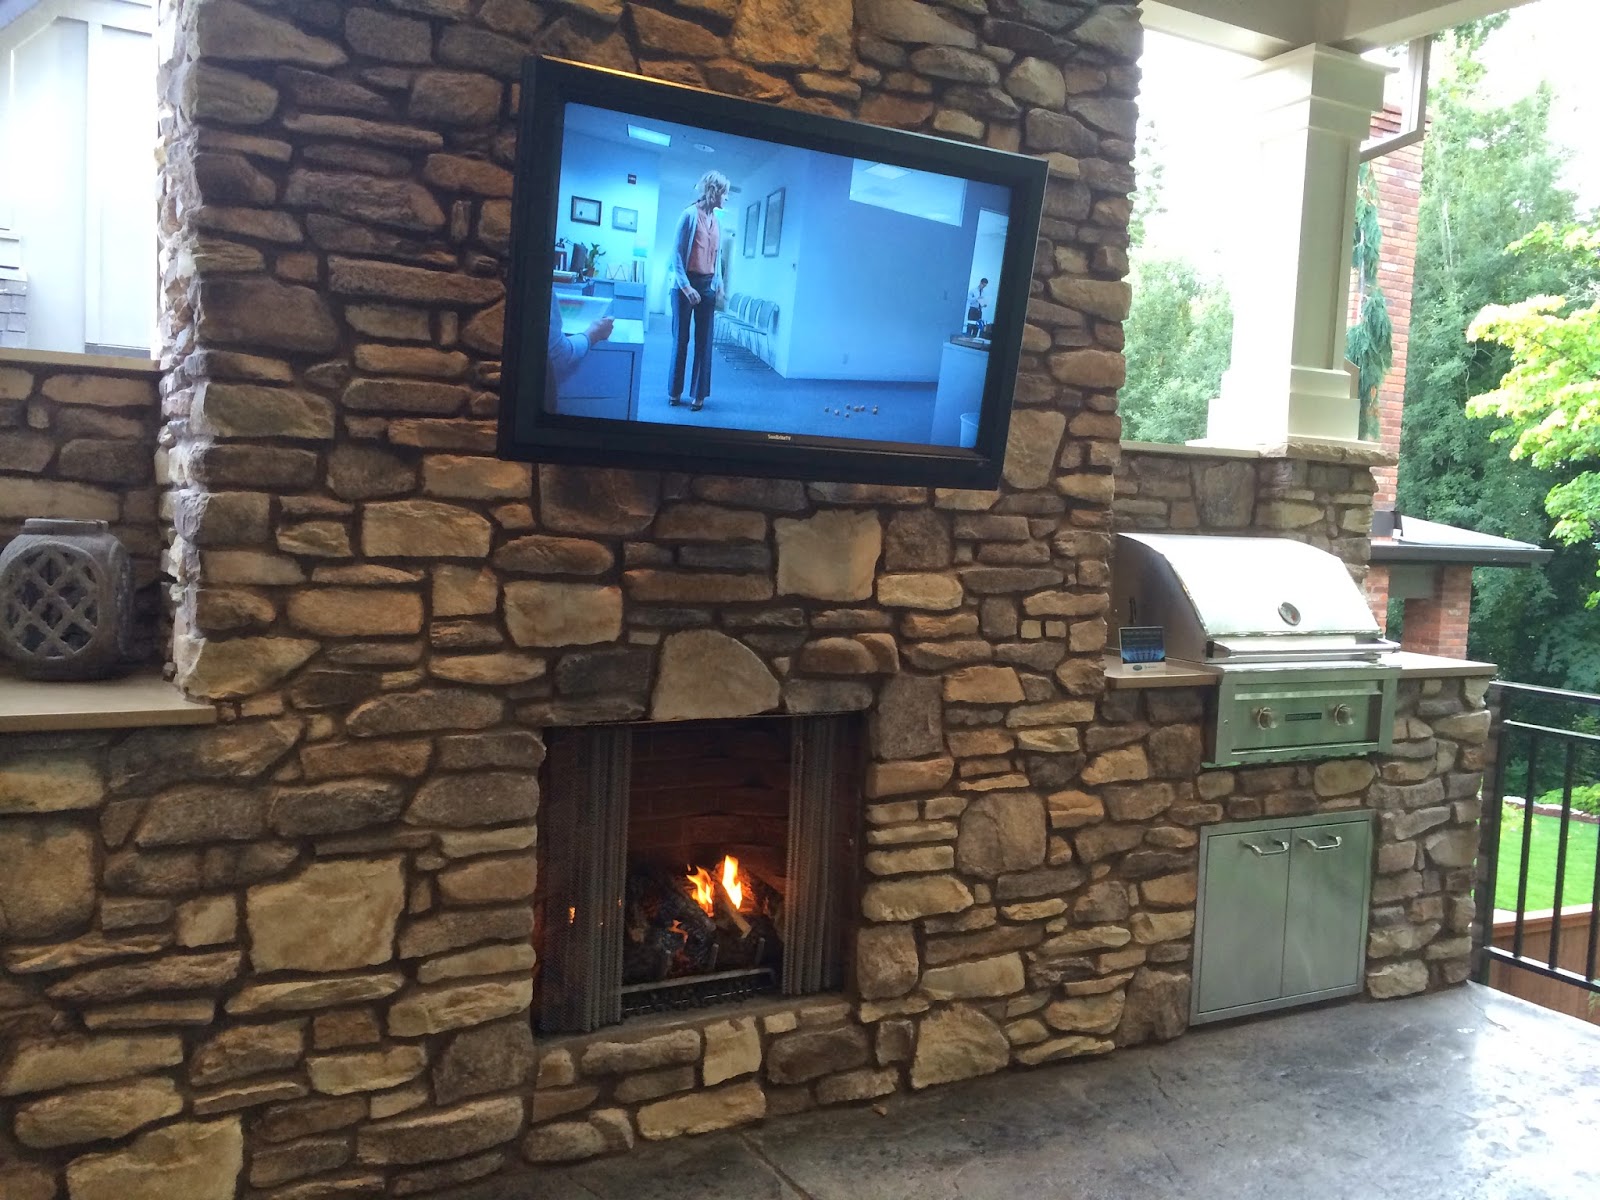
Another variation of an outdoor kitchen. Fireplace is natural gas.  This covered outdoor area actually had skylights so it felt more outdoorsy then just sitting outside with a roof over your head!

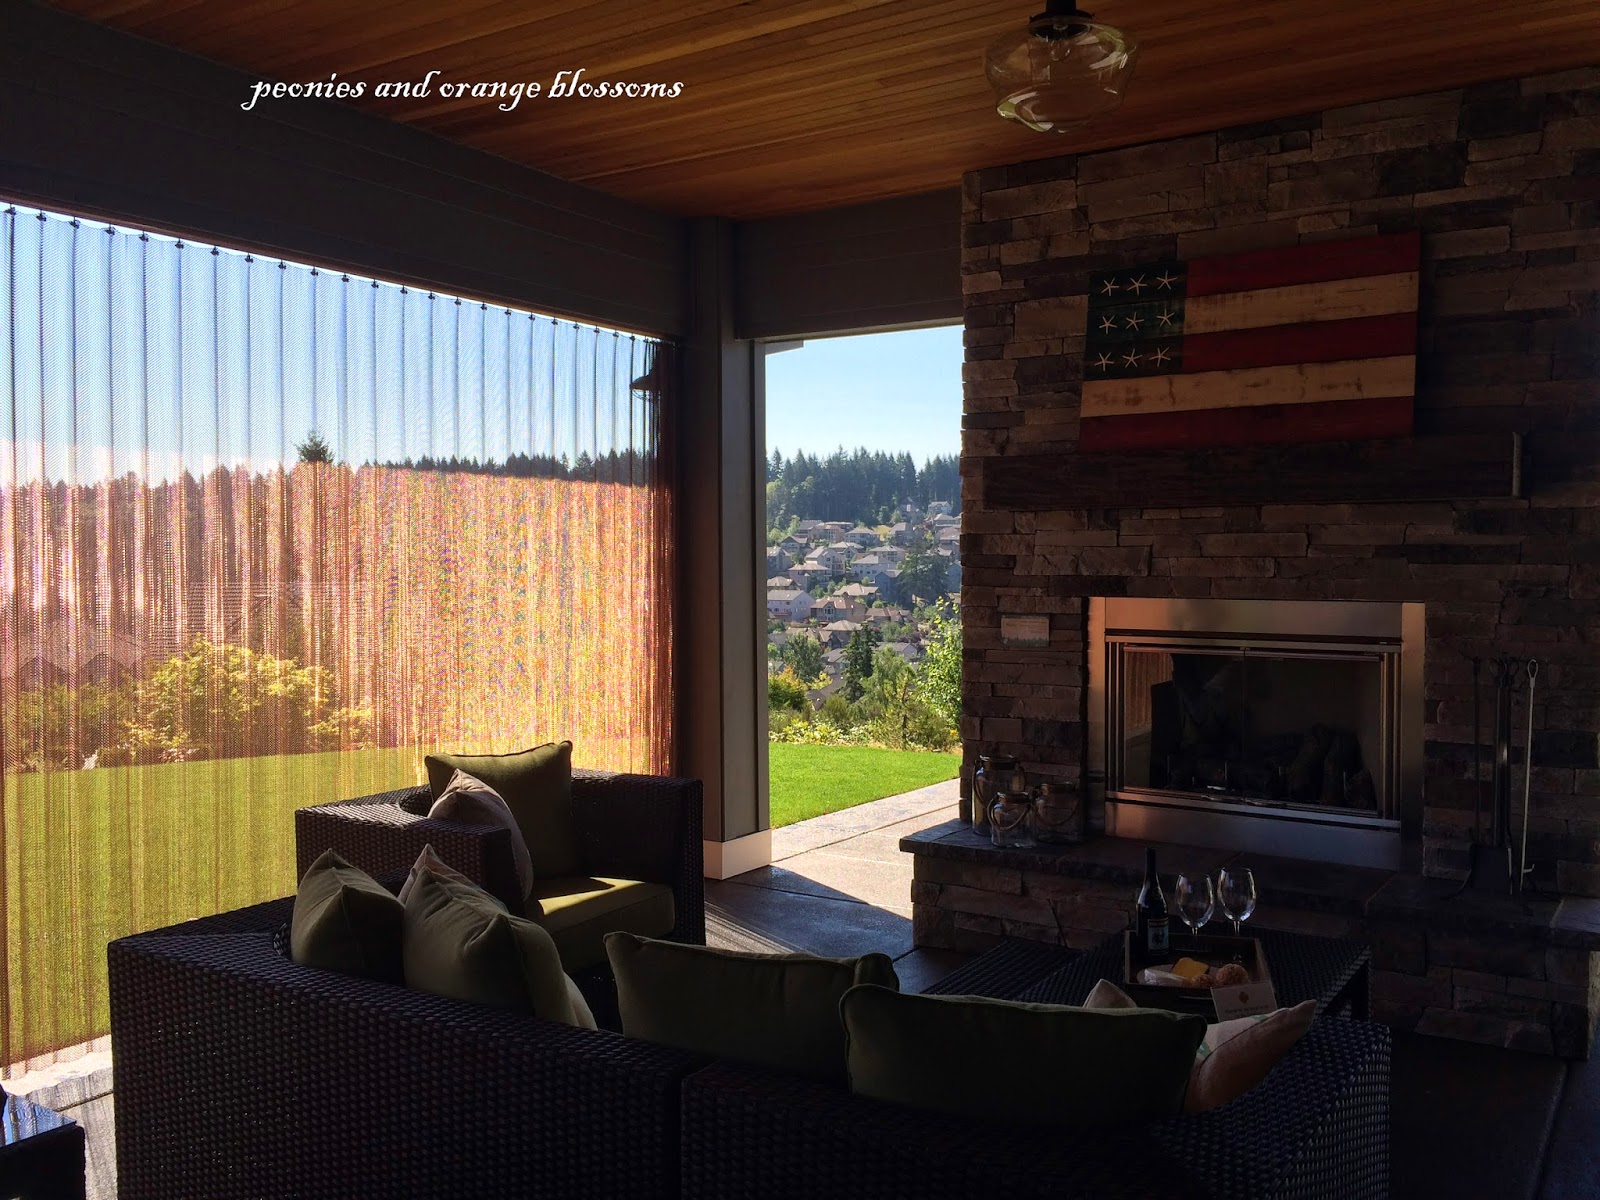
Onto our next house… it had a large covered outdoor area.  One wall had a chain-link curtain to keep bugs away.  It was really nice and large.

Now, if you turned left you would see this pass-through from the kitchen with a bar.  I would’ve moved the chairs and made it a buffet area.

This is looking in the other direction.  A nice fireplace with a cough.  you can see the chain link curtain still.

The next house had this built-in dining area… but what’s cool about it is the firepit right in the middle of the table! Perfect for those chilly nights!!  I thought of roasting marshmallow’s over it… but then thought of the mess I’d make trying to clean melted marshmallow off those glass beads!

This last house had a covered kitchen/entertaining area between their garage and house.  What was interesting about this area was this sliding barn-type door that you could slide in front of the grill, refridgerator, and prep area and lock up!  Great if you are storing things you don’t want to get stolen!  

Touring these homes certainly gave me ideas for my dream outdoor kitchen/entertaining area.  What did you wish you had outside this Summer?

What did you like?  

http://peoniesandorangeblossoms.blogspot.com

Linking up with these fabulous link parties: The Scoop!,  Metamorphosis Monday’sInspire Me Tuesday,Wow us Wednesdays! What’s it WednesdaysCreative Ways, Treasure Hunt ThursdayHome Sweet Home Feathered Nest Fridays,G’day Saturdays,

Follow:

Pupusa recipe with marinated slaw

We use affiliate links in our posts and our site. This means if you make a purchase using these links, we may earn a small commission. You don’t pay a cent more than you would otherwise! Our full disclosure is available under About.

A few years ago I was first introduced to a pupusa.  My husband was just introduced a month ago.  We both fell in love with them. Since he’s the chef, he decided we should make some!

First things first, a poo-poo-wha?  Poo-POO-sah.  Pu-PU-sa. See, it’s even fun to say! Now say it fast: pupusa

What is a pupusa?  It is a traditional food from El Salvador made from a thick, handmade corn tortilla that is filled with meats, beans, and cheese.  It’s kind of like a quesadilla.

Let’s take a look…

Pupusa recipe 

 Doesn’t it look GOOD?

pupusa recipe

Time for the recipe.  Make the slaw first, then the filling, then the masa dough.  This whole process took me TWO hours.  This pupusa recipe is adapted from Go Vegan Meow

First, make the slaw.

Marinated cabbage slaw (aka curtido) 

  • 1/2 a green cabbage, shredded
  • 1/2 a red cabbage, shredded
  • 1 jalapenos, seeded and finely chopped
  • 1 large carrot, shredded
  • 1/4 cup fresh cilantro, finely chopped
  • 1/2 Tbsp salt
  • 2 tsp dried oregano
  • 1/4 cup white vinegar

Directions

  1. The easiest way to shred the cabbage is to use a large food processor with the shredding blade.  Then I’d try a mandoline.  Slice cabbage in half, remove the core, then shred away! Now place in a separate bowl.
  2. Shred the carrots. Add to the cabbage
  3. Add all of the remaining ingredients and toss well.
  4. Place the slaw into a large reasalable plastic bag (the gallon size should work). Press out all of the air and tightly seal the bag.
  5. Store in the fridge with heavy items on top.  Let cool for approx 1 hour before serving.  If you wanted to prepare this the day ahead you could.

Black bean, cheese, and potato filling

Ingredients

  • 1 can black beans
  • 2 cloves garlic, chopped
  • 1 jalapeno, seeded and finely chopped
  • 1/4 cup water
  • 1/2 tsp ground cumin
  • 1/2 tsp dried oregano
  • 1 tbsp olive oil
  • 1 potato (russet or yukon gold)
  • shredded Mexican cheese mix or mozzarella cheese

Directions

  1. Clean the potato and cook in the microwave until done.
  2. Add the garlic and oil into a skillet and fry over medium heat until fragrant. 
  3. Add the jalapeno, black beans, cumin, water, and oregano.  Bring to a simmer.
  4. Cook for about 8 minutes, or until the water is absorbed.  The beans should still be moist.
  5. Once the potato is slightly cooled, cut into very small fine chunks (like o’brien potato size) and add to the beans. 

Masa Dough

Ingredients

  • 2 cups instant Mexican style masa harina (found it at walmart neighborhood market here)
  • 1 3/4 cups or more of warm water
  • 1/4 tsp salt

Directions

  1. In a large bowl, stir together the masa harina, warm water, and salt.  The dough should be moist and firm, not too sticky.  If it is too sticky, sprinkle with 1 tbsp masa harina at a time until you reach the right consistency.  If too dry, add more water. The dough is done with it doesn’t stick to the bowl.
  2. Grab a chunk of dough and roll it into a ball.  (picture 1)
  3. With the ball of dough in your palm, use your fingers in your other hand to form a little bowl.  (Picture 2)
  4. Now add 1.5-2 tbsp of filling to the indentation.
  5. Sprinkle some cheese on top of the filling (picture 3)
  6. Fold over the sides of the bowl like a taco. (picture 4)
  7. To shape into a flat disc, perform gentle but firm patting motions in a circular pattern.  
  8. If your pupusa cracks or some of the filling pokes out, you can smear a little more dough over the crack.  Honestly though, the filling tastes good when it fries on the pan so it’s not a big deal.  The pupusa should be about 1/4 of an inch thick. (picture 5)
  9. Prepare all of your pupusas (this recipe makes approx 8 of them)
  10. Heat a large skillet coated with some olive oil on medium-high heat.
  11. Grill a few at a time, taking about 5 minutes on each side to finish cooking.  They are done when browned with a few darker (yes even burned spots!) are on them.
  12. If you are serving them all at once, warm in some foil in the oven while the rest cook.
  13. Serve with the slaw on top!
steps for making the pupusa
finished pupusa!
Black bean, cheese and potato pupusas with marinated slaw (curtido) on the side

Delicious!  Bring on pupusa jokes!

http://peoniesandorangeblossoms.blogspot.com

Linking up with these fabulous link parties: The Scoop!,  Metamorphosis Monday’sInspire Me Tuesday,Do Tell Tuesday Wow us Wednesdays! What’s it Wednesdays,  Creative Ways, Home Sweet Home Feathered Nest Fridays,G’day Saturdays,

Follow:

Easy DIY Pineapple Vase

We use affiliate links in our posts and our site. This means if you make a purchase using these links, we may earn a small commission. You don’t pay a cent more than you would otherwise! Our full disclosure is available under About.

In this post – Easy DIY Pineapple Vase

This post may contain affiliate links. 

YOU GUYS. I have got the COOLEST tool maybe…. ever.

A Pineapple De-Corer and Slicer 

It did this:

At first I thought, oooh! A neat pineapple cup for drinks! How cool is that?

I thought of another use for this pineapple as well…

A pineapple vase! This would be great for tropical themed parties!

Perfect for luaus.

Or it would make a great vase for an outdoor BBQ or party because it can withstand the elements from the outdoors.

Get it here  or get it on Amazon.

You could put more tropical appearing flowers in it: protea, birds of paradise, orchids…

I just used some roses from the garden.


Follow:

Courtly Check black and white tablescape

We use affiliate links in our posts and our site. This means if you make a purchase using these links, we may earn a small commission. You don’t pay a cent more than you would otherwise! Our full disclosure is available under About.

Last week I showed you my DIY MK placemats.  Now it’s time to show you my table setting which I totally love!

Courtly check tablescape

 My napkin rings I made from another DIY project.  Check out how to make your own HERE. (Ironically I made those napkin rings a year ago!)  This platter we bought to use outside for the BBQ.  But I stole it for my centerpiece!

I love how the Juliska Country Estate plates go with the MK Courtly Check!

I had been wanting these candlesticks for a long time too.  When I made my napkin rings. I had leftover ribbon.  Since I didn’t have the candlesticks, I just tied bows around the faux-candles to get the look.  But this past Christmas DH surprised me with these candlesticks!

Love my candlesticks!

What’s been on your MK wishlist?

written at http://peoniesandorangeblossoms.blogspot.com


Linking up with these fabulous link parties: The Scoop!,  Metamorphosis Monday’sInspire Me Tuesday,Do Tell Tuesday Wow us Wednesdays! What’s it WednesdaysCenterpiece WednesdaysCreative Ways,Tablescape ThursdayTreasure Hunt ThursdayHome Sweet Home Feathered Nest Fridays,G’day Saturdays,

Follow:

Vegetable Pizza Recipe

We use affiliate links in our posts and our site. This means if you make a purchase using these links, we may earn a small commission. You don’t pay a cent more than you would otherwise! Our full disclosure is available under About.

I love all of the fresh fruits and vegetables of Summer.  I also love pizza.  One way to eat up that plethora of squash is to bake it in a pizza.

vegetable pizza

Our Basic Pizza Crust Recipe

Ingredients

  • 2 cups of regular flour (but if you want the best, use the 00 flour)
  • 1 cup of fine corn meal
  • 1 tablespoon of active dry yeast
  • 1 teaspoon salt
  • 1 tablespoon extra virgin olive oil
  • 3/4 cup plus 2 tablespoons lukewarm water
  • 2 tablespoons honey, optional

Directions

  1. Heat the water to lukewarm. Then add the olive oil. (for really yummy dough, add the 2 tbsp honey here)
  2. Dissolve the yeast in the warm water.
  3. Using your bread kneader mixing option on your mixer (we use the option on the kitchenaid), pour the yeast solution into the mixer and mix for 5 minutes.
  4. Now, add all of the dry ingredients to the mixer. Mix on low until it forms a ball.  If it does not form a ball, you need to add more flour or cornmeal.
  5. Once it has formed a ball, knead on low speed for 20 minutes.  I know this seems unnecessary, but it is the most critical part!
  6. After, cover and let the dough sit in a warm, dry place for 1 hour. This allows the dough to rise.  If you want to make your dough ahead of time, place the dough in the fridge overnight and take it out 1 hour before cooking time.
  7. Spread the dough into desired shape. This dough makes enough for two 10″ pizzas, so we separate the dough into two. This makes the shaping of the circular pizza dough a little easier!

Now choose your toppings!

Ingredients

  • zucchini, thinly sliced
  • yellow squash, thinly sliced
  • mushrooms, sliced
  • tomatoes, sliced (my tomatoes weren’t ripe yet)
  • fresh basil
  • Whatever other vegetable you want to put on… olives, onions, peppers. Or if you want to be less healthy… add some pepperoni or sausage.
  • Pizza sauce (I like Trader Joe’s)
  • Mozzarella cheese, pre-shredded is easier to use.

Directions:

  1. Preheat oven to 500F, best cooked with a pizza stone.
  2. Spread the pizza sauce over the pizza
  3. Sprinkle mozzarella (as much as desired)
  4. Place all your ingredients on the pizza, except the basil.
  5. If you use a pizza peel (as I do), sprinkle coarse cornmeal on the bottom so the pizza will easily slide off the peel onto your stone.  This is a nice trick.
  6. Place in oven and cook for 8-12 minutes, until it looks done. 
  7. Immediately after you take the pizza out of the oven, sprinkle the basil on top. 
  8. Enjoy! 
homemade vegetable pizza

Yummy!


Written at http://peoniesandorangeblossoms.blogspot.com


Linking up with these fabulous link parties:G’day Saturdays,

Follow:

DIY Mackenzie-Childs Courtly Check placemats!

We use affiliate links in our posts and our site. This means if you make a purchase using these links, we may earn a small commission. You don’t pay a cent more than you would otherwise! Our full disclosure is available under About.

I have long wanted some Mackenzie Child’s Courtly Check placemats.  But their cheapest cork back ones run at $68 for a set of four.  Whereas their fabric ones are $56 a piece! Boo!  So I had to come up with my own solution!  I’ll make my own!

Easy DIY Mackenzie Childs Courtly Check placemats!


Materials Needed

Courtly Check tissue paper (you can get this either from a previous MK purchase OR you can search eBay and purchase some).

Directions

  1. Cut out the tissue paper in the placemat size desired. Use a previous placemat as a guide.
  2. Go to kinkos and have the paper laminated. The tissue paper is too soft for the laminator, so using a regular piece of paper to back it is a good idea.  I used the biggest piece of paper that could fit in their laminator at my local kinkos. Size will vary depending on local kinkos.
  3. And there is no number three. You are already DONE!

Total project cost for making 8 placemats: $52. 

Are they as nice as the real MK placemats? NO. But now whenever I spill my salsa drips on these ones, it’s no big deal!

Easy DIY Mackenzie-childs placemats

A view from the side:

A view from the back…

Love this idea because it gives me the look for literally the price of 1 placemat!  

Now check back next week because I’ll unveil my tablescape with these wonderful placemats!

Written at http://peoniesandorangeblossoms.blogspot.com

Linking up with these fabulous link parties: The Scoop!,  Metamorphosis Monday’sInspire Me Tuesday,Wow us Wednesdays! What’s it Wednesdays,  Treasure Hunt ThursdayHome Sweet Home Feathered Nest Fridays,G’day Saturdays,

Follow:

San Francisco Gingerbread Houses

We use affiliate links in our posts and our site. This means if you make a purchase using these links, we may earn a small commission. You don’t pay a cent more than you would otherwise! Our full disclosure is available under About.

This Spring I was visiting San Francisco and took a few pictures of some of the wonderful houses.

I thought I would share them with you today.

Now this house under construction below was pretty.  I initially thought the window trim was bright blue which I thought was a neat idea… but then I realized it was painter’s tape.  I still think bright blue would be a great idea!


San Francisco Houses

I enjoy all of the little gingerbread details

This house is just classic San Francisco style.

Wow! Look at this house below!  So pretty!  Notice the bay on the far left side of the picture…

 If you stand at the corner where that white Prius is above and look down, this is what you see: The Golden Gate!  Wow!

Another fabulous house!


I really liked the trees in front of the house on the right.

I like the wisteria on the house on the left…

This was the front door to one of the houses. What a rare thing to have a little yard with your front door.  Also like the neoclassical details of the porch!

This house reminded me of France…

And to end today’s post, another classic San Francisco style house!

What do you like about the Victorian architecture in San Francisco?

Follow:

Mexican-style Corn with Serrano Crema

We use affiliate links in our posts and our site. This means if you make a purchase using these links, we may earn a small commission. You don’t pay a cent more than you would otherwise! Our full disclosure is available under About.

I ate at Rick Bayless’ Red O Mexican restaurant and LOVED it.  My favorite dish they served there was something called “deconstructed Mexican street corn”.  I don’t care what it’s called, it’s absolutely delicious.  My husband and I sat there and studied the flavors.  We think we came up with a recipe that closely resembles it.

We call it… Mexican style corn with serrano crema.

AKA Mexican corn-off-the-cob

AKA deconstructed Mexican street corn

AKA get-in-my-mouth-now corn.  We had a hard time naming this dish!  Enough chat, time for the recipe!

Mexican Style Corn with Serrano Crema recipe- printable recipe here!

Serrano Crema Recipe

Ingredients

  • 3 serrano chile peppers, seeded and chopped.
  • 3 cloves garlic
  • 1/2 bunch of cilantro, coarsely chopped with the stems removed
  • 1 cup mayonnaise (may substitute greek yogurt for a lighter version)
  • 1 cup heavy cream (may susbstitute milk, but won’t be nearly as good!)
  • salt and pepper, to taste.

Directions

  1. Place all ingredients into a blender and blend until smooth. Done! Now set this aside and get ready for the corn.

Mexican style corn

Ingredients

  • 3 ears of corn with husks on
  • 1 poblano pepper, julienned
  • 1/2 red onion, julienned
  • cilantro, for garnish
  • queso fresco cheese, grated

Directions

  1. Soak corn with the husks still on in cold water for approx. 1 hour.
  2. BBQ the corn in the husk until all sides of the husk are charred.
  3. Meanwhile, saute the onions and peppers in a little bit of EVOO.
  4. Remove ear from husks.
  5. Place corn cobs back on BBQ, and cook until outsides are lightly browned.
  6. Cut the kernels off the cob, leaving as big as chunks as possible (see pics below).
  7. Add the cut corn to the pepper/onion mixture and saute until warm.
  8. Serve the mixture on a plate.  Drizzle the serrano crema on top (careful, this crema is spicy).
  9. Sprinkle the queso fresco on top.  The cheese is key! If you don’t get this cheese it won’t taste right.
  10. Add cilantro for garnish.
  11. Enjoy!


sauteing the peppers and onions
How you remove the corn from the cob.

Finished product! Yum!!

SaveSave

Follow:

From the Shop

I may earn a small commission if you purchase with these links

Caning Natural Tote Handbag - Universal Thread™
The Hustler High Waist Fray Hem Ankle Bootcut Jeans
Le Panier Pliage Raffia Crossbody Bag
Extra Large Le Pliage Panier Tresse Straw Tote
The Bennet Buttondown Shirt by Maeve
T Monogram Perforated Leather Bucket Bag
Mellow Stud Mule
Le Pliage Marinière Recycled Nylon Canvas Travel Bag
Unseen Sunscreen Broad Spectrum SPF 40 PA+++
Maxine Stripe Cotton Button-Up Shirt
Citizens of Humanity Charlotte High Rise Straight Jeans
Navy Equestrian Traversee M Linen Tote
Cream Carrie Blouse
Ellison Natural
Jolene High Rise Vintage Slim
Citizens of Humanity Blue Jolene Jeans
Charlotte High Rise Straight Jeans
Le Pliage Filet Top Handle Bag
Vintage cotton crewneck T-shirt
Air Heart Sunglasses
Le Pliage Torchon XS Top Handle Bag With Strap
Santorini Raffia Basket Bag
Chuck Taylor® All Star® Lift High Top Platform Sneaker
Please note that I use ShopSense, LIKETOKNOW.it, Shareasale and Amazon affiliate links on this site. This means using them for purchases won’t cost you extra but may earn me a small commission.  Our full disclosure is available for viewing under About in the disclosure policy.
All rights reserved. Our graphics, images and text are all subject to copyright protection.