Friday Favorites

We use affiliate links in our posts and our site. This means if you make a purchase using these links, we may earn a small commission. You don’t pay a cent more than you would otherwise! Our full disclosure is available under About.

It’s Friday and I’m back with some more Friday Favorites this week! Can you believe July is over?? I can’t. It was a big month for us. Moved from SoCal to NorCal.  Both of us started new jobs. Big things happening over here.
This post may contain affiliate links. See my disclosure policy.

French Pastries
I have a French pastry problem. The problem is… I love them and can’t stop eating them.  These pastries are from Craftsman & Wolves in San Francisco.  The one of the left is a raspberry eclair and was delicious! The one of the right is called a peach twinkie.  It is nothing like a twinkie!  With the edible flower blossoms and fresh peach cream inside, it is a delight!  If you are heading to San Francisco, I recommend going there.  I wrote about them in a blogpost here.

Honey
This honey from the Savannah Bee Company is one of the best honeys I’ve ever had. It’s an orange blossom honey and it actually tastes like orange blossom! I’ve many other orange blossom honeys but they never actually taste like orange blossom.  But this one does! As you can see, we already used half the bottle!

Pumpkins!
We planted pumpkins on July 1 when we moved it and this was them earlier this past weekend. We planted them from seed. There are 6 different varieties.  I’ve been outside cackling around like a witch… grow my pretties!  While they look really big, they need to started growing like mad if we are to have pumpkins by Halloween!

Pretty Tile
This past week we were playing at the San Francisco Design Center and I saw this pretty tile design on the wall.  Wouldn’t you love to have this… in your kitchen, bathroom, or outside, or anywhere? It’s so beautiful!

 Liberty London at Nordstrom
This past week when we went to the downtown San Francisco Nordstrom’s we checked in at Liberty London’s pop-up store!  If you’ve never heard of Liberty London, LL is actually a department store in London that sells really cute products!  They are known for the cute floral prints! They have no current store in the USA, so Nordstrom struck a little deal with them.  Nordstrom is exclusively selling their merchandise for 1-2 months.  If your local Nordies doesn’t have the pop-up store, that’s okay, you can get everything online.  I purchase the gardening gloves on the bottom right – they are soft and cute, and long to protect my arms from the rose thorns!  Here are some of the other things I eyed as well… oh, did I mention they give you a free cute little shopping bag if you buy something?

*contains affiliate links

Friday Favorites with A Little Bit of EverythingMomfessionals, and Grace and Love
Five on friday at A Liz Adventures .
Friday Favorites at the Diary of a Real Housewive
Oh Hey, Friday! at September FARM

Follow:

Summer French Table Setting

We use affiliate links in our posts and our site. This means if you make a purchase using these links, we may earn a small commission. You don’t pay a cent more than you would otherwise! Our full disclosure is available under About.

I have assembled my first tablescape after the big move!  I was inspired by the beautiful roses that are blooming here, the orange topiaries, and my new French burlap fabric I bought!

This post may contain affiliate links


I put a freshly picked rose on each place setting.  It’s not just to look at – pick it up and take a little sniff and you’ll be treated with the most pleasant smelling rose!

These are David Austin roses and they smell heavenly!

I saw a very similar table runner in Napa recently but they wanted $100.  I found very similar fabric at a fabric store and bought it for $6/yard.  I intended to make placemats with it but I think I like it as a runner for now!

I put one of my madeleine anduze candle pots in the center. It has a really nice fragrance.  Purchased these at Pierre Deux years ago (RIP).

I like the Frenchie Summer feeling of this table.  The cups and plates are from Williams-Sonoma.  The cups are printed in French with fruits on them.

A pretty little collage that is pin-worthy for you 🙂

French Country Summer Table Setting Decor Idea


SaveSave

Follow:

White Chocolate Blackberry Macarons

We use affiliate links in our posts and our site. This means if you make a purchase using these links, we may earn a small commission. You don’t pay a cent more than you would otherwise! Our full disclosure is available under About.

I’ve been back in the kitchen baking again.  You will love what I came up with! I was inspired ball of the pretty french pastries I saw in Paris! White chocolate blackberry macarons!
This post may contain affiliate links.

White Chocolate Blackberry Macarons – printable recipe here

We will need 2 cups of fresh blackberries, but will not use them until the very end.

Materials needed: (affiliate links are used for your convenience)

    • a food scale (yes, you need this. I use this one)
    • a piping tip and piping bag (I like the ateco #806, I use these tips and piping bag)
    • Food coloring (the gels or dry powder works best, not the liquid store stuff)
    • A macaron template
    • food processor (I use this one)


Macaron Shell Recipe (from Laduree)

275g ground almonds

250g powdered sugar

210g egg whites

210g granulated sugar


1.  Mix almond meal and the powdered sugar in a food processor. Be careful not to grind too long, otherwise it will form a paste.

2. Sift the almonds and powdered sugar. Set aside.

3. Weigh out granulated sugar.

4. Weigh the egg whites.  Beat them slowly on a low speed until foamy. SLOWLY add the granulated sugar to the egg whites as you beat.  Once all mixed, increase speed to medium and beat until a firm meringue forms.  You want a firm meringue with glossy peaks but not stiff peaks.  They should defy gravity and remain in the bowl if you turn it upside down.  If you tilt your bowl to the side and they are sliding out, keep beating.

5. Add the food coloring gel and mix.

6. Then fold in 1/3rd of the almond/sugar mixture into the meringue with a silicone spatula.  Once combined, add another third of the almond mixture. Add last bit.  This batter requires more deflation during this step since it creates such a poofy meringue.

7. Add the batter to a piping bag.  Pipe in rows using your template onto parchment paper.  These macarons are a bit bigger than your usual macarons – 7cm in diameter.  To make my template I found a round glass that measured 7cm and drew around it.

8. Pick up the pan and beat until the counter.  The cookies need to rest on the counter between 30-60 minutes.  They are ready to go in the oven when they are dry to touch (the shell shouldn’t stick to your finger)

9.  Set the oven to 300F.

10. Bake the cookies for 15-20 minutes, one sheet at a time. They are done when they look kind of matte and seem firm when you lightly tap on them.  You can always rescue a slightly overcooked one with the maturation process that comes later, but you cannot rescue an undercooked one!!   The cooking time really depends on your oven.

11. Remove from paper once completely cool. If they stick to the paper, they aren’t cool yet. Or you undercooked them.

miam miam

White Chocolate Cream Filling

  • 1 large egg + 1 egg yolk
  • 85g granulated sugar (about 1/4 cup + 2tbsp)
  • 1 cup milk (doesn’t matter whole milk vs nonfat, I used 1%)
  • 29g cornstarch (3tbsp)
  • 119g white chocolate (4ounces)
  • 28g butter (2tbsp)
  1. Beat the egg, egg yolk, and the 1/4 cup of sugar together in a mixer until pale yellow and thick. This takes about 4 minutes.
  2. Add the cornstarch, mix on medium-low until mixed in.
  3. Mix the milk and the remaining 2 tbsp of sugar on a saucier pan over heat.  Bring it to a boil.
  4. Once boiling, pour half of the milk slowly into the egg mixture and whisk constantly.
  5. Then pour the entire mixture back into the remaining milk in the saucepan.  Bring up to a boil to thicken on low.
  6. You must whisk continuously to make sure that it doesn’t burn on the bottom, This takes several minutes.  If it burns, you must throw away and start over.
  7. The pastry cream will suddenly thicken.  Once it thickens, add the white chocolate and mix together thoroughly until chocolate is melted.  Remember we are only melting the chocolate, not cooking it!
  8. Put a piece of saran wrap directly onto the surface of your cream and place it in the refrigerator.  Let cool for 1-2 hours before using.


Assembling the macarons!


On one shell, form a ring of blackberries on the edge.  Using a piping bag, pipe the white chocolate cream into the center of the blackberry ring.Then put another macaron shell on top to make a sandwich.  For looks, pipe a little dollop around each blackberry so it appears to be sandwiched between white chocolate cream.

For garnish, pipe a little dollop of cream on top, add a blackberry, and sprig of fresh mint. Voila! You, too, are a pastry chef!

Below is a picture of what I mean by putting the blackberries on the edge and adding the cream to the center.  As you can see, my recipe was inspired by a raspberry rose version I had in Paris.  Except… I never saw a blackberry one there! So I came up with my own!

this is what I mean by putting a ring of berries on the edge and piping cream into the center!

These were really very good.  I struggled with piping the larger 7cm macaron shells. The oven here is super crappy, in fact, we are getting a new one. I had the oven set at 300 and it ranged from 250-350F!  You just have to practice. I had some trays of flops… and some trays of nice ones!  I am very happy that these turned up with feet and I got the perfect flat top too!


SaveSave

Follow:

Weekend Whimsy!

We use affiliate links in our posts and our site. This means if you make a purchase using these links, we may earn a small commission. You don’t pay a cent more than you would otherwise! Our full disclosure is available under About.

I almost forgot about weekend whimsy this week!  I’m quickly writing this before I head into work…

A tour of some of England’s Stately Homes… I love this! 

While this is technically a baby shower, I do love the French theme of this party!

Kate Spade announced plans for a new line of activewear, home goods, and baby.  Save your money now!!

As I still have a bunch of peaches, I like this recipe for peach iced tea. This will be nice for next week when the high is near 110!

The Converse chuck taylor, one of my main shoes that I wear, is getting a redesign for the first time ever.  Nike is adding softer inserts to it. 

Follow:

Happy 2nd Blogiversary!

We use affiliate links in our posts and our site. This means if you make a purchase using these links, we may earn a small commission. You don’t pay a cent more than you would otherwise! Our full disclosure is available under About.

You’re invited to…. my second blogivesary party!  Last year we had a little blogivesary party like Marie Antoinette in Versailles (and then for my 30th birthday in real-life!).

This year we are going to a nice little dinner in Napa on some private grounds…

First you will enter through the gates below…

then drive up this tree lined driveway…

You’ll then stroll along the pretty private grounds hearing the pitter patter of the fountain…

 …and eventually find this beautiful affair…

 …where we would dine under the vines with lights dancing like stars above our heads…

…we would feast on some dinner under the warm evening air…

 …before diving into this beautiful cake for dessert!

Hope you all enjoyed my little pretend soiree in Napa today! I can’t believe it’s already been TWO years since I started blogging.  I have had a lot of fun continuing to run this blog. 

I love everyone’s comments; sometimes it takes me a little while to respond because I do work a full-time job “in real life”.  If you’ve never left a comment here and enjoy reading my blog, leave me one today! 

Thank you for reading my little blog! 

If you aren’t following me, you can follow me here : bloglovin, instagramtwitterpinterest, and google plus.

I am going to highlight some of my readers’ most viewed posts from the past year!

You loved the Laduree Paris Tea Room Review…

You liked my Paris packing list ideas…

 You loved the orange blossom macaron recipe…

 You loved the taupe, greige, and grey kitchen round up…

 You liked this French country lavender table..,

And most recently, this blackberry peach galette with cinnamon ice cream!

And lastly, you agreed last Fall that Starbucks’ pumpkin scones sucked and were curious why they were recalled.

Thanks for stopping by and reading my blog!  Also, I won’t be doing a Friday Favorites this week since I did this post instead.

linking up at: Thursday Favorite ThingsFoodie Friday & Everything Else

Follow:

FitBit Charge HR review

We use affiliate links in our posts and our site. This means if you make a purchase using these links, we may earn a small commission. You don’t pay a cent more than you would otherwise! Our full disclosure is available under About.

I have had my FitBit Charge HR for a month now and am ready to write my review!

There are several different FitBits available.  I purchased the Charge HR.  What that means is that it tracks steps, sleep, miles, calories, and my heart rate.  The heart rate monitor was essential for me… I can track calories burned during exercise more accurately.

This post may contain affiliate links. See my disclosure policy.

FitBit Charge HR review

Here’s a look at the home screen…

 It tracks and trends your steps for the week.  I love getting the 10,000 steps!  However, it doesn’t happen every week like it did on this one.

 It also tracks floors climbed.  As you can see, I don’t climb a ton of floors.  I live in a single story house.

It tracks your exercise too… You can do biking, walking, running.  Here I did my PiYo and walking.  If you use it while on the treadmill, it will NOT count your steps *unless* you have your arm swinging down at your side. If you arm is not moving the FitBit assumes you aren’t either.

 What’s cool with the charge HR model is that it lets you track your sleep.   It shows you how many times you were restless and how many times you woke up.  As you can see, I like to sleep at lot and sleep pretty solidly through the night.

 It also tracks your sleeping pattern over time.  In the screenshot below, I was working various shifts during various times of day.  As you can see, it totally messed up my sleep. I mean one night (which is actually when I slept during broad daylight) I only slept 3 hours.  People who work night shift and swing shifts have chronic sleep deprivation… You can see that evidenced below.

 … then I went on vacation.  And had a normal circadian rhythm like the rest of the world.  Check out how I consistently slept the nearly the same duration every night!

Here is a sample of a work out I did on July 4th. I went bike riding this day.  You can see how my work-out truly went. It measures your heart rate during your work out! It calculates your target HR based on height, weight, and age.

 It also takes resting heart rates when you sleep.

If you have friends or family with a fit bit, you can add them as a friend and challenge them! It’s kind of fun (if you’re winning!)

It can also do calorie tracking with food that you enter manually into the system.  I haven’t done that (yet). 

I sync mine with my iPad and iPhone without any problems.  I find the battery lasts about 4-5 days.

PROS

– It helps me exercise. I like getting 10,000 steps!

– It allows me to better calculate my burned calories while exercising.

– It lets me know how I am sleeping which helps me with my night shift planning

– did I mention it motivates you to exercise? I think that’s really the biggest plus and is worth mentioning again.

– It lets me measure how far I walked!

– You can sync it up to other apps and map your runs

– the battery life is long and can be easily recharged

CONS

– it did cause a rash on me one day. To avoid this, I recommend taking it off right away after exercising and cleaning it regularly. 

– if you do swimming for exercise, it doesn’t count it

– it’s not 100% accurate.  My mom’s fitbit and my fitbit will measure different steps for the same distance, which is expected that there will be some variation but it shouldn’t be a large difference.

At first I thought the fitbit looked really ugly and I would never wear it… but now that I’ve been wearing it around I barely notice it on my arm!  I got it in the black because I thought that would be the least annoying of all the colors.  The color selection is below…

There is a wide range of FitBit products.  The fitbit flex is the most popular and allows you to change arm bands with Tory Burch accessories!  But for me, the heart rate monitor was necessary and was only available on the two fitbits on the bottom right of the picture below.  FitBit also makes a scale that syncs with their program.  Here is a comparison of all the different models!  I considered other tracking devices but thought this one delivered the most bang for the buck!

linking up at: The Scoop!  2 Bees in a Pod,  Metamorphosis Monday’s Inspire Me Tuesday Wow us Wednesdays! Creative Ways  Share Your Style Thursday Favorite ThingsYour Turn to Shine Feathered Nest Fridays Foodie Friday & Everything Else  

Follow:

Multnomah Falls and Wahkeena Falls Loop Hike in the Columbia River Gorge

We use affiliate links in our posts and our site. This means if you make a purchase using these links, we may earn a small commission. You don’t pay a cent more than you would otherwise! Our full disclosure is available under About.

As you may or may not know, I grew up in the suburbs of Portland, Oregon.  One thing we did almost every weekend in the Summer was to go on a hike.  One of my FAVORITE hikes is the Multnomah Falls – Wahkeena Falls loop hike.  It is located in the scenic Columbia River Gorge

If you love waterfalls, then this hike is for you!  There are officially 8 named waterfalls but the numerous little falls that “don’t count” as you hike your way up and down Multnomah creek and Wahkeena creek.

Multnomah Falls!

For my trip, I started at Multnomah Falls (mainly because there is a bathroom stop there).  Multnomah Falls is Oregon’s tallest waterfall, falling 620 feet. Only 3 waterfalls in the whole US are taller!

a snail friend

You start at the Multnomah Falls parking lot (get there early otherwise there will be no parking!).  Just follow the crowds to the bridge… then keep going.   You go up a whole bunch of switchbacks and you will end up at the top of Multnomah Falls. Years ago you used to be able to look right over the cliff but someone committed suicide there so the viewpoint is now a ways back from the cliff.

Dutchman Falls

Now at the top of the falls, continue on the Larch Mountain trail.  You follow along Multnomah creek past a whole bunch of bigger and smaller waterfalls. It is so pretty!

Weisendanger Falls

You then will come to Wahkeena Trail #420, heading to the right. Go to the right!  You will climb uphill through a ferny forest.  Although there is no waterfall, it is really pretty!

pretty ferny forest, sorry for blurry iPhone picture

You will end up at a 3-way junction.  Go straight.  The trail will go downhill and reach intersection for Angel’s rest trail #415.  If you want to see Wahkeena Spring, head further up only 0.1 miles. I highly recommend doing that!   This is no ordinary spring!  It is literally a creek just flowing out from underground.

Wahkeena Falls
steep switchbacks. Can you count how many? there are 4.

Now, turn around and head back down.  You will follow Wahkeena creek down the mountain.  You will meet another stream coming into Wahkneea Creek at Fairy Falls.  This waterfall is so pretty! If you need to cool off, sit on the log bench or stand in the mist of the waterfall.

Fairy Falls!

Continue on downhill, enjoying the sights and sounds of Wahkeena creek.

Wahkeena Creek

You will eventually reach some switchbacks and find yourself at the base of Wahkeena Falls.
Continue down the paved trail to the road.  Follow the return trail #442 eastward back to the Multnomah Falls parking lot.  This section is next to the Scenic Highway. Do not walk on the road, you will get hit by a RV!

base of Wahkeena Falls

The trail is 5 miles long.  The elevation gain is 1600 feet and it is moderately difficult.
To get to the hike, head east on I-84 from Portland.  Take exit 31, the Multnomah Falls exit.  Do not leave any valuables in your car!

For a more scenic route, I highly recommend taking the historic Columbia River Scenic Highway.  Take it at exit 22, Corbett.  Travel 3 miles up the hill to the top were the road makes a “Y”. Go left and head east on the Scenic Highway.  Multnomah Falls is 10 miles East.

To see Wahkeena Springs just come bubbling out from the ground, check out this pretty video!

Follow:

Weekend Whimsy

We use affiliate links in our posts and our site. This means if you make a purchase using these links, we may earn a small commission. You don’t pay a cent more than you would otherwise! Our full disclosure is available under About.

Hey everyone! It’s the weekend so you know what that means… weekend whimsy.  I round up a few of my favorite links from around the web that I’ve found.  I’ve had a few people request for pictures with my links… I would love to BUT for now, my internet is super slow.

Oneota Falls

Check out these most elaborate hedges and topiaries. They are so beautiful!

Do you love MacKenzie-Childs??  Take a virtual tour inside the MacKenzie-Childs Estate!

I’m sure you’ve heard of Birch Box by now or some other boxes of the sort.  Well, Hermes is getting in on the box business… it’s called the Petite H box.

While we were at the Chateau de Versailles during our vacation trip to Paris, we learned that every year there is a period masquerade ball held once a year.  Anyone can attend, but the caveat is that you must wear period-appropriate costumes! How much fun! check it out here.

The Nordstrom anniversary sale opens to the general public this weekend.  If you haven’t checked it out, here are my picks for the sale!  This sale is unique because it offers Fall 2015 clothes on sale BEFORE the season instead of clearing out old styles!

Follow:

Friday Favorites

We use affiliate links in our posts and our site. This means if you make a purchase using these links, we may earn a small commission. You don’t pay a cent more than you would otherwise! Our full disclosure is available under About.

Hey o! It’s time for Friday Favorites!

Nicky Hilton’s Wedding Dress
How beautiful is this wedding dress that Nicky Hilton wore to her wedding last weekend?  It is custom-made Valentino gown costing $75,000!  Isn’t it just beautiful?  The bride is beautiful too, of course!

Normally I would not be a fan of the sleeved gown with the turtle neck, but this is such a beautiful creation I love it!

I am sure the pictures do not do the gown justice.

Isn’t the bride just stunning?

But even when you’re a billionaire, your wedding day cannot be perfect.  The driver of this Bentley (!!) drove over part of her veil!  Luckily it did not wind around in the wheel well, but I am just horrified for her!  And this was on her way TO the ceremony, to make matters worse.  

She married a Rothschild and got married at Kensington Palace.

THIS PIZZA
I know, the picture is blurry.  But this pizza was soooo good.  It is from Kaleidoscope pizza in Medford, Oregon.  It has fresh spinach, red pepper, mushrooms, garlic, mozzarella on garlic olive oil.  It is soooo good.  I’ve put my husband on a mission to try to figure out how to copycat one of these.

MOONSTRUCK CHOCOLATES
Ever heard of them?  They are a local chocolatier in Portland, Oregon and they make the cutest chocolate truffles!  Look at them below! A school of clown fish! From left to right: sea salt toffee, peanut butter, raspberry, and blackberry. So cute and delicious!

The other flavors we tried were: peach (left), vanilla caramel (middle) and lemon (right).  The lemon truffle was to-die-for.  Like how these look? You don’t have to go to Portland to get some, you can have some shipped from their online store here. (no I wasn’t paid by them to write this, but I’ll gladly accept payment in the form of chocolate hint hint)

MOVE COMPLETE!
I just wanted to give everyone an update about my moving: our stuff FINALLY arrived. Only 10 days late.  It arrived the day we headed up to Portland… went to Portland… came back and now we’ve been busy unpacking like mad!

We moved out into the country on a couple of acres.  It’s my parents house but they don’t live here.  They are letting us live here in the meantime…. I will tell you what we did with a big announcement in a separate post!  I started a new job this week too.  I was so super stressed out but it has gone well. One problem in the country though is the internet.  We had major major internet problems that just got fixed last night.

wahhhh I need the internet.

Written at http://peoniesandorangeblossoms.blogspot.com

Thank you for stopping by!!

You can also follow me by clicking on these: bloglovin, instagramtwitterpinterest, and google plus.

Sharing at…

Friday Favorites with A Little Bit of EverythingMomfessionals, and Grace and Love 
Five on friday at A Liz Adventures .
Friday Favorites at the Diary of a Real Housewive
Oh Hey, Friday! at September FARM

Follow:

Paris Haute Couture Fall 2015 Fashion Week

We use affiliate links in our posts and our site. This means if you make a purchase using these links, we may earn a small commission. You don’t pay a cent more than you would otherwise! Our full disclosure is available under About.

So sorry, this post is old and has been removed. Please redirect to https://www.petitehaus.com

Follow:

Pistachio Macaron Recipe Version 2

We use affiliate links in our posts and our site. This means if you make a purchase using these links, we may earn a small commission. You don’t pay a cent more than you would otherwise! Our full disclosure is available under About.

As you may or may not know, I have a recipe on this site for pistachio macarons.  I went back a year later to try to make those macarons, and I realized that I don’t have a candy thermometer.  So when I tried to make the filling, it was a fail. And then another fail.  So I searched high and low and came up with another pistachio filling recipe that I love.  AND no candy thermometer is needed!  I wrote this post a little bit ago, but decided to share it now while I’m buying myself time while I am busy with the move!
This post may contain affiliate links.

This new recipe tastes exactly like the other one.  It uses the same recipe for the shells.  The only thing that changed is my filling.

Pistachio Macaron Recipe Version 2 – printable version here

Materials needed: (affiliate links are used for your convenience)

    • a food scale (yes, you need this. I use this one)
    • a piping tip and piping bag (I like the ateco #806, I use these tips and piping bag)
    • Food coloring (the gels or dry powder works best, not the liquid store stuff)
    • A macaron template
    • food processor (I use this one)

Pistachio Macaron Shell Recipe

• 200g almond flour

• 75g pistachio flour (step 1)

• 250g powdered sugar

• 210g granulated sugar

• 6 egg whites (room-temperature)

• 1/8 cup chopped pistachios

• food coloring (green is traditional color for this cookie)


1 Grind your unshelled pistachios (salted or unsalted, I prefer the salted) using a food processor. Be careful not to turn it into a paste.

2 Sift almond flour, pistachio flour, and powdered sugar through a fine mesh screen into a bowl.

3 Whisk or using a beater, turn 6 egg whites to a foam.  Slowly add the granulated sugar to the egg whites as you beat.  Whip until the meringue has firm glossy peaks but not super stiff peaks. They should defy gravity and remain in the bowl if you turn it upside down.  If you tilt your bowl to the side and the meringue started to slide, keep beating.

4 Add your food coloring.

5 Then fold in 1/3rd of the almond/pistachio/sugar mixture into the meringue with a silicone spatula.  Once combined, add another third of the almond mixture. Then the last third.

6 Add the batter to the piping bag.  Pipe in rows using your template onto parchment paper.

7 Pick up the pan and beat onto the counter.  Now sprinkle pistachio nuts on half of the cookies as a garnishment.

8 Preheat oven to 300 degrees.  The cookies need to rest on the counter between 30-60 minutes. They are ready to go into the oven when they are dry to the touch.  The shell shouldn’t stick to your fingers.

9 Bake the cookies for 13-15 minutes, one sheet at a time.  They are done when they look kind of matte and seem firm if you tap on them.  You can always rescue an overcooked cookie with the maturation process that comes later, but you cannot rescue an undercooked one!

10 Remove from the paper once completely cool.  If they stick to the paper, they either aren’t cool yet or you undercooked them.


For the pistachio buttercream:

•75g butter, at room temperature

•75g powdered sugar

•50g finely ground pistachios (just grind some up in the food processor)

•1/4 teaspoon vanilla extract (optional)

•1 tablespoon whipping cream


Preparing the pistachio buttercream:

1Cream together the butter and icing sugar on low speed using the paddle attachment, if you’re using a stand mixer. Or mix by hand.

2Add the ground pistachios and beat on medium speed for approx. three minutes.

3Pour in the whipping cream and beat for one minute on medium speed.

4       Optional, add the vanilla and then mix together.  (I added only a few drops, as this enhanced the taste a little).

5      Add the buttercream to a piping bag, and pipe the buttercream onto the shells that do not have the extra pistachio sprinkled on top.

6      Store overnight in an airtight container in the refrigerator.  They taste better the next day, promise!


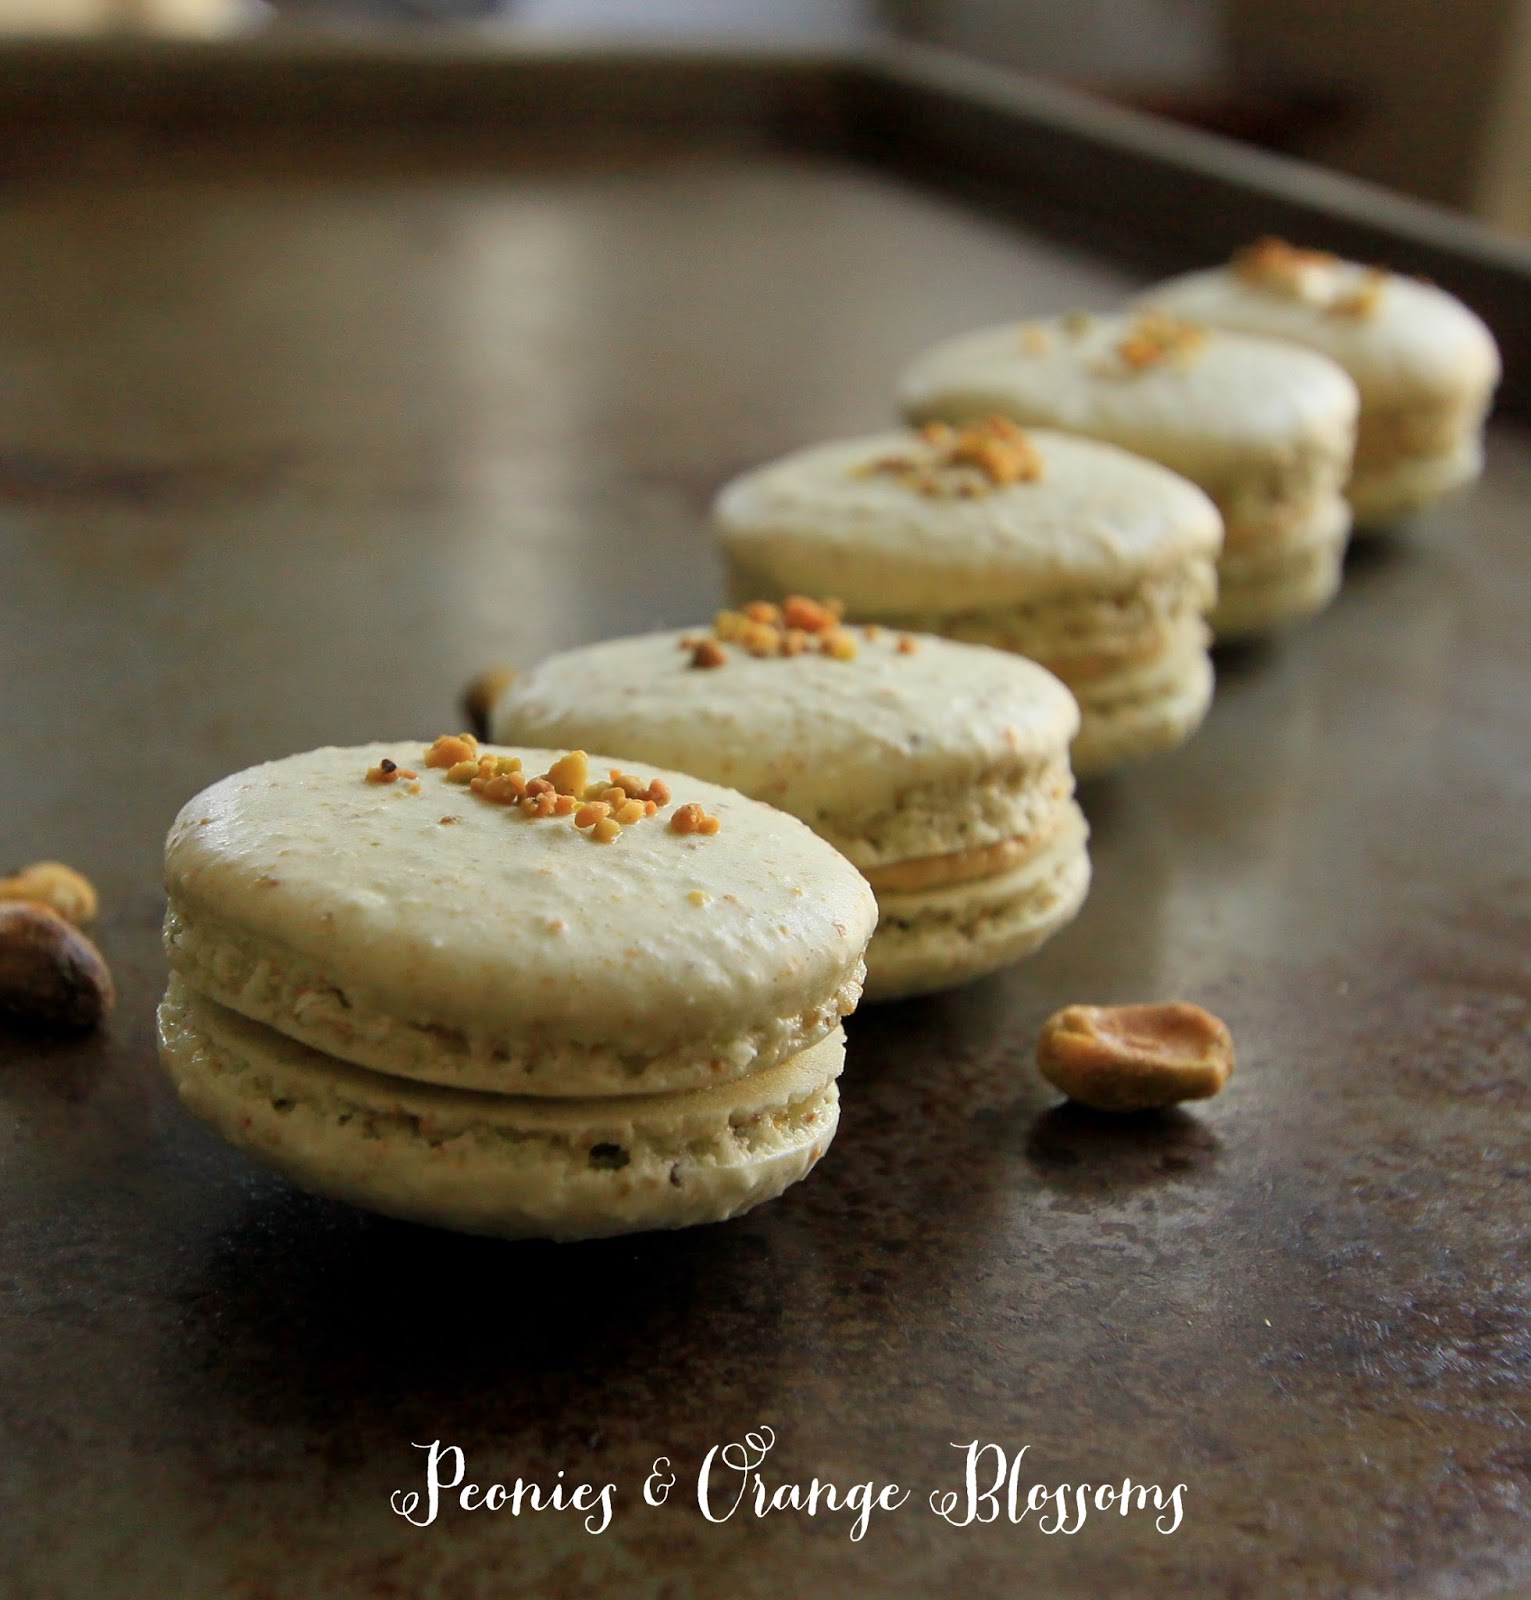
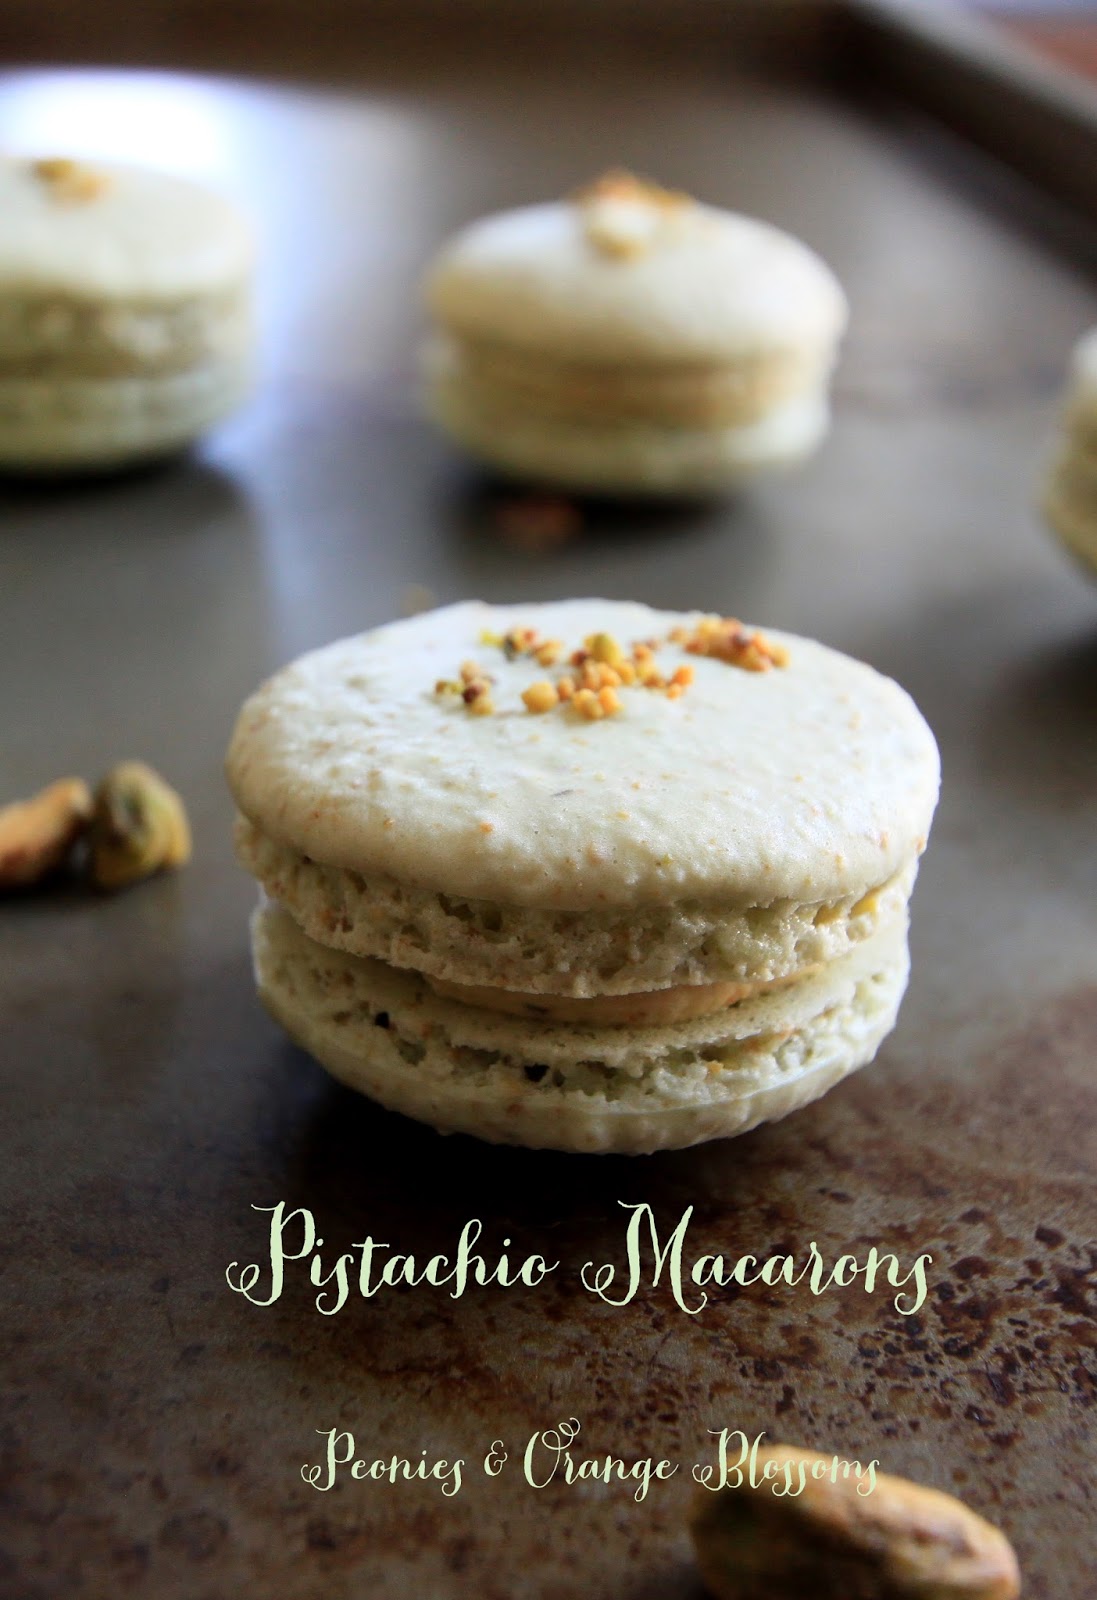
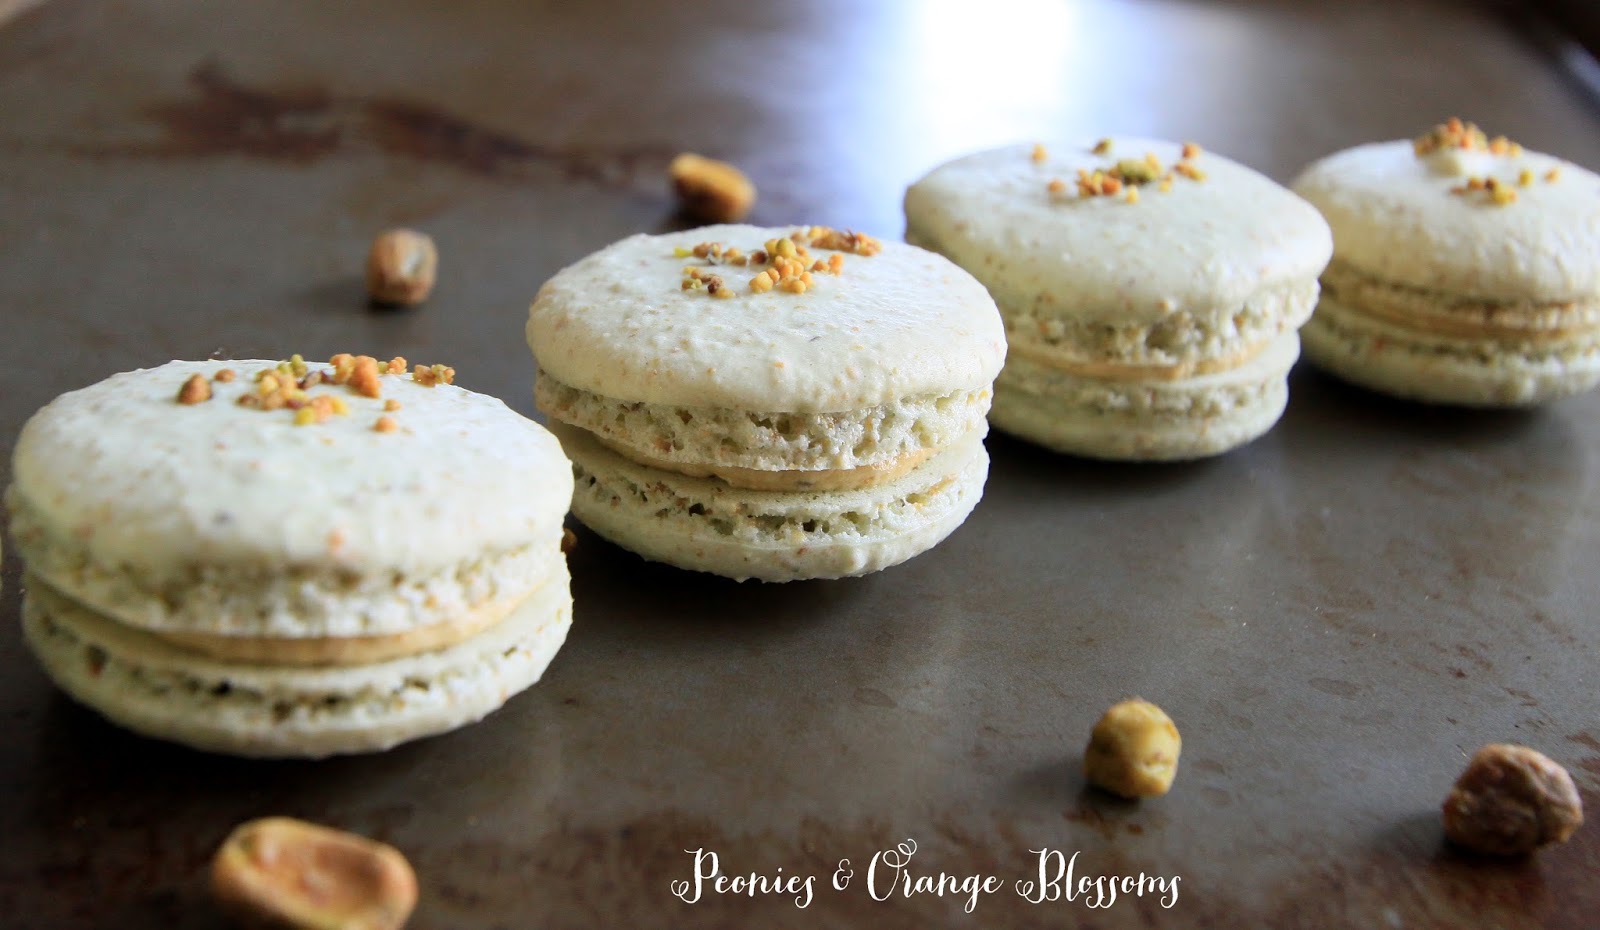
Don’t these macarons look pretty?  When I look at my old ones I get so embarrassed by them.  Granted, they tasted exactly the same. But still! They didn’t have perfectly little flat tops and didn’t all have nice little feet!


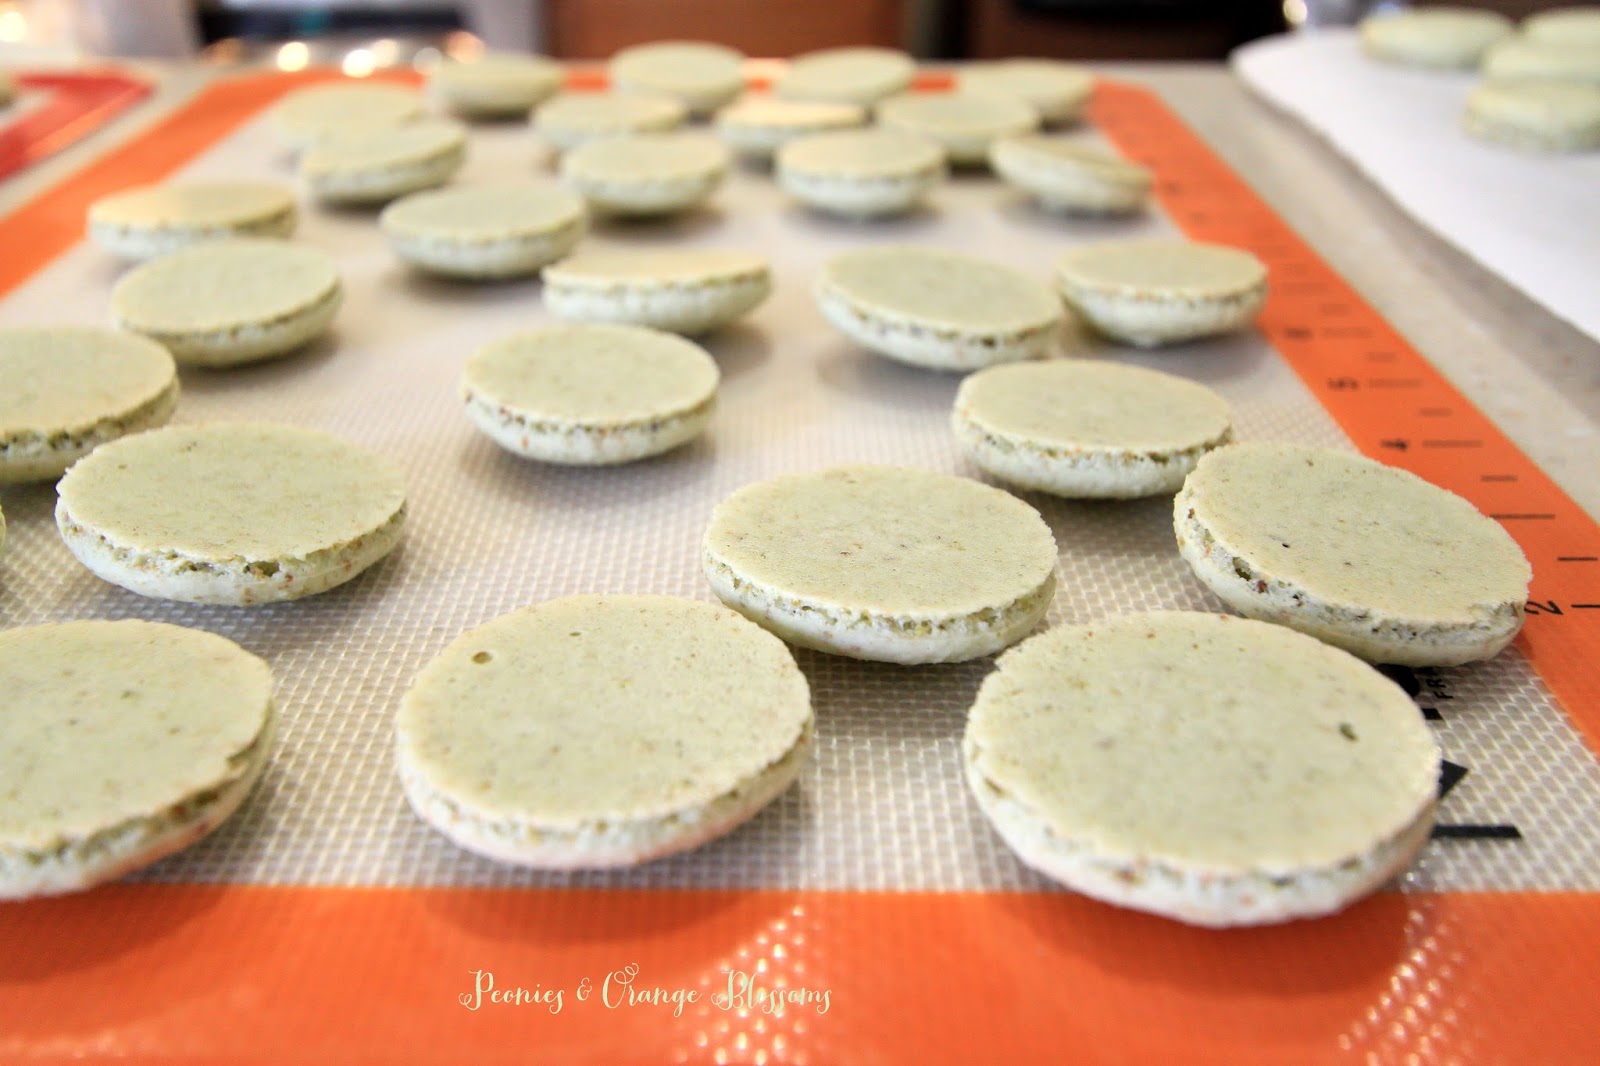
If you look below, this is how the macarons should look when you lift them up from the silpat or parchment paper… perfectly flat feet.  If they are sticking to the paper or silpat, let them cool a little bit longer and they will lift right up!

Don’t worry about yours if they don’t turn out perfect the first time you make them.  Mine obviously didn’t look perfect if you look at my old recipe, but they still tasted really good!

Some tips:
If they are puffy like little ice cream cones when you pipe them (like my old recipe, you can see the pictures of them) you need to do some more folding.  They need to be a little bit runnier.  That way when you pipe them they’ll spread out.  However, if you fold them too much, they will be too runny and will be ruined.  It’s an art.  I’ve been practicing for a while.  With time, you’ll learn. Just don’t give up. Giving up is for quitters and we don’t quit!

I will say, even when I make the macarons.  My first tray I pipe is always a little bit poofier than the last tray I pipe.  By the time I get to the last tray, I’ve stirred the batter a few more times and gravity has started to work on deflating the meringue some.  Just things I’ve noticed as I’ve been making these for a while.


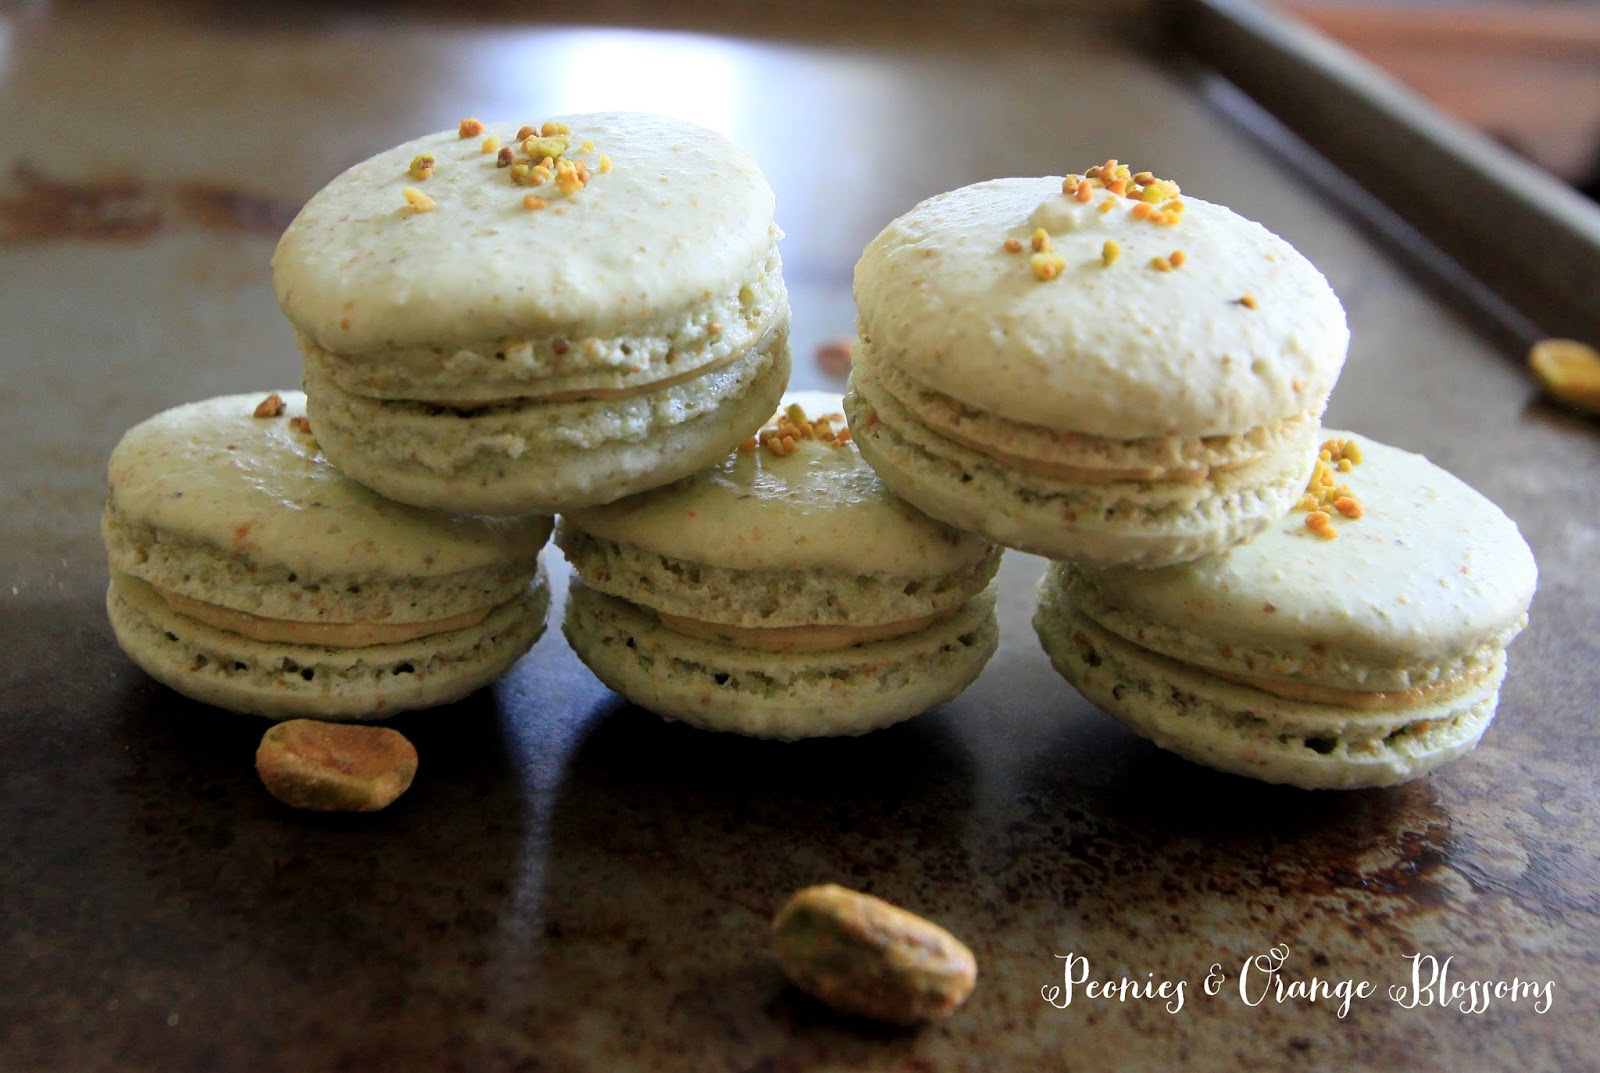
I was having fun taking food pictures with my camera… an old grimey baking sheet makes a nice food backdrop.


SaveSave

SaveSave

Follow:

Weekend Whimsy

We use affiliate links in our posts and our site. This means if you make a purchase using these links, we may earn a small commission. You don’t pay a cent more than you would otherwise! Our full disclosure is available under About.

I took a break last week for the holiday weekend from weekend whimsy.  We had a party of 24 people and it was fun fun fun! and busy. This week I’m back with new links.

I LOVE this remodel that Chip and Joanna of Fixer Upper did.  They took a ranch style house and turned it French Country.  Do you guys what Fixer Upper?  It’s my current favorite home reno show that’s on right now.

Are you planning on going to a picnic this Summer? Here’s a round-up of the cutest picnic baskets.  I will take one of each, thank you!

While we were busy celebrating our Independence from England this past weekend, the British Royals were busy christening the brand new baby Princess Charlotte.  If you missed the pictures, check them out here.  If you’re not a fan of the royals, at least check out the baby pram!

I found a cupcake round-up of 23 cupcakes inspired by other desserts... like churros, thin mint cookies, reese’s pb cups, neapolitan ice cream… go take a look, looking is calorie-free! 

Last but not least:  There is a preschool that is located inside of a nursing home.  I think this is such a great idea.    It keeps the elderly mind active and a 2 year old can learn a thing or two from an 80 year old – even if they are demented. Watch the video and you’ll too be convinced that more places should do this!  The link is to the documentary film about this special place.

Follow:

Nordstrom Anniversary Sale 2015 Favorite Picks

We use affiliate links in our posts and our site. This means if you make a purchase using these links, we may earn a small commission. You don’t pay a cent more than you would otherwise! Our full disclosure is available under About.

It’s that time of year again!! Nordstrom’s Anniversary Sale started today for Nordstrom cardholders.  Here are my favorite picks for this year’s sale! As I am currently traveling in the Northwest, I am blogging on my iPad. I didn’t have the time to include the links for all of my pics at the moment. To search for these items, you go to http://shop.nordstrom.com and enter in the search bar at the top right hand corner the item number.  The item number for every product is listed to the right of the price. 

First, Barefoot Dreams cardigan was high on my list. Last year it sold out super fast and I couldn’t get one.  This cardigan is like a soft fuzzy blanket but in sweater form.  I think they had some robes on sale too; I highly recommend the robe as well! 

This post may contain affiliate links. See my disclosure policy.

This North Face pullover is super cute and is great for cold climates!

If I needed a new jacket, I would’ve bought this parka! It’s super cute and warm too!

I am liking the colors of this Jacquard cardigan.

I like the length of this long cardigan.

I have a few of these halogen cardigans below and they are nice!

This shirt is super popular! It comes in lots of fun patterns.

I think this white blouse with black piping is fun.

I almost got this red plaid shirt… Can’t you imagine wearing some tall boots and going apple picking in the Fall?

I looooove the Nike tank below. I have it now in 3 colors.

I can’t sing enough praise about Zella live in legging capris. Love the fun colors.

These Zella leggings are a little bit longer than those above but are so much fun!

I bought this wit & wisdom skinny jeans last year and love them! What a great price.

I loooove my josefina bf jeans I got this Spring.

I love the two Kate spade cuffs because they are hinged and can fit over my big hands.

I also like the hinged nadri bracelets… They had 3 of them that looked good together.

This nadri double pendant is super cute and dainty.

I liked all the colors of these Kendra Scott pendants.

Freida Rothman is a newer upscale jewelry brand and I love the designs. But it is expensive so it’s more for looking.

If I had pierced ears I would buy these earrings! 

While I am not buying any new purses after my LV purchase in Paris this year, I think this Rebecca Minkoff bucket bag is pretty cute.

But the bigger deal of the sale is the Longchamp Le Pliage expandable tote for $130. That was the price of what it was in Europe when my mom got hers this year.

I looooove Frye boots and have the Melissa short boot. This year’s version of the long boot includes a zipper, so easy on easy off!

I am on an Oxford kick right now… These are fun…

I love these rain boots! Except it never rains where I live, so someone else should get one.

Like I said, I’m on an Oxford kick. I love love love these Stuart Weitzman oxfords.

These AGL sneakers remind me of the gold shoes I saw in Paris this Spring!

I think these Dr Marten boots fit some of the throwback 90s looks I’ve seen.

Well there you have it. I don’t wear dresses very often and don’t buy professional clothes for work, so I didn’t include any of those items. Hope you all have fun and if I have time I will update with links. 

Note: I was not paid by Nordstrom to write this post. Opinions are my own.

Written at http://peoniesandorangeblossoms.blogspot.com

Thank you for stopping by!!

You can also follow me by clicking on these: bloglovin, instagramtwitterpinterest, and google plus.

Sharing at…

Friday Favorites with A Little Bit of EverythingMomfessionals, and Grace and Love 
Five on friday at A Liz Adventures .
Friday Favorites at the Diary of a Real Housewive
Oh Hey, Friday! at September FARM

Follow:

Grand Hyatt Kauai – Trip report and review

We use affiliate links in our posts and our site. This means if you make a purchase using these links, we may earn a small commission. You don’t pay a cent more than you would otherwise! Our full disclosure is available under About.

Last year we went to the Grand Hyatt Kauai for vacation.  We had a wonderful time.  We had never been to the island of Kauai before.  I had this post saved up but never really found a chance to share it until now!

Grand Hyatt Kauai Trip Report and Review

We visited in April 2014.  We booked our trip through Costco Travel.  It was really nice… it included flight, car rental, and hotel.  And the bonus was… breakfast everyday in their Ilima terrace dining room!

GROUNDS:
When you first walk into the hotel, you are greeted with the view below… A-looooooo-HA!  That’s what I felt like when I got off the plane. Welcome to Paradise!!  The Grand Hyatt grounds really do feel like you’ve entered paradise.  It is a newer beach front hotel that was designed all at once… it wasn’t one of the original hotels built in the 60s that then tried to upgrade the grounds to meet current desires.  This one was designed all at once!

If you’ve ever stayed in the Grand Hyatt Maui or the Grand Hyatt Kauai… one thing that’s unique to their hotels is they have parrots scattered in the main lobby.  They are so much fun because you can talk to them!

There are beautiful hibiscus and plumeria everywhere on the property. There are all sorts of birds too… swans, parrots, egrets, little songbirds… it is really nice and relaxing!!

DINING: 

We ate breakfast every morning at the Ilama Terrace breakfast buffet.  We were treated to the view below… with the swans and beach in the background.  The morning I took the picture it rained… but no big deal.  The terrace breakfast brunch was nice.  It was included in our package so I don’t know how much it costs.  As with all dining outdoors in Hawaii, there is always a problem with the little songbirds that try to steal your food.  You cannot leave your food uncovered and unattended!

We ate at their Italian restaurant, Dondero’s one night.  It was alright. Nothing too special.

We also ate at their luxury restaurant, Tidepools, one night as well.  The ambiance of this restaurant is really nice as it is in thatch roof bungalows with fish swimming around them next to a waterfall.  The food here was pretty good.   If you look at the first picture, the thatch roof building at the base of the waterfall is the restaurant.

Ilama terrace at breakfast

POOLS: 

I LOVED their pools.  They have a giant pool with a water volleyball/basketball area, little seating areas in the pools, a waterslide, an adults-only pool, and… a lazy river!  I would plop myself on a float and go on the lazy river all day.  Below is a waterfall headed into the pool!


I enjoyed a pineapple mango smoothie at the adults only pool. So refreshing!

Below is a picture of the salt water lagoon.  The beach in front of the hotel kind of sucks, so they built their own salt water area to play around in.  You can rent kayaks and floats and sit in this area.  I didn’t like it very much because the sand is really rough.  However, it was really popular, especially for kids.  We preferred the pools.

BEACH: 

The beach… not so great.  It is not for swimming and there are rocks all over. You can’t walk very far barefoot.  It’s nice that this hotel is beach front so you can hear the ocean, but stick to the pools!


OVERALL THOUGHTS:

This hotel was super nice and was on the drier side of Kauai.  It really felt like paradise here.  The pools were fantastic.  The rooms had spacious bathrooms.  I didn’t take a picture of the rooms.  Our room was quiet and faced a garden.  I did not have a chance to go to their spa.

The hotel is family friendly but if you were to go on your honeymoon here there is a quiet adults only pool section too.  Of course, the grounds are magnificent and we had fun walking around the winding paths.

Given that the hotel is located on the Garden Isle, that means one thing… it rains. Every day.  It won’t likely rain all day but as you can see by many of my pictures… it did rain.  Granted, the times it was sunny I was at the pool without my camera.  How else can it stay so green if it doesn’t rain??


Grand Hyatt Kauai Trip Report and Review… Tide pools restaurant is on the right next to the waterfall

If I were to stay on Kauai again I would spend some time at this hotel again and sometime on the Northern side of the island (where it rains even more!).  We did a kayaking and hiking tour one day through this company which was so much fun.

All and all… I recommend this hotel if you are going to Kauai. Check it out: Grand Hyatt Kauai.
However, if you’ve never been to Hawaii, I recommend going to Maui instead.  The Grand Hyatt Maui and the Grand Wailea in Maui both have fabulous pools AND a fabulous beach in front.

Note: I was not compensated for this review.  I just wanted to write about my experience at this hotel.


Follow:

Blackberry and Peach Galette with Cinnamon Ice Cream Recipe

We use affiliate links in our posts and our site. This means if you make a purchase using these links, we may earn a small commission. You don’t pay a cent more than you would otherwise! Our full disclosure is available under About.

It’s that time of year when we have peaches coming out of our ears!  We have so many peach trees here out on the farm I decided to bake a galette for the first time.  A Galette (pronounced GAL-ette) is a type of free-form French tart.  It’s nice because there is no tart pan needed!  Now this isn’t to be confused with the Breton Galette, which is the buckwheat pancake.

Blackberry Peach Galette

While the traditional French tart has every piece of fruit and dough molded to perfection, the galette is much less fussy and closer to the American pie in taste.

Blackberry Peach Galette (get the printable recipe here.)


Ingredients

  • 1 premade pie crust
  • 5 peaches, peeled, pitted, and sliced
  • 1/3 cup fresh blackberries
  • 1/4 cup brown sugar
  • 2 tbsp honey
  • 1/2 tsp cinnamon
  • 1/2 tsp nutmeg
  • 2 tsp vanilla
  • 2 1/4 tbsp all-purpose flour
  • 1 egg 
  • turbinado sugar for dusting
  • sliced almonds for the crust

Directions

  1. Line a baking sheet with parchment paper.
  2. If you used a pre-made store pie crust, take it out from the freezer and let it thaw. (It should still be cold).  Remove from the pie pan and flatten into a circle on the parchment paper.  Don’t worry about it looking perfectly pretty, galettes are not perfect!
  3. In a bowl, combine peaches and vanilla.
  4. In a separate bowl, combine brown sugar, cinnamon, nutmeg, and flour.  Mix well to combine.
  5. Add the dry mixture to the peaches.  
  6. Pour in the honey and stir.
  7. Fold in the blackberries.
  8. Pour the fruit filling into the center of the crust, leaving a 2 inch border.  Now, working around the galette, fold the edges of the dough over the fruit.
  9. Place the galette into the freezer for 15 minutes.
  10. Preheat oven to 350F.
  11. Remove galette from freezer.
  12. Brush the folded edge of dough with the egg wash.
  13. Sprinkle the dough edge with slivered almonds and turbinado sugar.
  14. Bake for 30min to 1 hour.  The crush should be golden brown and the fruit insides should be bubbling when done.  
  15. Serve warm or cold, I suggest with ice cream.

I adopted the recipe from this website, tidy mom.

the fruit juices leak onto the paper while cooking… that’s okay and expected!

Want to know what this tastes good with? Cinnamon ice cream!!  I use an ice cream maker to make my own ice cream.  You could just serve it up with store bought vanilla too!

Easy Blackberry Peach galette with homemade cinnamon ice cream!

Cinnamon Ice Cream Recipe (printable recipe here)


Ingredients

  • 1 3/4 cups whipping cream
  • 1 1/4 cup whole milk
  • 1 tsp vanilla
  • 2 tsp ground cinnamon
  • 3/4 cup granulated sugar
  • *optional: 1/4 tsp xanthan gum (makes it a little thicker, optional ingredient)

Directions

  1. Add the cream and milk together and stir in the sugar.  Stir until the sugar dissolves.  This should be hand-stirred, if you use a mixer you could end up with butter.
  2. Add the vanilla.
  3. Slowly pour in the cinnamon so you don’t end up with cinnamon chunks.  If you are using the xanthan gum, slowly add it in as well so you don’t have chunks.
  4. Pour your mixture into your ice cream mixer and wait.
  5. When the ice cream mixer is done, either serve immediately or store in a freezer air-tight container.  To help decrease ice crystals, put some saran wrap directly on the ice cream and then close the lid.  This helps decrease the ice crystals that form!

Blackberry Peach Galette

Yum yum, doesn’t it look delicious? Well let me tell you… it was!  The four of us gobbled it up and left only one piece… for someone’s breakfast the next day.  Dessert for breakfast? I know you do that too, don’t lie 😉

You can also follow me by clicking on these: bloglovin, instagramtwitterpinterest, and google plus.


linking up at: amaze me monday The Scoop!  2 Bees in a Pod,  Metamorphosis Monday’s Inspire Me Tuesday Moonlight and Mason Jars Wow us Wednesdays! Creative Ways  Share Your Style Thursday Favorite ThingsYour Turn to Shine The Inspiration Gallery My Romantic Home  Home Sweet Home Feathered Nest Fridays Foodie Friday & Everything Else  Sunday’s Down Under Share it One More Time

Follow:

From the Shop

I may earn a small commission if you purchase with these links

Caning Natural Tote Handbag - Universal Thread™
The Hustler High Waist Fray Hem Ankle Bootcut Jeans
Le Panier Pliage Raffia Crossbody Bag
Extra Large Le Pliage Panier Tresse Straw Tote
The Bennet Buttondown Shirt by Maeve
T Monogram Perforated Leather Bucket Bag
Mellow Stud Mule
Le Pliage Marinière Recycled Nylon Canvas Travel Bag
Unseen Sunscreen Broad Spectrum SPF 40 PA+++
Maxine Stripe Cotton Button-Up Shirt
Citizens of Humanity Charlotte High Rise Straight Jeans
Navy Equestrian Traversee M Linen Tote
Cream Carrie Blouse
Ellison Natural
Jolene High Rise Vintage Slim
Citizens of Humanity Blue Jolene Jeans
Charlotte High Rise Straight Jeans
Le Pliage Filet Top Handle Bag
Vintage cotton crewneck T-shirt
Air Heart Sunglasses
Le Pliage Torchon XS Top Handle Bag With Strap
Santorini Raffia Basket Bag
Chuck Taylor® All Star® Lift High Top Platform Sneaker
Please note that I use ShopSense, LIKETOKNOW.it, Shareasale and Amazon affiliate links on this site. This means using them for purchases won’t cost you extra but may earn me a small commission.  Our full disclosure is available for viewing under About in the disclosure policy.
All rights reserved. Our graphics, images and text are all subject to copyright protection.