Laduree Paris – Tea Room, Macaron, and Pastry review!!

We use affiliate links in our posts and our site. This means if you make a purchase using these links, we may earn a small commission. You don’t pay a cent more than you would otherwise! Our full disclosure is available under About.

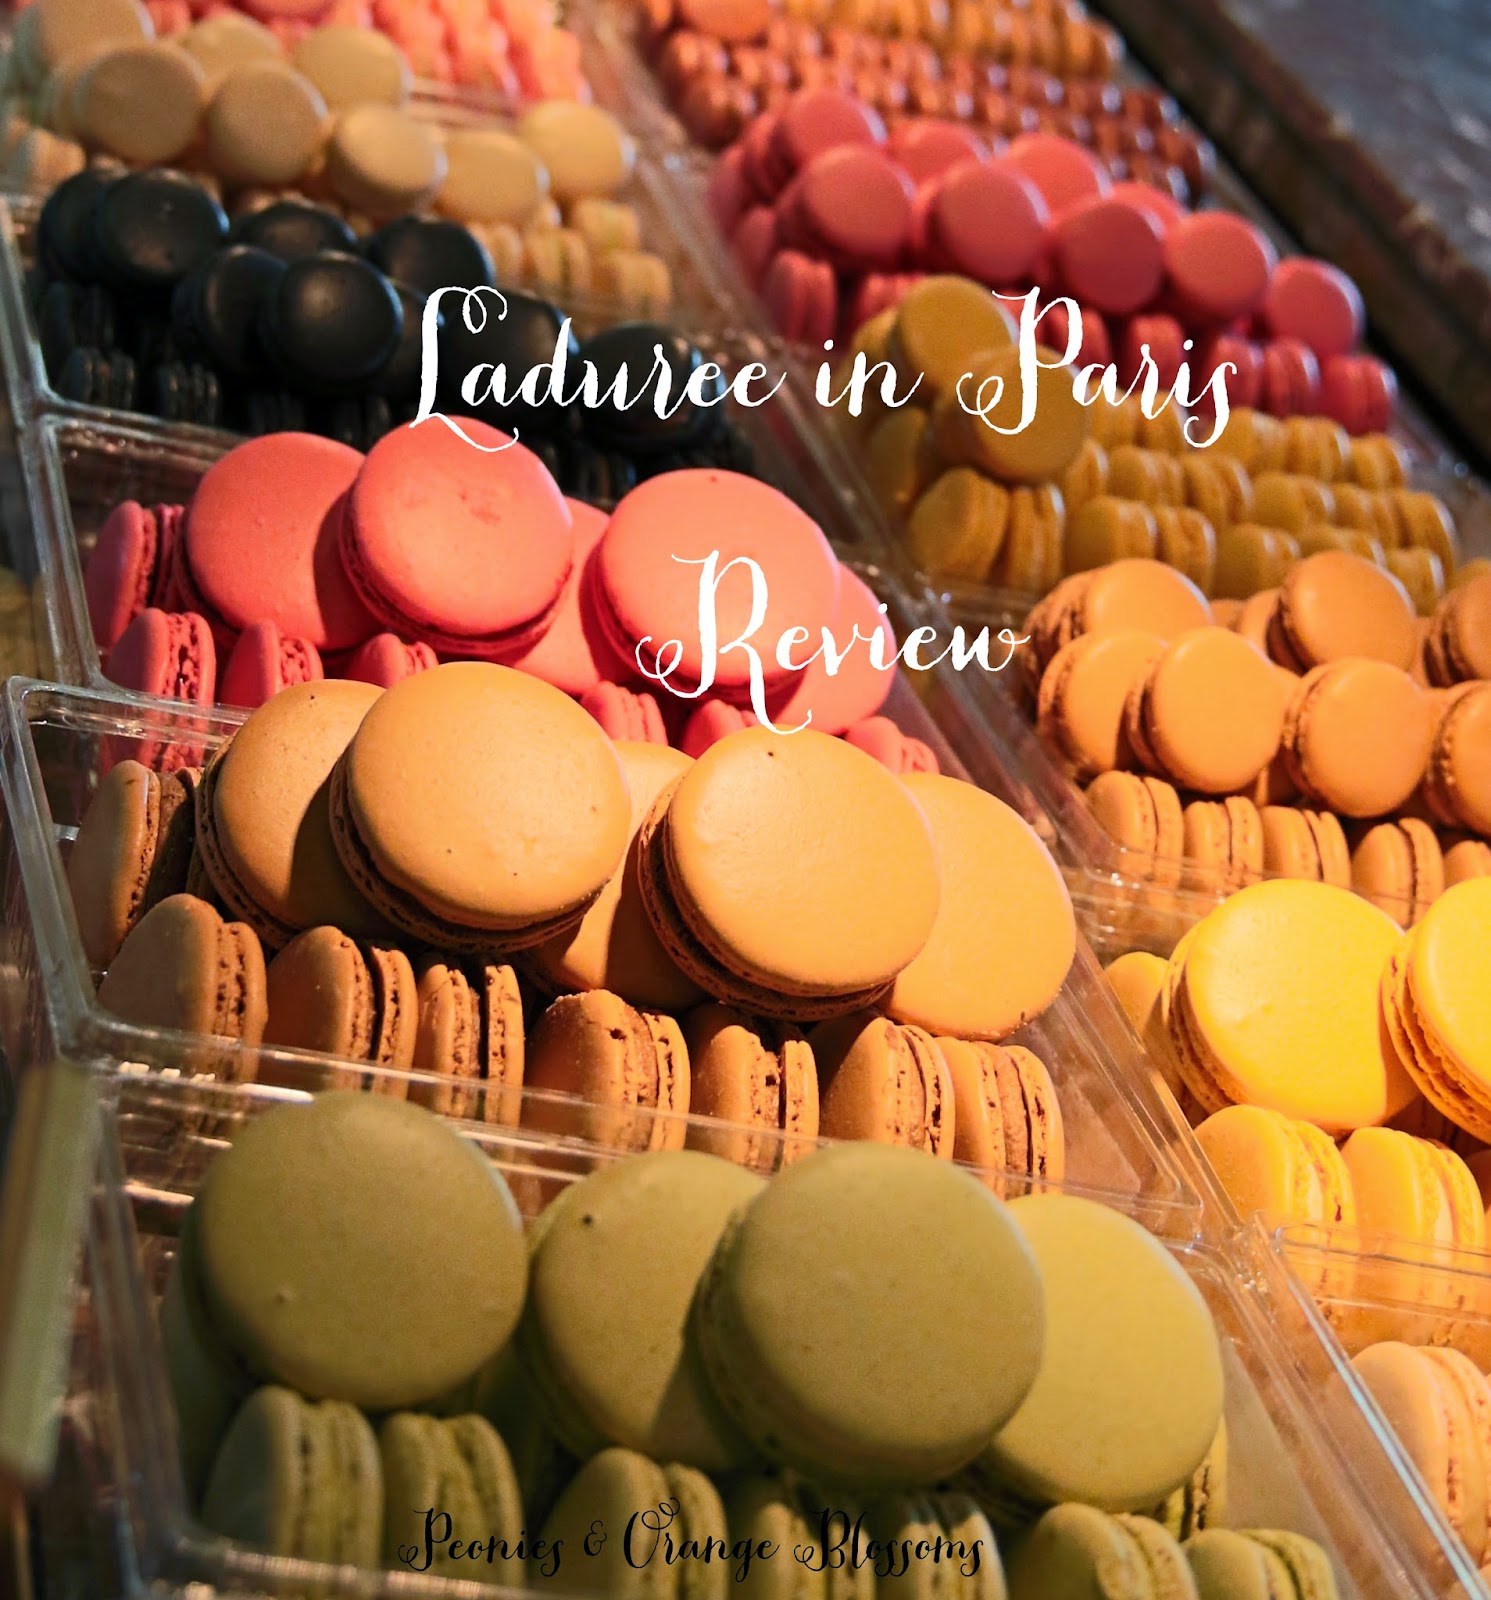
As you all know, I’ve been a little bit obsessed with Laduree’s macarons.  One of my top priorities when visiting Paris was to visit the Laduree tea salon on the Champs Elysees.

Not only do I have their Sweets Recipe book, I had poured over numerous websites trying to decide what I was going to eat when I arrived!  Now settle in, I have a lot to say about Laduree!

a review of Laduree Paris

We had made a reservation for breakfast at the Laduree’s tea salon on the Champs Elysees in the morning.  We made it around 9am in the morning, which I guess according to how empty the salon was, it was *much* to early to eat breakfast.  However, for these jet-lagged Americans, 9am was perfect timing.  We made a reservation through this website. 

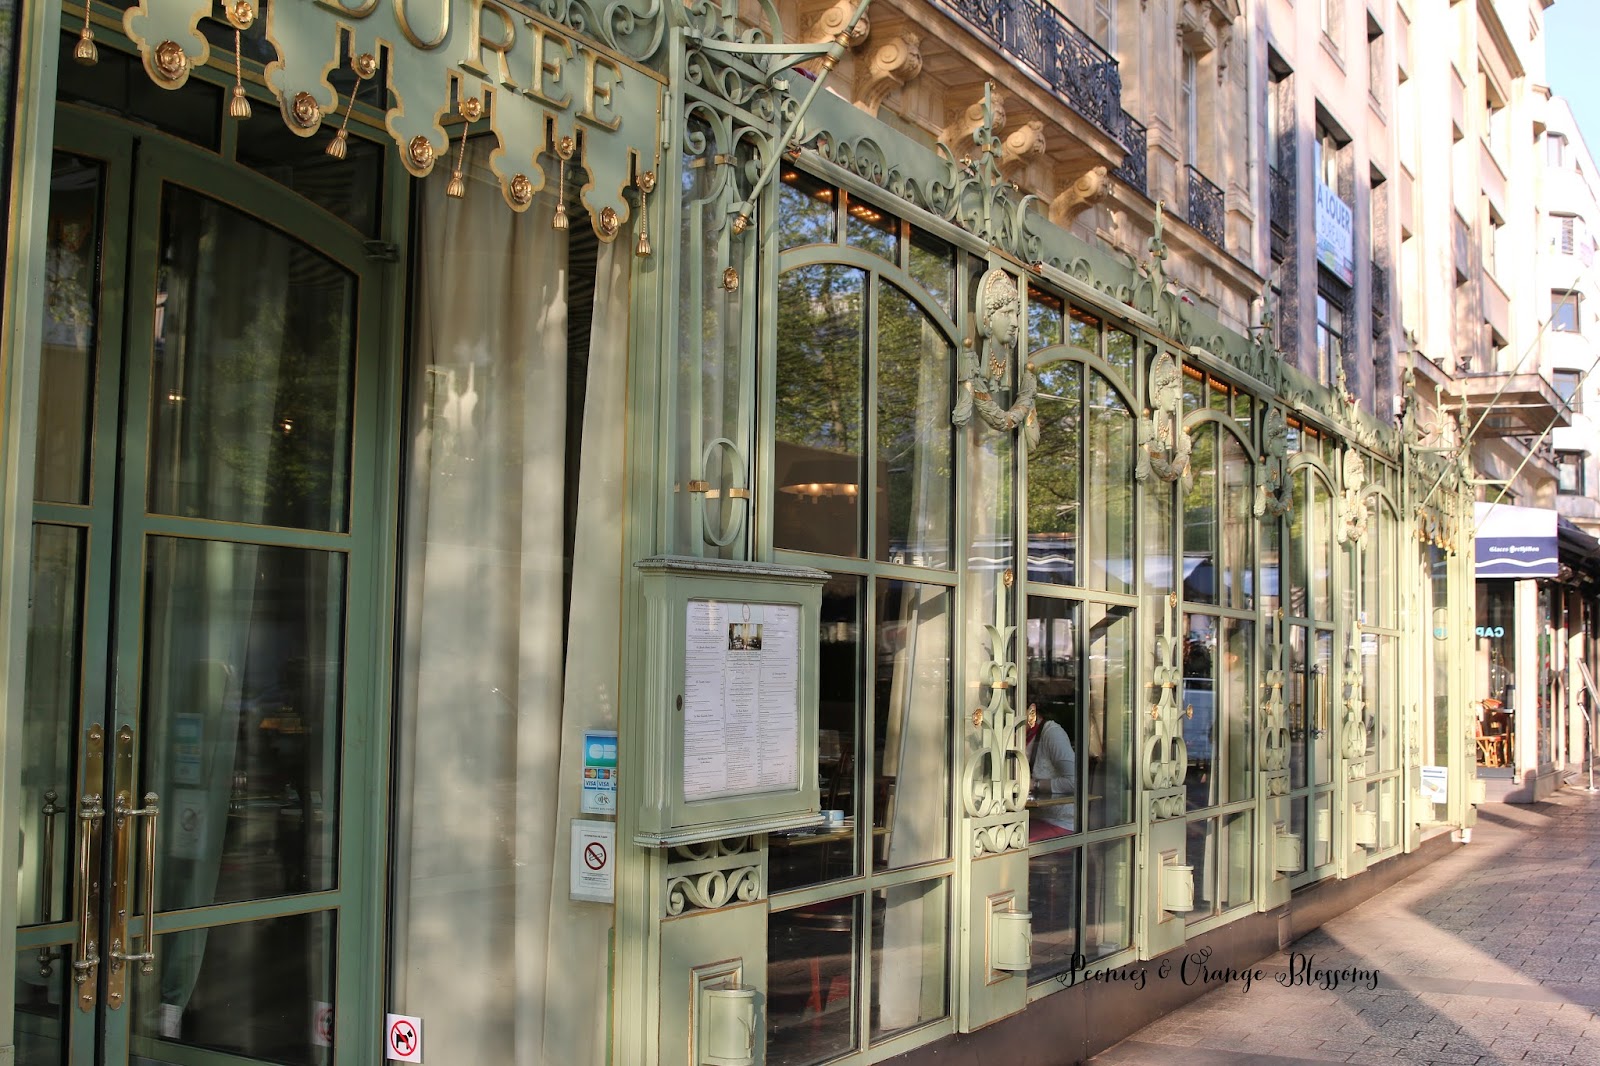
We knew we had arrived when we spotted the pretty green metalwork outside.  How cute!

Although Easter had already passed, they still had their Easter displays up complete with cute chocolate chickens.  While we were there, they did change their displays to a Mikimoto display, which I forgot to take a picture of.

We bypassed the row of viennoisseries and patisseries and headed up the stairs to the tea salon.

We were seated next to this beautiful antique French clock.

I did not take too many pictures of the upstairs as I was trying to be discreet.

Below is a picture of the (free) bread they give you… and wrapped up in that pretty green package is not candy but… butter!

Now, deciding what to order was a bit difficult.  The menu was pages and pages long.  I *highly* recommend looking at the menu before you go.  You can browse through the menu here.

The Tea Room Experience

We had both coffee (which was good) and the Melange Laduree tea. The Melange Laduree tea is the house signature tea which is a mix of black teas, rose petals, and essence of orange, caramel, vanilla, cinnamon, bergamot, and black currant.  If you like Earl Grey, you will like this tea!  I loved it so much I bought some to bring home.  (The tea is for sale downstairs)

To eat, we started off with some pastries.  We had a little pastry with raisins, an apple turnover, and a chocolate croissant.  They were yummy!

For breakfast, we had the plain French toast, raspberry French toast, and an omelette.  The plain French toast was very good; it was a nice brioche with pure maple syrup.  But then I tried the French toast that had fresh raspberries with raspberry coulis… oh boy, that was SUPER good.  I highly recommend trying that.  But, what I really loved was their omelette.  It was perfectly cooked.  It also was very thick but fluffy at the same time.  It was the best omelette I’ve ever had!  I think they probably use more yolk in their omelettes (With all of that macaron baking, they will have a plethora of extra yolks).  I read some poor reviews about the omelette about it being cold and I feel sorry for those people because mine was delicious!

 After the waiter allowed us to enjoy the salon for several hours, we headed downstairs.  A note about dining in Paris – you must ask for the bill.  They won’t present it to you automatically.  It is considered rude to force someone out of their seat, so the waiters will wait for your signal.  A lot of Americans think that the waiters are being rude and ignoring you, when in fact, they are being nice to you and not rushing you through the wonderful dining experience!  Imagine it from their view: you are paying top dollar to dine in a fine tea salon on the most famous street in the world! No rushing here!

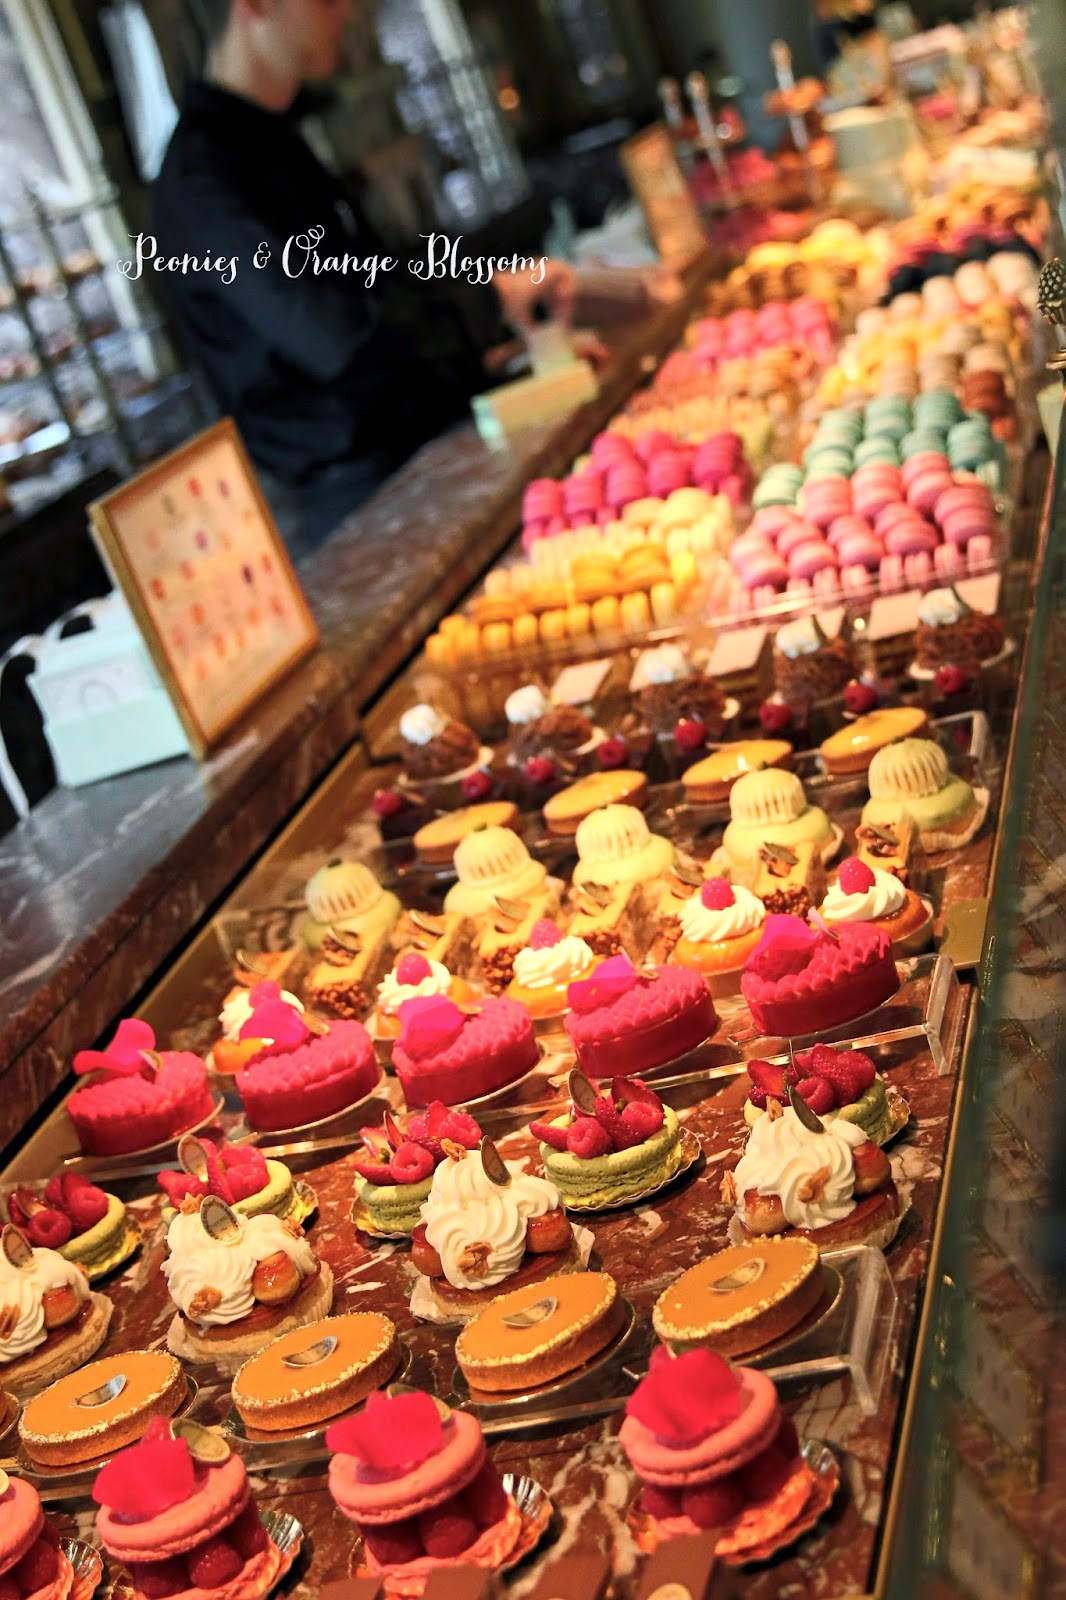
We headed downstairs after eating to the store.  Enjoy some eye candy…


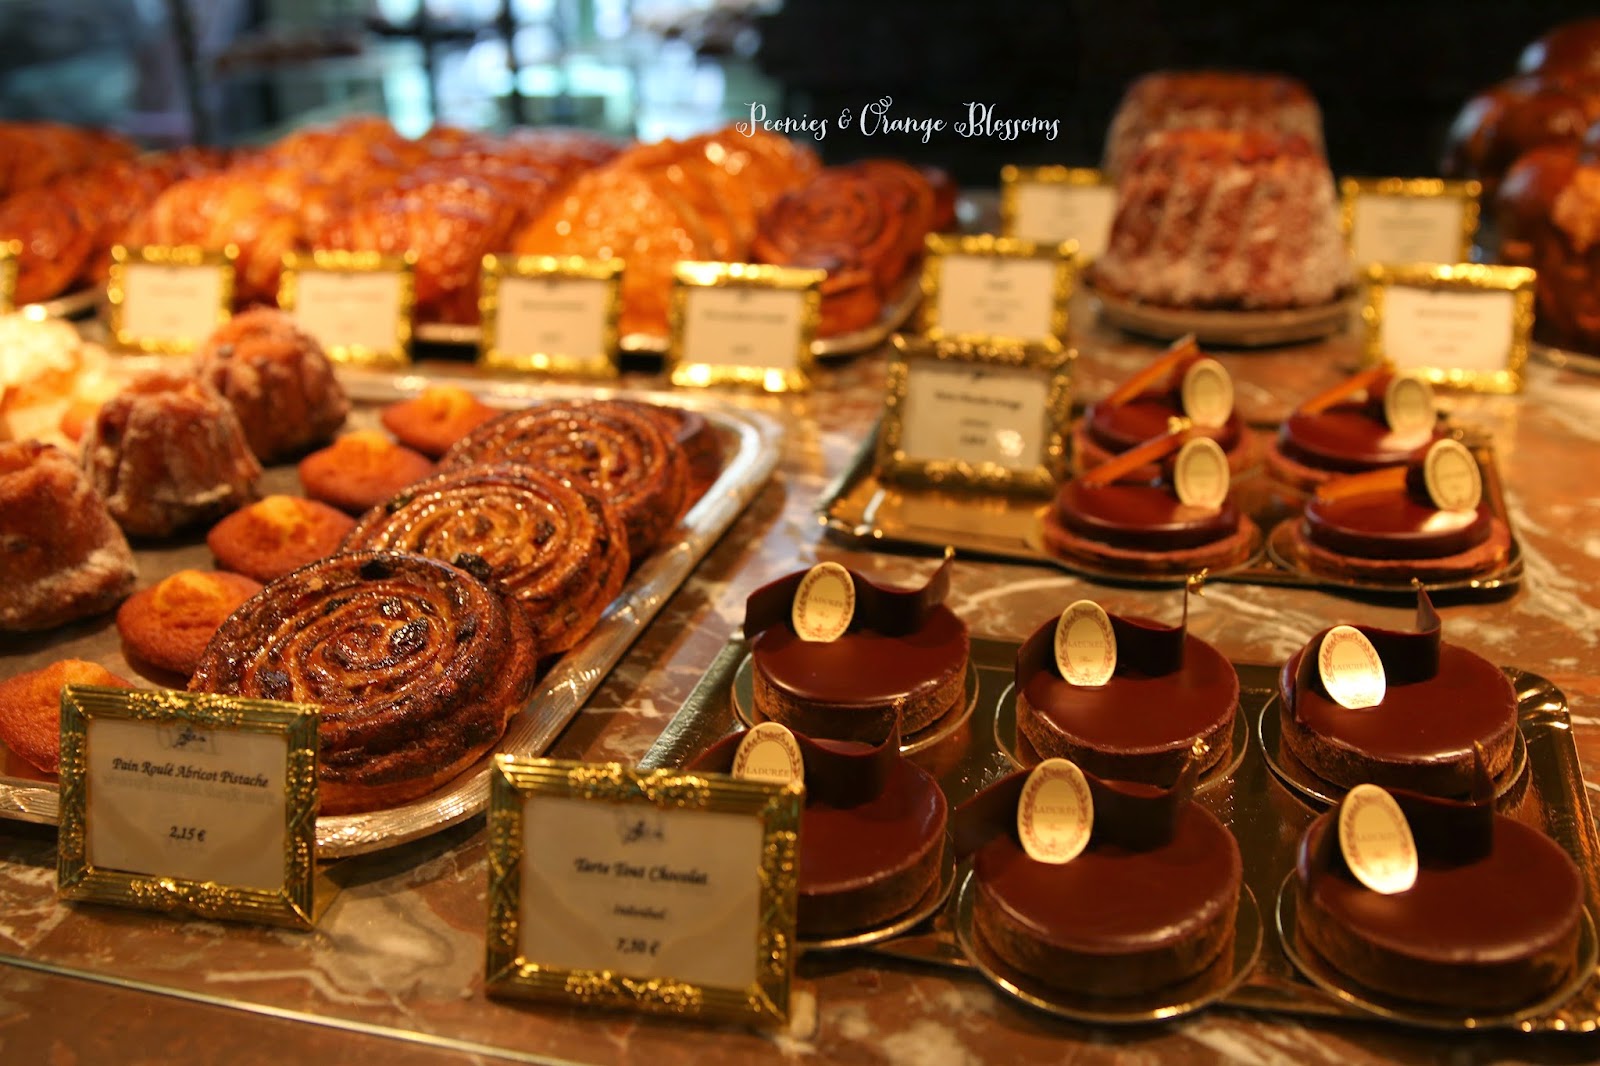
After staring for a while at all of the sweets, we eventually we were able to choose some macarons to take back and enjoy later.  We arrived early in the day to the tea salon and store which I highly recommend!  Later in the day, i.e. in the afternoon, there will be a VERY long line to get in to not just the tea salon but the store downstairs.  We had no line.  That was around 11am.

 I highly recommend choosing a pretty box so you can take it open as a souvenir!

Laduree Paris Macarons

Macaron Tasting Reviews

For all of the macarons we tasted, they all had perfectly baked cookies with perfectly smooth tops and perfect feet.  We did not have a single one that was bad.  They are fragile and got beaten up a bit as I carried my loot around Paris all morning, but that’s okay.

Laduree salted caramel macaron

Salted Caramel Macaron – The salted caramel macaron as delicious.  It was one of my favorites.  I have nothing bad to say about it.  You MUST try this one.

Laduree cherry blossom

Cherry Blossom Macaron – The cherry blossom macaron was very pleasant.  It tasted, like, well, cherry blossoms!  I didn’t know what cherry blossoms would taste like, but if I were to go and eat them I am guessing they would taste like this!  This one is not a must-try.

Laduree pistachio macaron

Pistachio macaron – The pistachio macaron was very very good.  The shell had pistachio in it to give the pastry more pistachio flavor.  The pistachio cream inside was very pistachio tasting as well.  Sometimes other places’ pistachio macarons do not have enough pistachio in them for my taste.  This one was VERY good.  Must get this one if you love pistachios!

Laduree orange blossom macaron

Orange Blossom Macaron– Onto my *favorite* macaron from Laduree… the orange blossom macaron!  This is one of their original and signature flavors.  It really does taste like an orange blossom.  But it isn’t too floral.  It is REALLY good. REALLY REALLY GOOD. You MUST try this one.  You can also check out my blog post which features their recipe if you can’t wait ’til a trip to Paris.

Laduree lemon macaron

Lemon Macaron – The lemon macaron was okay.  There wasn’t anything special about it.  It wasn’t bad, but… there are other flavors that are more amazing that I recommend!

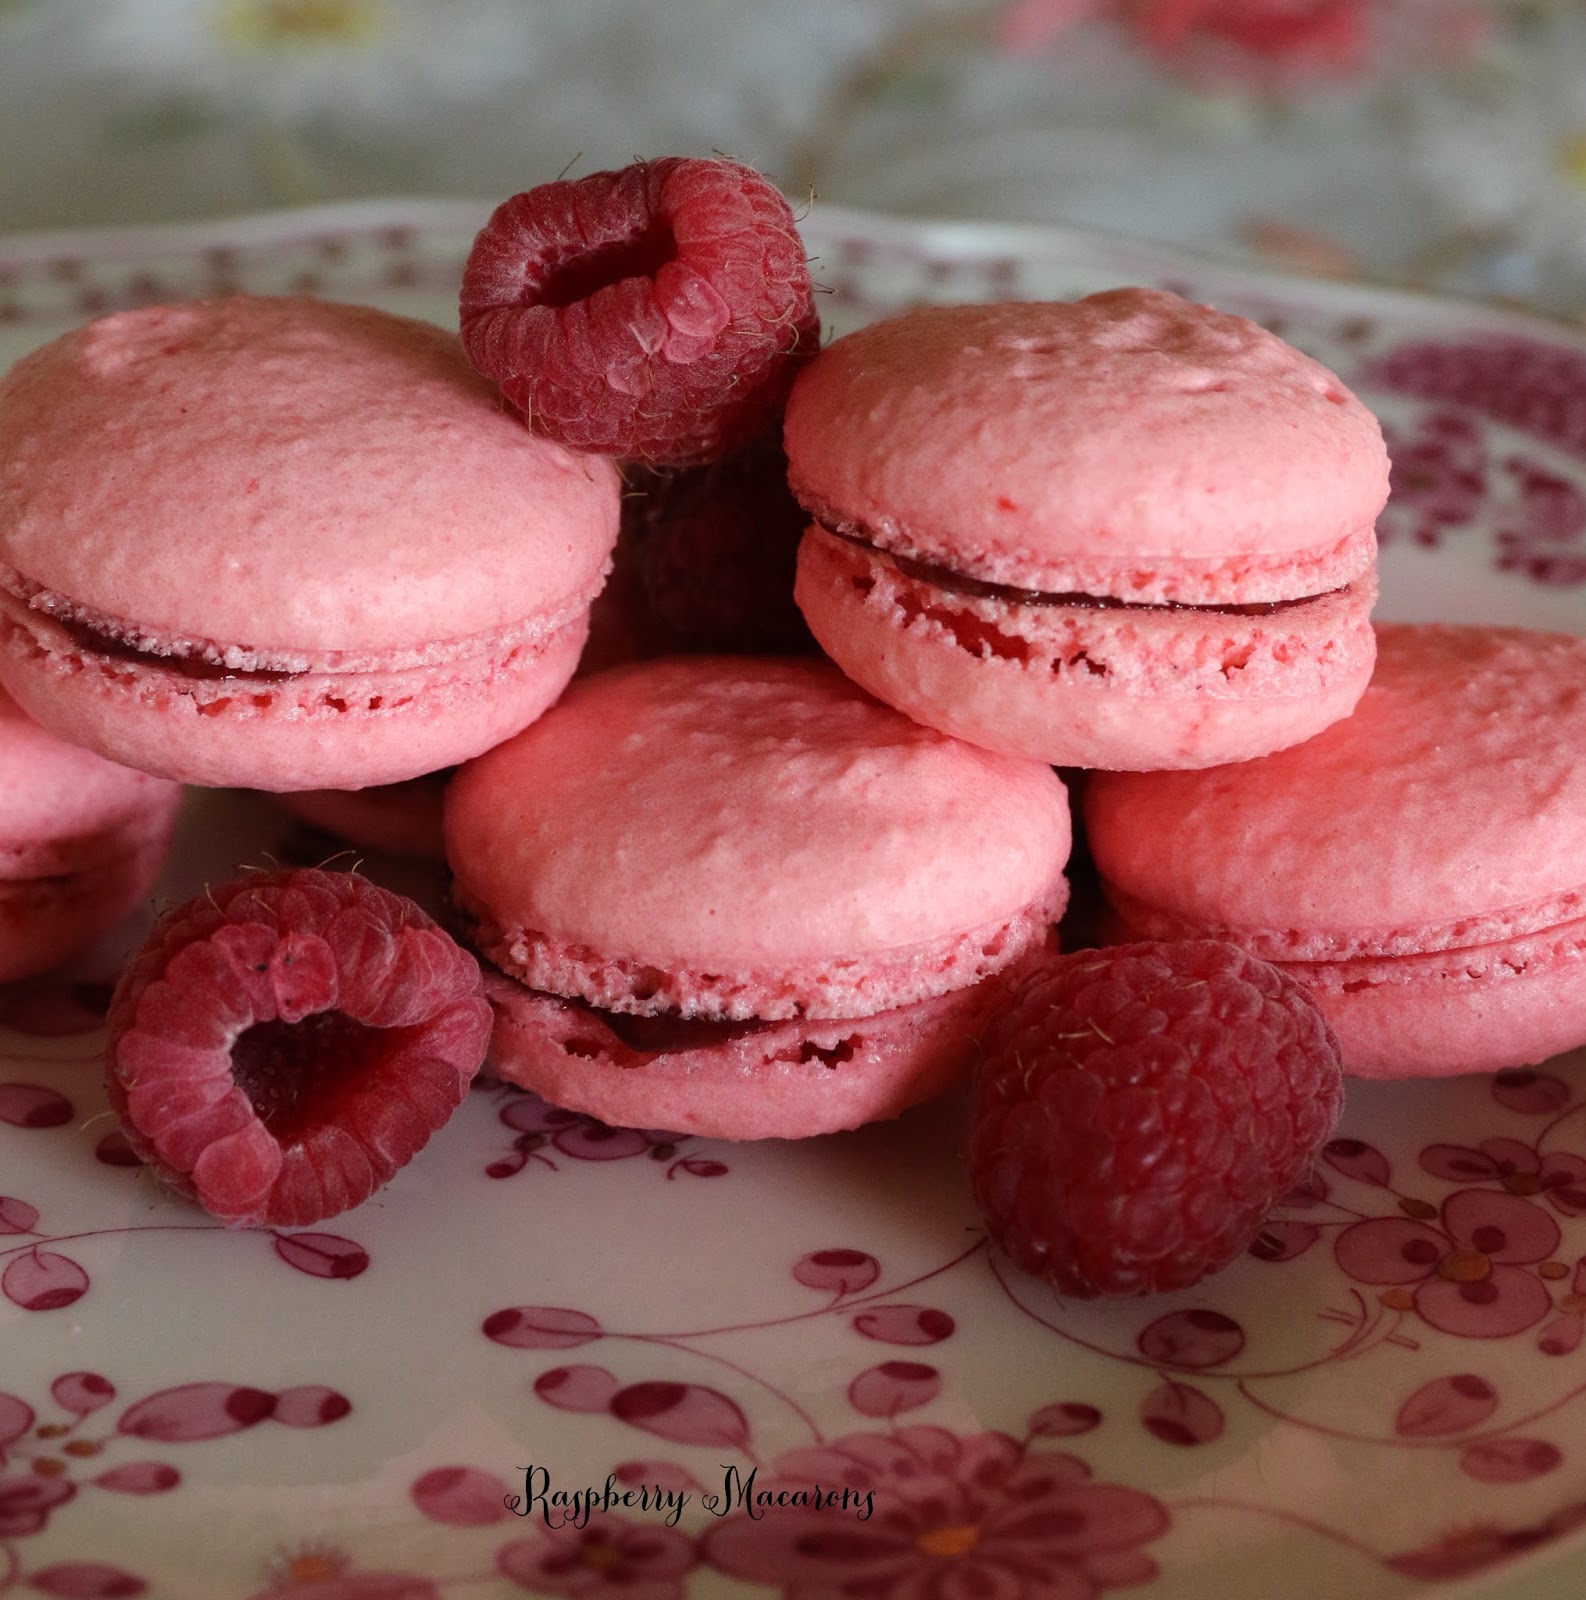
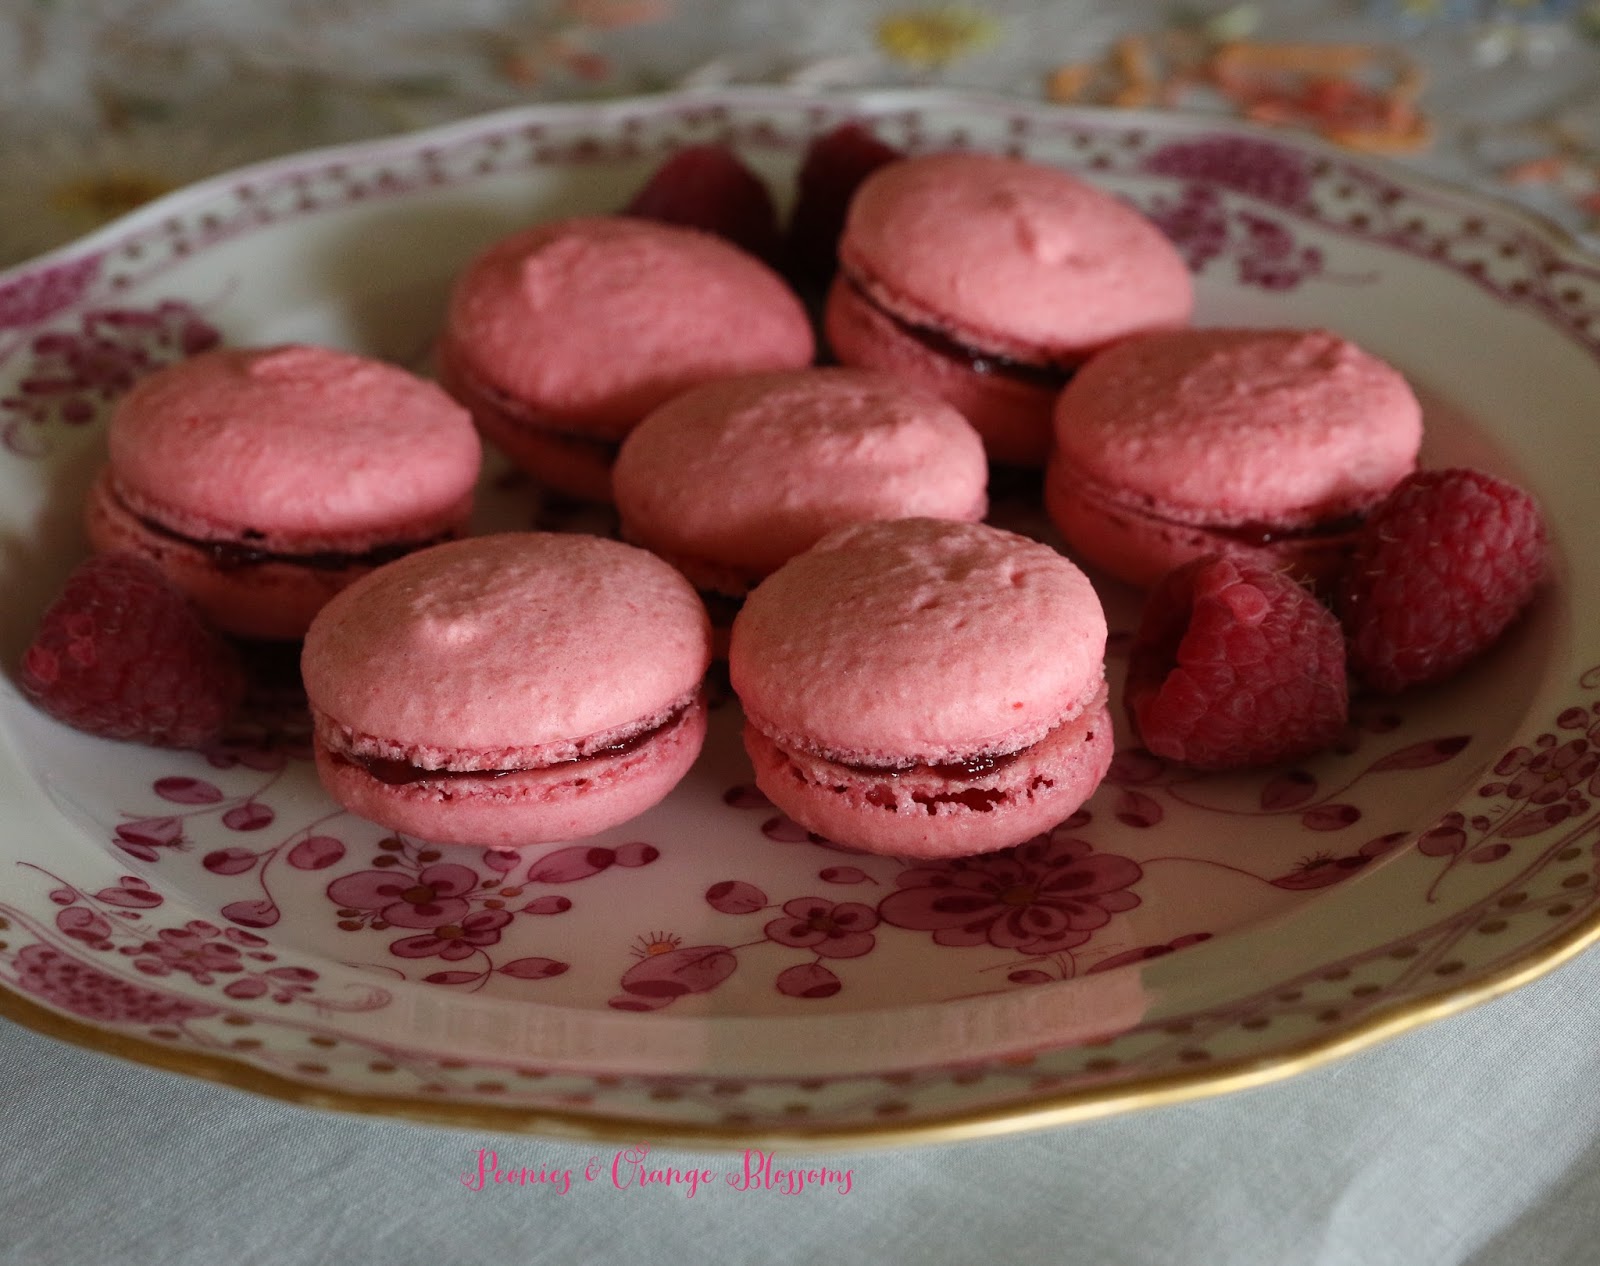
Laduree raspberry macaron

Raspberry Macaron – The raspberry macaron was really good.  I love raspberry macarons.  The tartness from the raspberries go really well with the almond shells.  Can’t go wrong with this one.

Laduree Lily of the Valley macaron

Lily of the Valley Macaron – I was surprised at how much I loved the Lily of the Valley macaron.  I bought it as a last-minute decision… and I ended up just loving it.  It has a really nice refreshing taste.  It does taste like the smell of lily of the valley.  This flavor was just REALLY good.  I’ve tried to find a recipe for it online and haven’t yet…. I guess I’ll have to make my own essence of lily of the valley.  This is a must-try.

Laduree macarons

Other Flavors that we tried but I forgot to take pictures of because we ate them too fast…

Mikimoto Macaron – this is a rose lychee macaron and was okay.  I don’t love rose nor lychee things, so I didn’t expect that I’d love it.  However, Pierre Herme’s rose lychee ispahan croissant is to-die-for.

The Marie Antoinette Macaron – the blue one in the picture above.  It tastes like an Earl Grey tea.  If you like earl grey tea flavored desserts, than this one is for you.  I just felt like they had other flavors that are worth your money and calories that you should try first.

Ice Cream Review – Yes, we tried their ice cream.  I shouldn’t call it ice cream, it’s more like a sorbet. It got hot one day and naturally we had to try it.  We tried both the raspberry and lemon flavors.  They were REALLY good.  The raspberry was very intense in raspberry flavor.  The lemon was tart but sweet at the same time.  I feel like their glaces do not get enough praise.  If it is a hot day in Paris, it is worth getting some!

FINAL THOUGHTS – What is not to like about the perfectly packaged patisseries from Laduree?  People have complained they are over-priced… um, yeah, duh. I wasn’t headed to Paris with bargains in mind.  Are there other macaron bakers in Paris that are good? yeah, sure.  But do they come in cute little boxes? No. Do they have an orange blossom macaron? No.  I HIGHLY recommend going to Laduree on your trip to Paris.  They have several tea salons throughout the city and then several macaron selling carts scattered about in popular areas… including one in the Louvre museum and another in the airport so you can pick some up to bring home to your friends (oops, then you eat it on the long 12 hour plane flight, sorry friends!)  You don’t have to do dine in the tea salon to get the experience… it was just something special I wanted to do.

My 6 recommended macaron flavors to purchase for your perfectly packaged box are: salted caramel, orange blossom, lily of the valley, pistachio, raspberry, and oh, another orange blossom!

I’m reviewing Pierre Herme next and will also try to answer the burning question… Which macarons are better, ones from Pierre Herme or Laduree?

If you’ve missed a Paris trip post, catch them ALL RIGHT HERE !

SaveSave

Follow:

Macaron Day 2015!

We use affiliate links in our posts and our site. This means if you make a purchase using these links, we may earn a small commission. You don’t pay a cent more than you would otherwise! Our full disclosure is available under About.

In honor of macaron day this year, I’ve rounded up my macaron recipes!

Lemon Raspberry Macarons
Orange Blossom Macaron Recipe

Cherry Almond Macarons

Chocolate Hazelnut Cat Macarons

Chocolate Ganache Macarons

And just to prove to you… practice makes perfect.  My first macarons in the pictures below did not have the flat tops and pretty feet, but they do taste VERY GOOD.  The problem with my macarons below is that I underfolded them… so to remedy the problem, all I needed to do was turn the almond flour a few more times into the meringue!

Salted Caramel Macarons

Marionberry Macarons

Orange Macaron Recipe


Pistachio Macarons
Lemon Macarons

Raspberry Macarons! 
Biscoff/Speculoos Cookie Butter Macaron

In less than a month I will be tasting some *real* macarons from Paris!
Written at http://peoniesandorangeblossoms.blogspot.com

Follow:

Orange Blossom Macarons Recipe like Laduree

We use affiliate links in our posts and our site. This means if you make a purchase using these links, we may earn a small commission. You don’t pay a cent more than you would otherwise! Our full disclosure is available under About.

I have been back in the kitchen baking macarons.  I have been longing to try Laduree’s famous orange blossom macarons, but I just couldn’t wait until my trip to Paris in April.  So I attempted to bake them at home!
This post may contain affiliate links.

Orange Blossom Macaron recipe

The result? DELICIOUSNESS!  I was unsure if I would like them since I don’t really like rose flavored things… but the orange blossom flavor is just as if I walked through the orange grove around the block with my mouth open and ate the smell.

No surprise that the blogger of a blog with the name of peonies and orange blossoms likes, well, orange blossom macarons!

Materials needed: (affiliate links are used for your convenience)

    • a food scale (yes, you need this. I use this one)
    • a piping tip and piping bag (I like the ateco #806, I use these tips and piping bag)
    • Food coloring (the gels or dry powder works best, not the liquid store stuff)
    • A macaron template
    • food processor (I use this one)
Laduree Orange Blossom Macaron recipe

Laduree Macaron shell Recipe (from Ladurée Macarons)
275g ground almonds
250g powdered sugar
210g egg whites
210g granulated sugar

1.  Mix almond meal and the powdered sugar in a food processor. Be careful not to grind too long, otherwise it will form a paste.

2. Sift the almonds and powdered sugar. Set aside.

3. Weigh out granulated sugar.

4. Weigh the egg whites.  Beat them slowly on a low speed until foamy. SLOWLY add the granulated sugar to the egg whites as you beat.  Once all mixed, increase speed to medium and beat until a firm meringue forms.  You want a firm meringue with glossy peaks but not stiff peaks.  They should defy gravity and remain in the bowl if you turn it upside down.  If you tilt your bowl to the side and they are sliding out, keep beating.

5. Add the food coloring gel and mix.
6. Then fold in 1/3rd of the almond/sugar mixture into the meringue with a silicone spatula.  Once combined, add another third of the almond mixture. Add last bit.  This batter requires more deflation during this step since it creates such a poofy meringue.

7. Add the batter to a piping bag. . Pipe in rows using your template onto parchment paper.

8. Pick up the pan and beat until the counter.  The cookies need to rest on the counter between 30-60 minutes.  They are ready to go in the oven when they are dry to touch (the shell shouldn’t stick to your finger)

9.  Set the oven to 300F.

10. Bake the cookies for 13-15 minutes one sheet at a time. They are done when they look kind of matte and seem firm when you lightly tap on them.  You can always rescue a slightly overcooked one with the maturation process that comes later, but you cannot rescue an undercooked one!!

11.  Remove from paper once completely cool. If they stick they stick to the paper, they aren’t cool yet. Or you undercooked them.

Laduree Orange Blossom Cream Filling
4 tbsp (60 mL) orange blossom water (you can get it: buy here)
4 1/2 tsp (15 g) corn starch
2/3 cup (160mL) heavy cream
1/2 cup (100g) granulated sugar
3 1/2 ounces (100g) white chocolate, coarsely chopped
7 1/2 tbsp (110g) softened butter
1 drop green food coloring

Directions

  1. Whisk the 3 tbsp (45mL) of the orange blossom water into the cornstarch.
  2. Combine the cream and sugar in a saucepan and heat until simmering.  Whisk the simmering liquid into the cornstarch mixture.  Then return it to the saucepan, continuing to whisk over low heat for 30 seconds until thickened and smooth.  Pour into a bowl.
  3. Use a spatula and little by little stir in the chocolate into the hot cream.
  4. Now pour into a food processor until it cools slightly
  5. Add the butter gradually, the remaining orange blossom water, food coloring and process until smooth and creamy.
  6. Pour into a dish, cover with plastic cling wrap and plate it directly onto the cream.  Refrigerate for at least 2 hours until firm enough to be piped.
  7. Spoon the orange blossom cream into a piping bag and pipe into the remains shells.
  8. Refrigerate the macarons in an air-tight container for at least 12 hours before serving. This allows the “macaronnage” to occur and makes the cookie super yummy.  If you eat it immediately it’s really good, if you wait 12 hours… perfection!

Get the printable recipe here

Orange Blossom Macaron Recipe

SaveSave

Follow:

Biscoff/Speculoos Cookie Butter Macaron Recipe

We use affiliate links in our posts and our site. This means if you make a purchase using these links, we may earn a small commission. You don’t pay a cent more than you would otherwise! Our full disclosure is available under About.

Remember how I mentioned how I loved cookie butter.  I had some chocolate macaron shells laying around (yes, I literally have macarons laying around the house… the life of a macaron lover and baker!) and I didn’t know what to do them.  I thought… I love cookie butter. I love chocolate macarons. Why not… combine the two?  I made a cookie butter chocolate cupcake here and it was yummy.

This post may contain affiliate links. See my disclosure policy.

The combination was a win. If you don’t know what cookie butter tastes like… it’s like brown sugar, caramel, with a hint of spice.

Cookie Butter Biscoff Chocolate Macaron Recipe

Materials needed:

  • a food scale (yes, you need this. I use this one)
  • a piping tip and piping bag (I like the ateco #806, I use these tips and piping bag
  • Food coloring (the gels or dry powder works best, not the liquid store stuff)
  • A macaron template (either make one or get one here or here. It makes piping easier)
  • food processor (for the cream filling, I use this one)

Chocolate Macaron Shell: GET THE PRINTABLE RECIPE HERE
260g almond flour
250g powdered sugar
15g cocoa powder
210g granulated sugar
210g egg whites

1.  Mix almond meal, cocoa powder, and the powdered sugar in a food processor. Be careful not to grind too long, otherwise it will form a paste.

2. Sift the almonds, cocoa powder, and powdered sugar. Set aside.

3. Weigh out granulated sugar.

4. Weigh the egg whites.  Beat them slowly on a low speed until foamy. SLOWLY add the granulated sugar to the egg whites as you beat.  Once all mixed, increase speed to medium and beat until a firm meringue forms.  You want a firm meringue with glossy peaks but not stiff peaks.  They should defy gravity and remain in the bowl if you turn it upside down.  If you tilt your bowl to the side and they are sliding out, keep beating.

5. Add the food coloring gel and mix.  To make mine a richer brown color, I used “chocolate brown” food coloring.


6. Then fold in 1/3rd of the almond/sugar mixture into the meringue with a silicone spatula.  Once combined, add another third of the almond mixture. Add last bit.  This batter requires more deflation during this step since it creates such a poofy meringue.

7. Add the batter to a piping bag.  Pipe in rows using your template onto parchment paper. 

8. Pick up the pan and beat until the counter.  The cookies need to rest on the counter between 30-60 minutes.  They are ready to go in the oven when they are dry to touch (the shell shouldn’t stick to your finger)

9.  Set the oven to 300F.

10. Bake the cookies for 13-15 minutes one sheet at a time. They are done when they look kind of matte and seem firm when you lightly tap on them.  You can always rescue a slightly overcooked one with the maturation process that comes later, but you cannot rescue an undercooked one!!   

11.  Remove from paper once completely cool. If they stick they stick to the paper, they aren’t cool yet. Or you undercooked them.


Cookie Butter Filling
Go to Trader Joe’s and buy a tub of cookie butter. Either the smooth or crunchy. I tried both.. they both taste good.
Or you can use the Biscoff cookie butter filling. I think I saw a Target have it once.


Directions
1. Carefully spread some cookie butter filling on one side of the cooled macaron shells, then place a shell on top.
2. Refrigerate in an air-tight container for 12 hours before serving. Why? This allows the “macaronnage” to occur… basically the flavors all meld together to make a delicious cookie even better.


Biscoff Cookie Butter Chocolate Macaron recipe

Need macaron supplies? Check out my amazon store


Linking up with these fabulous link parties: The Scoop!, Inspire Me Tuesday,Wow us Wednesdays!Creative Ways ,Share Your Style,Feathered Nest Fridays, Home Sweet Home

Written at http://peoniesandorangeblossoms.blogspot.com

This post may contain affiliate links.

Follow:

Chocolate Ganache Macaron Recipe

We use affiliate links in our posts and our site. This means if you make a purchase using these links, we may earn a small commission. You don’t pay a cent more than you would otherwise! Our full disclosure is available under About.
Chocolate Ganache Macarons

I’ve been busy baking macarons again.  This time I’ve made chocolate ganache macarons, adapted from Laduree’s recipe.  They are GOOD.  These would be perfect to make for Valentine’s Day.  They will go fast!

chocolate ganache macarons

Materials needed:

  • a food scale (yes, you need this. I use this one)
  • a piping tip and piping bag (I like the ateco #806, I use these tips and piping bag
  • Food coloring (the gels or dry powder works best, not the liquid store stuff)
  • A macaron template (either make one or get one here or here. It makes piping easier)
  • food processor (for the cream filling, I use this one)


Chocolate Macaron Shell: PRINTABLE RECIPE HERE

260g almond flour

250g powdered sugar

15g cocoa powder

210g granulated sugar

210g egg whites


1.  Mix almond meal, cocoa powder, and the powdered sugar in a food processor. Be careful not to grind too long, otherwise it will form a paste.

2. Sift the almonds, cocoa powder, and powdered sugar. Set aside.

3. Weigh out granulated sugar.

4. Weigh the egg whites.  Beat them slowly on a low speed until foamy. SLOWLY add the granulated sugar to the egg whites as you beat.  Once all mixed, increase speed to medium and beat until a firm meringue forms.  You want a firm meringue with glossy peaks but not stiff peaks.  They should defy gravity and remain in the bowl if you turn it upside down.  If you tilt your bowl to the side and they are sliding out, keep beating.

5. Add the food coloring gel and mix.  To make mine a richer brown color, I used “chocolate brown” food coloring.

6. Then fold in 1/3rd of the almond/sugar mixture into the meringue with a silicone spatula.  Once combined, add another third of the almond mixture. Add last bit.  This batter requires more deflation during this step since it creates such a poofy meringue.

7. Add the batter to a piping bag.  Pipe in rows using your template onto parchment paper.

8. Pick up the pan and beat until the counter.  The cookies need to rest on the counter between 30-60 minutes.  They are ready to go in the oven when they are dry to touch (the shell shouldn’t stick to your finger)

9.  Set the oven to 300F.

10. Bake the cookies for 13-15 minutes one sheet at a time. They are done when they look kind of matte and seem firm when you lightly tap on them.  You can always rescue a slightly overcooked one with the maturation process that comes later, but you cannot rescue an undercooked one!!  

11.  Remove from paper once completely cool. If they stick they stick to the paper, they aren’t cool yet. Or you undercooked them.


Chocolate Ganache

290g chocolate (minimum 70% cacao solid)

1 cup + 2 tbsp heavy cream

60g butter

1.  Finely chop the chocolate and place in a large bowl.

2.  In a saucepan, bring the cream to a boil.  Pour the hot cream in 3 parts over the chopped chocolate, mixing with a wooden spoon between each addition.

3.  Cut the butter in small pieces and stir into the ganache until spoon.

4.  Transfer to a baking dish and cover with plastic wrap.  Allow the ganache to cool at room temperature and then refrigerate for 1 hour until it is thick and creamy.

5.  After the cookies and ganache are cooled, fill the cookies with ganache.

6.  Store in the refrigerator for 24 hours before enjoying.

Linking up with these fabulous link parties: The Scoop!, Inspire Me Tuesday,Wow us Wednesdays!Feathered Nest Fridays, Home Sweet Home

http://peoniesandorangeblossoms.blogspot.com

This post may contain affiliate links.

Follow:

Chocolate Hazelnut Cat Macarons

We use affiliate links in our posts and our site. This means if you make a purchase using these links, we may earn a small commission. You don’t pay a cent more than you would otherwise! Our full disclosure is available under About.

As you know, I LOVE macarons.  Earlier this year I did a feature, Macaron Mondays, for a few months.  For this upcoming Halloween, I created some scary cat chocolate hazelnut macarons!

The recipe is adapted from Laduree’s Sucre book.

scary cat chocolate hazelnut macarons

Materials needed:

  • a food scale (yes, you need this. I use this one)
  • a piping tip and piping bag (I like the ateco #806, I use these tips and piping bag)
  • Food coloring (the gels or dry powder works best, not the liquid store stuff)
  • A macaron template (either make one or get one here or here. It makes piping easier)
  • food processor (for the cream filling, I use this one)
  • Googly food eyes
  • Food marker

Chocolate Macaron Shell – CLICK HERE FOR A PRINTABLE RECIPE

260g almond flour

250g powdered sugar

15g cocoa powder

210g granulated sugar

210g egg whites

1.  Mix almond meal, cocoa powder, and the powdered sugar in a food processor. Be careful not to grind too long, otherwise it will form a paste.

2. Sift the almonds, cocoa powder, and powdered sugar. Set aside.

3. Weigh out granulated sugar.

4. Weigh the egg whites.  Beat them slowly on a low speed until foamy. SLOWLY add the granulated sugar to the egg whites as you beat.  Once all mixed, increase speed to medium and beat until a firm meringue forms.  You want a firm meringue with glossy peaks but not stiff peaks.  They should defy gravity and remain in the bowl if you turn it upside down.  If you tilt your bowl to the side and they are sliding out, keep beating.

5. Add the food coloring gel and mix.  To make mine a richer brown color, I used “chocolate brown” food coloring.

6. Then fold in 1/3rd of the almond/sugar mixture into the meringue with a silicone spatula.  Once combined, add another third of the almond mixture. Add the last bit.  This batter requires more deflation during this step since it creates such a poofy meringue.

7. Add the batter to a piping bag.  Pipe in rows using your template onto parchment paper.  To add the cat ears, pipe a tiny bit and use the flick of your wrist to make it point at the tip.  This takes some practice.  I piped half the rows with cat ears and the other half as regular circles.  This way when you assemble the cookies you have the cat on one side and a regular circle on the other.

8. Pick up the pan and beat until the counter.  The cookies need to rest on the counter between 30-60 minutes.  They are ready to go in the oven when they are dry to touch (the shell shouldn’t stick to your finger)

9.  Set the oven to 300F.

10. Bake the cookies for 13-15 minutes one sheet at a time. They are done when they look kind of matte and seem firm when you lightly tap on them.  You can always rescue a slightly overcooked one with the maturation process that comes later, but you cannot rescue an undercooked one!!

11.  Remove from paper once completely cool. If they stick they stick to the paper, they aren’t cool yet. Or you undercooked them.

Assembly and filling:Ingredients for the filling

•Chocolate Hazelnut filling (I cheated and used Nutella!)

•googly eyes

•food markers

•flat circles for the nose (I used some sprinkles from decorating sugar cookies)

•small tube of frosting (to glue the eyes to the cat)


1. Once your cookies have cooled, draw a cat’s face with the black food marker.

2. Pipe two circles on the cat’s face and attach the googly eyes.

3.  Fill the inside with a small amount of Nutella and twist the back on.

4.  Store inside the refrigerator for approximately 24 hours before enjoying… trust me, it will taste better!

chocolate cat macarons
Chocolate Cat Macarons!
getting the cat ears right takes practice!

I had fun taking pictures of these cute little cookies!

scary cat chocolate hazelnut macaron


Follow:

Lemon Raspberry Macaron Recipe!

We use affiliate links in our posts and our site. This means if you make a purchase using these links, we may earn a small commission. You don’t pay a cent more than you would otherwise! Our full disclosure is available under About.
Lemon Raspberry Macaron Laduree Recipe

This post may contain affiliate links. See my disclosure policy.

Thought Macaron Mondays had ended last week? So did I… until I made some more!

I had intended just to make lemon macarons when it hit me as the meringue was whipping… what if I added… raspberry! *evil laugh*. I did. And it was good.

Lemon Raspberry Macaron Laduree Recipe

Time for the recipe.
It’s from this fabulous book: Laduree: The Sweet Recipes.  Let’s get started. 
Three recipes today: The macaron shells, the lemon filling, and the raspberry filling.
GET THE PRINTABLE RECIPE HERE


Materials needed:

  • a food scale (yes, you need this. I use this one)
  • a piping tip and piping bag (I like the ateco #806, I use these tips and piping bag
  • Food coloring (the gels or dry powder works best, not the liquid store stuff)
  • A macaron template (either make one or get one here or here. It makes piping easier)
  • food processor (for the cream filling, I use this one)

Laduree Macaron shell Recipe

275g ground almonds  

250g powdered sugar   

210g egg whites          

210g granulated sugar 

1.  Mix almond meal and the powdered sugar in a food processor. Be careful not to grind too long, otherwise it will form a paste.

2. Sift the almonds and powdered sugar. Set aside.

3. Weigh out granulated sugar.

4. Weigh the egg whites.  Beat them slowly on a low speed until foamy. SLOWLY add the granulated sugar to the egg whites as you beat.  Once all mixed, increase speed to medium and beat until a firm meringue forms.  You want a firm meringue with glossy peaks but not stiff peaks.  They should defy gravity and remain in the bowl if you turn it upside down.  If you tilt your bowl to the side and they are sliding out, keep beating.

5. Add the food coloring gel and mix.

6. Then fold in 1/3rd of the almond/sugar mixture into the meringue with a silicone spatula.  Once combined, add another third of the almond mixture. Add last bit.  This batter requires more deflation during this step since it creates such a poofy meringue.

7. Add the batter to a piping bag.  Pipe in rows using your template onto parchment paper.

8. Pick up the pan and beat until the counter.  The cookies need to rest on the counter between 30-60 minutes.  They are ready to go in the oven when they are dry to touch (the shell shouldn’t stick to your finger)

9.  Set the oven to 300F.

10. Bake the cookies for 13-15 minutes, one sheet at a time. They are done when they look kind of matte and seem firm when you lightly tap on them.  You can always rescue a slightly overcooked one with the maturation process that comes later, but you cannot rescue an undercooked one!!   

11. Remove from paper once completely cool. If they stick to the paper, they aren’t cool yet. Or you undercooked them.


Lemon Filling Recipe
Ingredients

  • 160g granulated sugar
  • zest of 1 lemon, grated (approx. 5 grams)
  • 5g cornstarch (cornflour)
  • 3 whole eggs
  • 110mL lemon juice (use fresh lemon juice)
  • 235g butter, softened

Directions
1. Prepare the lemon cream one day in advance.

2. In a bowl, mix together the sugar and lemon zest. Then add the cornstarch.

3. Add the eggs one at a time and then the lemon juice.

4. Pour this mixture into a saucepan and cook over low heat, stirring with a spatula until it simmers, allowing the cream to thicken.

5. Remove from heat.

6. Allow the cream to cool slightly for approx. 10 minutes so that is hot but not scalding (approx. 140 degrees Fahrenheit).  (Now, if you got egg white chunks in it like I did one time, just strain the lemon mixture before adding the butter).

7. Add the softened butter.

8. In a blender or food processor, blend the butter and cream together until mixed. 

9. Keep in airtight container for minimum of 12 hours so that the cream may become firm.


Raspberry Filling Recipe
Ready for this recipe: go buy seedless raspberry jam. Done!


Filling the cookie shells:
1. On one side of the cookie shell, fill one-half of the shell with lemon cream.  On the other cookie shell, fill one-half the shell with raspberry jam.  Twist the two shells together to get them to stick. 


2. Let cookies rest in the fridge for a minimum of 12 hours but preferably 24 hours.  This allows the “macaronnage” to occur. (basically, the ingredients all soak in together and make the cookie taste amazing!).

Lemon Raspberry Macaron Laduree Recipe

This is the end of Macaron Mondays (for now).  To check out my other macaron recipes, either click on the “recipe” link above or the macaron link below!

written at http://peoniesandorangeblossoms.blogspot.com
 I’ve linked up with:The Scoop! at Confessions of a Plate Addict/Stone Gable, Inspire Me Tuesday at a Stroll Thru Life, Do Tell Tuesday at a Vintage Zest,  Tickle my Tastebuds Tuesday,  Wow us Wednesdays! at Savvy Southern Style, What’s it Wednesdays at Ivy & Elephants, Centerpiece Wednesdays at The Style Sisters Feathered Nest Fridays at French Country Cottage,   Home Sweet Home at the Charm of HomeG’day Saturdays at Natasha in Oz Sunday Best Showcase at Twigg Studios.and worthwhile Wednesdays! Be sure to check out all of these fabulous blogging parties! A big thank you to all of the wonderful hosts!


This post was featured at The Scoop!, Tickle my Tastebud Tuesday’s feature at A Kitchen Hoor’s Adventure, and Do Tell Tuesday at Diane;s Vintage zest!  Thank you all for the features!

Follow:

Cherry Almond Macaron Recipe!

We use affiliate links in our posts and our site. This means if you make a purchase using these links, we may earn a small commission. You don’t pay a cent more than you would otherwise! Our full disclosure is available under About.

Sharing yet another macaron recipe as part of Macaron Mondays.  Today’s recipe is Cherry Almond macarons.  They are really good!

This post may contain affiliate links. See my disclosure policy.

Cherry Almond Macarons Recipe

Cherry Almond Macaron Recipe – click HERE FOR THE PRINTABLE RECIPE

For the macaron cookie shell recipe, I use the Laduree macaron recipe.

Materials needed:

  • a food scale (yes, you need this. I use this one)
  • a piping tip and piping bag (I like the ateco #806, I use these tips and piping bag
  • Food coloring (the gels or dry powder works best, not the liquid store stuff)
  • A macaron template (either make one or get one here or here. It makes piping easier)
  • food processor (for the cream filling, I use this one)

Laduree Macarons Recipe –

275g ground almonds  

250g powdered sugar   

210g egg whites          

210g granulated sugar 

1.  Mix almond meal and the powdered sugar in a food processor. Be careful not to grind too long, otherwise it will form a paste.

2. Sift the almonds and powdered sugar. Set aside.

3. Weigh out granulated sugar.

4. Weigh the egg whites.  Beat them slowly on a low speed until foamy. SLOWLY add the granulated sugar to the egg whites as you beat.  Once all mixed, increase speed to medium and beat until a firm meringue forms.  You want a firm meringue with glossy peaks but not stiff peaks.  They should defy gravity and remain in the bowl if you turn it upside down.  If you tilt your bowl to the side and they are sliding out, keep beating.

5. Add the food coloring gel and mix.

6. Then fold in 1/3rd of the almond/sugar mixture into the meringue with a silicone spatula.  Once combined, add another third of the almond mixture. Add last bit.  This batter requires more deflation during this step since it creates such a poofy meringue.

7. Add the batter to a piping bag.  Pipe in rows using your template onto parchment paper.

8. Pick up the pan and beat until the counter.  The cookies need to rest on the counter between 30-60 minutes.  They are ready to go in the oven when they are dry to touch (the shell shouldn’t stick to your finger)

9.  Set the oven to 300F.

10. Bake the cookies for 13-15 minutes, one sheet at a time. They are done when they look kind of matte and seem firm when you lightly tap on them.  You can always rescue a slightly overcooked one with the maturation process that comes later, but you cannot rescue an undercooked one!!   

11. Remove from paper once completely cool. If they stick to the paper, they aren’t cool yet. Or you undercooked them.

Cherry-Almond Filling Recipe:

Makes enough for 40 small sandwiched macarons.

  • 4 ounces of almond paste***
  • 1 stick unsalted butter, cut into cubes, at room temperature
  • 1/2 pint of cherry preserves or cherry pie filling (I used cherry preserves from Trader Joe’s)
  • a pinch of salt
  • cinnamon 
  • nutmeg
  1. In a food processor, place the contents of the cherry preserves and start to grind until the large chunks of cherries are gone.  
  2. Add a little bit of cinnamon and a dash of nutmeg to taste.  Add more if you want it to be spicier tasting.  Set mixture aside.
  3. Now, in the bowl of an electric mixer with a paddle attachment, beat the almond paste on low speed to break it up.
  4. Slowly incorporate the butter while the mixture is running.  When the butter is completely incorporated the mixture will be smooth.
  5. Add the ground cherries in and a pinch of salt.  Mix until it appears well-mixed.
  6. You may store this cream if it is covered and in the fridge for up to 2 weeks.

Assembling the cookies:

  1. Add the filling to the macarons. I used a piping bag to pipe the filling in.
  2. Store the filled cookies in the refrigerator for at least 24 hours for the best results.

***If you don’t have any almond paste, here’s my recipe for almond paste:

Almond paste recipe:

  • 4 ounces of almonds (blanched. I used the pre-ground almonds from Trader Joe’s)
  • 4 ounces powdered sugar
  • 1/2 an egg white

1. Grind the almonds in a food processor.
2. Add the sugar and grind again.
3. Add the egg white and continue grinding. Keep grinding until it looks like a paste.

I adapted the cherry almond filling recipe from this wonderful book:

Les Petits Macarons: Colorful French Confections to Make at Home

I want to point out below the different between not folding the almond mixture in enough and folding it in perfectly.  Notice the first ones I piped look like ice cream cones?  They are not mixed enough.  I then remedied the problem and folded my batter a few more times in order to get my cookies to lie flat.

macaron piping

See the difference?  These ones below are now perfectly folded and therefore lie nice and flat.

The cherry preserves I used:

The finished product…

cherry almond macaron recipe

Yum yum!

Cherry Almond Macaron Recipe

For my favorite product recommendations for making such delicate cookies, check out my amazon store

 I’ve linked up with:The Scoop! at Confessions of a Plate Addict/Stone Gable, Merry Mondays at my pinterventures, Inspire Me Tuesday at a Stroll Thru Life, Do Tell Tuesday at a Vintage Zest,  You’re Going to Love it Tuesday at Kathe with an E,  Tickle my Tastebuds Tuesday,  Creative Ways at Posed Perfection,   Wow us Wednesdays! at Savvy Southern Style, What’s it Wednesdays at Ivy & Elephants,  Feathered Nest Fridays at French Country Cottage, Sunday Best Showcase at Twigg Studios. Say G’day  Be sure to check out all of these fabulous blogging parties! A big thank you to all of the wonderful hosts!

Written  at http://peoniesandorangeblossoms.blogspot.com
This post may contain affiliate links.

Follow:

Orange Macaron Recipe

We use affiliate links in our posts and our site. This means if you make a purchase using these links, we may earn a small commission. You don’t pay a cent more than you would otherwise! Our full disclosure is available under About.

Did you try those lemon macarons?  Well, it’s easy to copy the same recipe with any citrus. I adapted the lemon macaron recipe for orange macarons!
This post may contain affiliate links. See my disclosure policy.

yum!

I use Laduree’s recipe.

Materials needed:

  • a food scale (yes, you need this. I use this one)
  • a piping tip and piping bag (I like the ateco #806, I use these tips and piping bag
  • Food coloring (the gels or dry powder works best, not the liquid store stuff)
  • A macaron template (either make one or get one here or here. It makes piping easier)
  • food processor (for the cream filling, I use this one)


Laduree Macarons Recipe – FOR A PRINTABLE RECIPE CLICK HERE

275g ground almonds  

250g powdered sugar   

210g egg whites          

210g granulated sugar 


1.  Mix almond meal and the powdered sugar in a food processor. Be careful not to grind too long, otherwise it will form a paste.


2. Sift the almonds and powdered sugar. Set aside.


3. Weigh out granulated sugar.


4. Weigh the egg whites.  Beat them slowly on a low speed until foamy. SLOWLY add the granulated sugar to the egg whites as you beat.  Once all mixed, increase speed to medium and beat until a firm meringue forms.  You want a firm meringue with glossy peaks but not stiff peaks.  They should defy gravity and remain in the bowl if you turn it upside down.  If you tilt your bowl to the side and they are sliding out, keep beating.


5. Add the food coloring gel and mix.


6. Then fold in 1/3rd of the almond/sugar mixture into the meringue with a silicone spatula.  Once combined, add another third of the almond mixture. Add last bit.  This batter requires more deflation during this step since it creates such a poofy meringue.


7. Add the batter to a piping bag.  Pipe in rows using your template onto parchment paper.


8. Pick up the pan and beat until the counter.  The cookies need to rest on the counter between 30-60 minutes.  They are ready to go in the oven when they are dry to touch (the shell shouldn’t stick to your finger)


9.  Set the oven to 300F.


10. Bake the cookies for 13-15 minutes, one sheet at a time. They are done when they look kind of matte and seem firm when you lightly tap on them.  You can always rescue a slightly overcooked one with the maturation process that comes later, but you cannot rescue an undercooked one!!   


11. Remove from paper once completely cool. If they stick to the paper, they aren’t cool yet. Or you undercooked them.

For the orange cream filling, I’ve adapted the lemon macaron recipe from Laduree’s Sucre Book.

Ingredients

  • 160g granulated sugar
  • zest of 1 lemon, grated (approx. 5 grams)
  • 5g cornstarch (cornflour)
  • 3 eggs
  • 110mL orange juice 
  • 235g butter, softened

Directions

**Prepare the orange cream one day in advance.

1. In a bowl, mix together the sugar and orange zest. Then add the cornstarch.

2. Add the eggs one at a time and then the orange juice.

3. Pour this mixture into a saucepan and cook over low heat, stirring with a spatula until it simmers, allowing the cream to thicken.

4. Remove from heat. Allow the cream to cool slightly for approx. 10 minutes so that is hot but not scalding (approx. 140 degrees Fahrenheit).

5. Add the softened butter.

6. In a blender or food processor, blend the butter and cream together until mixed.

7. Keep in airtight container for minimum of 12 hours so that the cream may become firm.

8. Add to the macaron shells. Let macarons sit in the fridge for at least 1 day until serving. It will taste better this way, I promise!!

HELPFUL HINTS:

  • Use fresh squeezed orange juice. If you can’t squeeze it yourself, then get a really good store brand like Simply Orange.
  • Do NOT use frozen orange juice. 
  • Let the macarons sit in the fridge for at least 1 day.
the orange cream

The finished product, the shells didn’t bake perfectly.  They little feet didn’t form AND they are a little too puffy.  But here’s the great thing about thesee macarons…they were delicious anyway!

For my favorite product recommendations for making such delicate cookies, check out my amazon store

I’ve linked up with:The Scoop! at Confessions of a Plate Addict/Stone Gable,  Merry Mondays at my pinterventures Inspire Me Tuesday at a Stroll Thru Life, Do Tell Tuesday at a Vintage Zest,  You’re Going to Love it Tuesday at Kathe with an E,  Tickle my Tastebuds Tuesday  Cottage Style Party at Lavender Garden Cottage, Creative Ways at Posed Perfection  Wow us Wednesdays! at Savvy Southern Style Treasure Hunt Thursday at From My Front Porch To Yours, Feathered Nest Fridays at French Country Cottage, Sunday Best Showcase at Twigg Studios. Be sure to check out all of these fabulous blogging parties! A big thank you to all of the wonderful hosts!

Written  at http://peoniesandorangeblossoms.blogspot.com

Follow:

Pistachio Macaron Recipe!

We use affiliate links in our posts and our site. This means if you make a purchase using these links, we may earn a small commission. You don’t pay a cent more than you would otherwise! Our full disclosure is available under About.

… the Macaron Monday madness continues. This week I present to you my FAVORITE macaron recipe. Pistachio macarons!
This post may contain affiliate links. See my disclosure policy.

Pistachio macaron recipe

Now, this macaron shell recipe is different than the other macarons I’ve been making.  The key here is adding pistachio to the shell.

Materials needed

  • Materials needed:
    • a food scale (yes, you need this. I use this one)
    • a piping tip and piping bag (I like the ateco #806, I use these tips and piping bag
    • Food coloring (the gels or dry powder works best, not the liquid store stuff)
    • A macaron template (either make one or get one here or here. It makes piping easier)
    • food processor (for the cream filling, I use this one)

Pistachio Macaron Shell Recipe FOR A PRINTABLE RECIPE CLICK HERE

200g almond flour

75g pistachio flour (step 1)

250g powdered sugar

210g granulated sugar

6 egg whites (room-temperature)

1/8 cup chopped pistachios

food coloring (green is traditional color for this cookie)

1 Grind your unshelled pistachios (salted or unsalted, I prefer the salted) using a food processor. Be careful not to turn it into a paste. 

2 Sift almond flour, pistachio flour, and powdered sugar through a fine mesh screen into a bowl.

3 Whisk or using a beater, turn 6 egg whites to a foam.  Slowly add the granulated sugar to the egg whites as you beat.  Whip until the meringue has firm glossy peaks but not super stiff peaks. They should defy gravity and remain in the bowl if you turn it upside down.  If you tilt your bowl to the side and the meringue started to slide, keep beating.

4 Add your food coloring.

5 Then fold in 1/3rd of the almond/pistachio/sugar mixture into the meringue with a silicone spatula.  Once combined, add another third of the almond mixture. Then the last third. 

6 Add the batter to the piping bag.  Pipe in rows using your template onto parchment paper.

7 Pick up the pan and beat onto the counter.  Now sprinkle pistachio nuts on half of the cookies as a garnishment.

8 Preheat oven to 300 degrees.  The cookies need to rest on the counter between 30-60 minutes. They are ready to go into the oven when they are dry to the touch.  The shell shouldn’t stick to your fingers.

9 Bake the cookies for 13-15 minutes, one sheet at a time.  They are done when they look kind of matte and seem firm if you tap on them.  You can always rescue an overcooked cookie with the maturation process that comes later, but you cannot rescue an undercooked one!

10 Remove from the paper once completely cool.  If they stick to the paper, they either aren’t cool yet or you undercooked them.

11 Fill the cookies when cool with the filling below. 

12 Refrigerate overnight for best results.

Pistachio Paste Recipe

Ingredients

80g granulated sugar

25g water

1 whole egg

1 egg yolk

160g soft butter

1/4 cup shelled pistachios (grind in a cuisinart into a paste). 

Directions:

1 Mix the water with the sugar until the sugar dissolves and bring mixture to a boil in a small pan.

2 Heat sugar to 250 degrees.

3 Whisk whole egg with the extra yolk until it lightens.

4 When sugar mixture is 250 degrees, pour into the eggs.

5 Whisk until cool.

6 Then add butter and pistachio paste to the sugar mixture.

To assemble the macarons, add the filling to the shell side without the pistachio crumbled on top.  Then add the crumbled pistachio top.  Store in an airtight container for 24-48 in the refrigerator.  The cookies will taste better after you wait a day, I promise!

pistachio macaron recipe

These macarons are a little underfolded.  They should not form stiff peaks when you pipe them.  I should’ve mixed it a little more.

pistachio macaron recipe

I used the standard lime green dye by chefmaster.

pistachio macaron recipe

Making of the pistachio paste… boiling the sugar…

pistachio macaron recipe

 … the final pistachio paste. Looks gross. Tastes delicious.

pistachio macaron recipe

 The finished product:

pistachio macaron recipe

 YUM YUM. You need to try this recipe.

pistachio macaron recipe

This was another post as part of my series “Macaron Mondays”
So far I’ve made…
Salted Caramel Macarons
Lemon Macarons
Raspberry Macarons
Marionberry Macarons

For my favorite product recommendations for making such delicate cookies, check out my amazon store

I’ve linked up with:The Scoop! at Confessions of a Plate Addict/Stone Gable,  Merry Mondays at my pinterventures Inspire Me Tuesday at a Stroll Thru Life, Do Tell Tuesday at a Vintage Zest,  You’re Going to Love it Tuesday at Kathe with an E,  Tickle my Tastebuds Tuesday  Cottage Style Party at Lavender Garden Cottage  Wow us Wednesdays! at Savvy Southern Style, What’s it Wednesdays at Ivy & Elephants, Centerpiece Wednesdays at The Style Sisters Treasure Hunt Thursday at From My Front Porch To Yours, Feathered Nest Fridays at French Country Cottage, Sunday Best Showcase at Twigg Studios. Be sure to check out all of these fabulous blogging parties! A big thank you to all of the wonderful hosts!

Written at http://peoniesandorangeblossoms.blogspot.com

Follow:

Lemon Macarons Recipe!

We use affiliate links in our posts and our site. This means if you make a purchase using these links, we may earn a small commission. You don’t pay a cent more than you would otherwise! Our full disclosure is available under About.

Although I think “macaron citron” has a better ring to it!
This post may contain affiliate links. See my disclosure policy.
Today I’m sharing with you the recipe for lemon macarons! They are GOOD.

Ok. First we start with the basic macaron recipe I use Laduree’s recipe.

Materials needed:

  • a food scale (yes, you need this. I use this one)
  • a piping tip and piping bag (I like the ateco #806, I use these tips and piping bag
  • Food coloring (the gels or dry powder works best, not the liquid store stuff)
  • A macaron template (either make one or get one here or here. It makes piping easier)
  • food processor (for the cream filling, I use this one)

Laduree Macarons Recipe

275g ground almonds  

250g powdered sugar   

210g egg whites          

210g granulated sugar 

1.  Mix almond meal and the powdered sugar in a food processor. Be careful not to grind too long, otherwise it will form a paste.

2. Sift the almonds and powdered sugar. Set aside.

3. Weigh out granulated sugar.

4. Weigh the egg whites.  Beat them slowly on a low speed until foamy. SLOWLY add the granulated sugar to the egg whites as you beat.  Once all mixed, increase speed to medium and beat until a firm meringue forms.  You want a firm meringue with glossy peaks but not stiff peaks.  They should defy gravity and remain in the bowl if you turn it upside down.  If you tilt your bowl to the side and they are sliding out, keep beating.

5. Add the food coloring gel and mix.

6. Then fold in 1/3rd of the almond/sugar mixture into the meringue with a silicone spatula.  Once combined, add another third of the almond mixture. Add last bit.  This batter requires more deflation during this step since it creates such a poofy meringue.

7. Add the batter to a piping bag.  Pipe in rows using your template onto parchment paper.

8. Pick up the pan and beat until the counter.  The cookies need to rest on the counter between 30-60 minutes.  They are ready to go in the oven when they are dry to touch (the shell shouldn’t stick to your finger)

9.  Set the oven to 300F.

10. Bake the cookies for 13-15 minutes, one sheet at a time. They are done when they look kind of matte and seem firm when you lightly tap on them.  You can always rescue a slightly overcooked one with the maturation process that comes later, but you cannot rescue an undercooked one!!   

11. Remove from paper once completely cool. If they stick to the paper, they aren’t cool yet. Or you undercooked them.

For the lemon cream filling (also Laduree’s recipe, from the Sucre Book):

Ingredients for the Lemon Filling

  • 160g granulated sugar
  • zest of 1 lemon, grated (approx. 5 grams)
  • 5g cornstarch (cornflour)
  • 3 eggs
  • 110mL lemon juice (use fresh lemon juice)
  • 235g butter, softened

Directions


1. Prepare the lemon cream one day in advance.

2. In a bowl, mix together the sugar and lemon zest. Then add the cornstarch.

3. Add the eggs one at a time and then the lemon juice.

4. Pour this mixture into a saucepan and cook over low heat, stirring with a spatula until it simmers, allowing the cream to thicken.

5. Remove from heat.

6. Allow the cream to cool slightly for approx. 10 minutes so that is hot but not scalding (approx. 140 degrees Fahrenheit).

7. Add the softened butter.

8. In a blender or food processor, blend the butter and cream together until mixed.

9. Keep in airtight container for minimum of 12 hours so that the cream may become firm.

10. Add to the macarons. Let macarons sit in the fridge for at least 1 day until serving. It will taste better this way, I promise!!

the lemon cream filling

piped lemon shells

The finished product:

For my favorite product recommendations for making such delicate cookies, check out my amazon store

I’ve linked up with:The Scoop! at Confessions of a Plate Addict/Stone Gable, Metamorphosis Monday’s at Between Naps on the Porch, Inspire Me Tuesday at a Stroll Thru Life, Do Tell Tuesday at a Vintage Zest,  You’re Going to Love it Tuesday at Kathe with an E, Cottage Style Party at Lavender Garden Cottage  Wow us Wednesdays! at Savvy Southern Style, What’s it Wednesdays at Ivy & Elephants, Centerpiece Wednesdays at The Style Sisters Tablescape Thursday at Between Naps on the Porch, Oh the places I have been at the Tablescaper, Treasure Hunt Thursday at From My Front Porch To Yours, Feathered Nest Fridays at French Country Cottage, Seasonal Sundays at the Tablescaper, Sunday Best Showcase at Twigg Studios. And Tickle my Tastebuds Tuesdays Be sure to check out all of these fabulous blogging parties! A big thank you to all of the wonderful hosts!

Written by  http://peoniesandorangeblossoms.blogspot.com
this post may contain affiliate links

Follow:

Salted Caramel Macarons

We use affiliate links in our posts and our site. This means if you make a purchase using these links, we may earn a small commission. You don’t pay a cent more than you would otherwise! Our full disclosure is available under About.

Fleur de Sel Macarons (aka Salted Caramel Macarons)

This post may contain affiliate links. See my disclosure policy.

This is part of my Macaron Mondays feature! I hope you’ve been inspired to make some macarons!

For the basic macaron recipe I use the Laduree macaron recipe.

FOR A PRINTABLE RECIPE, CLICK HERE!!
Materials needed:

  • a food scale (yes, you need this. I use this one)
  • a piping tip and piping bag (I like the ateco #806, I use these tips and piping bag
  • Food coloring (the gels or dry powder works best, not the liquid store stuff)
  • A macaron template (either make one or get one here or here. It makes piping easier)
  • food processor (for the cream filling, I use this one)

Laduree Macarons Recipe

275g ground almonds  

250g powdered sugar   

210g egg whites          

210g granulated sugar 

1.  Mix almond meal and the powdered sugar in a food processor. Be careful not to grind too long, otherwise it will form a paste.

2. Sift the almonds and powdered sugar. Set aside.

3. Weigh out granulated sugar.

4. Weigh the egg whites.  Beat them slowly on a low speed until foamy. SLOWLY add the granulated sugar to the egg whites as you beat.  Once all mixed, increase speed to medium and beat until a firm meringue forms.  You want a firm meringue with glossy peaks but not stiff peaks.  They should defy gravity and remain in the bowl if you turn it upside down.  If you tilt your bowl to the side and they are sliding out, keep beating.

5. Add the food coloring gel and mix.

6. Then fold in 1/3rd of the almond/sugar mixture into the meringue with a silicone spatula.  Once combined, add another third of the almond mixture. Add last bit.  This batter requires more deflation during this step since it creates such a poofy meringue.

7. Add the batter to a piping bag.  Pipe in rows using your template onto parchment paper.

8. Pick up the pan and beat until the counter.  The cookies need to rest on the counter between 30-60 minutes.  They are ready to go in the oven when they are dry to touch (the shell shouldn’t stick to your finger)

9.  Set the oven to 300F.

10. Bake the cookies for 13-15 minutes, one sheet at a time. They are done when they look kind of matte and seem firm when you lightly tap on them.  You can always rescue a slightly overcooked one with the maturation process that comes later, but you cannot rescue an undercooked one!!   

11. Remove from paper once completely cool. If they stick to the paper, they aren’t cool yet. Or you undercooked them.

Salted Caramel Filling Recipe
(makes 1.5 cups of caramel)
1 cup of cream
1.5 cups of granulated sugar
2 tsp coarse salt (or 1tsp for a less salty flavor)
1 cup unsalted butter

Instructions:
1. Chop butter into small cubes and set aside.
2. Pour cream into the pan and add the salt. Bring to a low boil while stirring and remove immediately. Do not scald the cream.
3. Place the sugar into a new pan. Cook over medium hit while stirring constantly.
4. Stir until sugar is melted and has caramelized into a rich color. Remove from heat.  Do not burn the sugar.  If your caramel starts to burn, throw it away. You cannot rescue it.
5. Pour and stir the hot cream into the caramel mixture. BE CAREFUL!!! Add the cream VERY SLOWLY.  The caramel will spit and boil up, so stir while incorporating the cream into the caramel.
6. Let the caramel cool to 115 degrees (about 5 minutes later).
7. Whisk in the cubes of butter into the mixture until melted and mixed.
8. Pour caramel into a shatter proof bowl and refrigerate until cold.

To use the caramel:
1. Remove from the fridge.
2. Whisk the caramel mixture to stiffen to more of a butter/cream consistency. Do not over-whisk as the caramel will separate.

Once all assembled, put them in an airtight container and let them mature (yes, that’s the scientific word for this process) in the refrigerator for 24-48 hours.  


Now, these cookies won’t be bad if you eat them immediately, they will just be amazing if you want a day.  The theory is that the juices from the filling soak back into the cookie to make an AMAZING cookie. 

YUM!

 This caramel tastes good on other things too, not just macarons!

For my favorite product recommendations for making such delicate cookies, check out my amazon store

I’ve linked up with:The Scoop! at Confessions of a Plate Addict/Stone Gable, Metamorphosis Monday’s at Between Naps on the Porch, Inspire Me Tuesday at a Stroll Thru Life, Do Tell Tuesday at a Vintage Zest,  You’re Going to Love it Tuesday at Kathe with an E, Cottage Style Party at Lavender Garden Cottage  Wow us Wednesdays! at Savvy Southern Style, What’s it Wednesdays at Ivy & Elephants, Centerpiece Wednesdays at The Style Sisters Tablescape Thursday at Between Naps on the Porch, Oh the places I have been at the Tablescaper, Treasure Hunt Thursday at From My Front Porch To Yours, Feathered Nest Fridays at French Country Cottage, Seasonal Sundays at the Tablescaper, Sunday Best Showcase at Twigg Studios. Be sure to check out all of these fabulous blogging parties! A big thank you to all of the wonderful hosts!

Written at http://peoniesandorangeblossoms.blogspot.com

Follow:

Marionberry Macarons Recipe

We use affiliate links in our posts and our site. This means if you make a purchase using these links, we may earn a small commission. You don’t pay a cent more than you would otherwise! Our full disclosure is available under About.
Marionberry Macarons
This post may contain affiliate links. See my disclosure policy.


For how to make the macaron cookie shells,  I use the Laduree recipe.

Materials needed:

  • a food scale (yes, you need this. I use this one)
  • a piping tip and piping bag (I like the ateco #806, I use these tips and piping bag
  • Food coloring (the gels or dry powder works best, not the liquid store stuff)
  • A macaron template (either make one or get one here or here. It makes piping easier)
  • food processor (for the cream filling, I use this one)

Laduree Macarons Recipe GET THE PRINTABLE RECIPE HERE

275g ground almonds  

250g powdered sugar   

210g egg whites          

210g granulated sugar 

1.  Mix almond meal and the powdered sugar in a food processor. Be careful not to grind too long, otherwise it will form a paste.

2. Sift the almonds and powdered sugar. Set aside.

3. Weigh out granulated sugar.

4. Weigh the egg whites.  Beat them slowly on a low speed until foamy. SLOWLY add the granulated sugar to the egg whites as you beat.  Once all mixed, increase speed to medium and beat until a firm meringue forms.  You want a firm meringue with glossy peaks but not stiff peaks.  They should defy gravity and remain in the bowl if you turn it upside down.  If you tilt your bowl to the side and they are sliding out, keep beating.

5. Add the food coloring gel and mix.

6. Then fold in 1/3rd of the almond/sugar mixture into the meringue with a silicone spatula.  Once combined, add another third of the almond mixture. Add last bit.  This batter requires more deflation during this step since it creates such a poofy meringue.

7. Add the batter to a piping bag.  Pipe in rows using your template onto parchment paper.

8. Pick up the pan and beat until the counter.  The cookies need to rest on the counter between 30-60 minutes.  They are ready to go in the oven when they are dry to touch (the shell shouldn’t stick to your finger)

9.  Set the oven to 300F.

10. Bake the cookies for 13-15 minutes, one sheet at a time. They are done when they look kind of matte and seem firm when you lightly tap on them.  You can always rescue a slightly overcooked one with the maturation process that comes later, but you cannot rescue an undercooked one!!   

11. Remove from paper once completely cool. If they stick to the paper, they aren’t cool yet. Or you undercooked them.

Filling – for Marionberry Macarons

For these macarons, the easiest way for the filling is to buy seedless marionberry jam.  I used Harry & David seedless marionberry Jam. 

 Once the cookies are cool, add a dollop of your filling to one cookie and spread with a small knife, spoon, or icing spatula. 

Place the other cookie to your filling, press gently, and slightly twist the two together.

Once all assembled, put them in an airtight container and let them mature (yes, that’s the scientific word for this process) in the refrigerator for 24-48 hours.  

Now, these cookies won’t be bad if you eat them immediately, they will just be amazing if you want a day.  The theory is that the juices from the filling soak back into the cookie to make an AMAZING cookie. 


What is a Marionberry, you ask?

I realized that some people may not have had a marionberry.  The Marionberry is a type of blackberry, first bred by Oregon State University.  It was first grown in Marion County, Oregon (hence its name).  It is a little bit sweeter than the typical blackberry.  So in other words, it’s good.  Growing up in the Northwest, we would eat all kinds of berries.  They are seriously weeds up there. 


Marionberry macarons

Marionberry Macarons

Check back next week as I continue Macaron Mondays!


For my favorite product recommendations for making such delicate cookies, check out my amazon store

I’ve linked up with:
The Scoop! at Confessions of a Plate Addict/Stone Gable, Metamorphosis Monday’s at Between Naps on the Porch, Inspire Me Tuesday at a Stroll Thru Life, Do Tell Tuesday at a Vintage Zest,  You’re Going to Love it Tuesday at Kathe with an E, Cottage Style Party at Lavender Garden Cottage  Wow us Wednesdays! at Savvy Southern Style, What’s it Wednesdays at Ivy & Elephants, Centerpiece Wednesdays at The Style Sisters Tablescape Thursday at Between Naps on the Porch, Oh the places I have been at the Tablescaper, Treasure Hunt Thursday at From My Front Porch To Yours, Feathered Nest Fridays at French Country Cottage, Seasonal Sundays at the Tablescaper, Sunday Best Showcase at Twigg Studios. Be sure to check out all of these fabulous blogging parties! A big thank you to all of the wonderful hosts!


Written by Orange Blossom at http://peoniesandorangeblossoms.blogspot.com
This post my contain affiliate links.

Follow:

Raspberry Macarons with recipes!

We use affiliate links in our posts and our site. This means if you make a purchase using these links, we may earn a small commission. You don’t pay a cent more than you would otherwise! Our full disclosure is available under About.

Raspberry Macarons like Laduree

The recipe I used to make macarons (mah-ka-rohn) is from Laduree.  It’s from this fabulous book: Laduree: The Sweet Recipes.  Let’s get started.

Raspberry Macarons like Laduree

Materials needed:

  • a food scale (yes, you need this. I use this one)
  • a piping tip and piping bag (I like the ateco #806, I use these tips and piping bag)
  • Food coloring (the gels or dry powder works best, not the liquid store stuff)
  • A macaron template (either make one or get one here or here. It makes piping easier)
  • food processor (for the cream filling, I use this one)


Laduree Macarons Recipe – printable recipe HERE

275g ground almonds

250g powdered sugar

210g egg whites

210g granulated sugar


1.  Mix almond meal and the powdered sugar in a food processor. Be careful not to grind too long, otherwise it will form a paste.

2. Sift the almonds and powdered sugar. Set aside.

3. Weigh out granulated sugar.

4. Weigh the egg whites.  Beat them slowly on a low speed until foamy. SLOWLY add the granulated sugar to the egg whites as you beat.  Once all mixed, increase speed to medium and beat until a firm meringue forms.  You want a firm meringue with glossy peaks but not stiff peaks.  They should defy gravity and remain in the bowl if you turn it upside down.  If you tilt your bowl to the side and they are sliding out, keep beating.

5. Add the food coloring gel and mix.

6. Then fold in 1/3rd of the almond/sugar mixture into the meringue with a silicone spatula.  Once combined, add another third of the almond mixture. Add last bit.  This batter requires more deflation during this step since it creates such a poofy meringue.

7. Add the batter to a piping bag.  Pipe in rows using your template onto parchment paper.

8. Pick up the pan and beat until the counter.  The cookies need to rest on the counter between 30-60 minutes.  They are ready to go in the oven when they are dry to touch (the shell shouldn’t stick to your finger)

9.  Set the oven to 300F.

10. Bake the cookies for 13-15 minutes, one sheet at a time. They are done when they look kind of matte and seem firm when you lightly tap on them.  You can always rescue a slightly overcooked one with the maturation process that comes later, but you cannot rescue an undercooked one!!

11. Remove from paper once completely cool. If they stick to the paper, they aren’t cool yet. Or you undercooked them.

Filling – for Raspberry Macarons

1. For these macarons, the easiest way for the filling is to buy seedless raspberry jam.  I used Harry & David seedless Raspberry Jam.


2. Once the cookies are cool, add a dollop of your filling to one cookie and spread with a small knife, spoon, or icing spatula.


3. Place the other cookie to your filling, press gently, and slightly twist the two together.


4. Once all assembled, put them in an airtight container and let them mature (yes, that’s the scientific word for this process) in the refrigerator for 24-48 hours.


Now, these cookies won’t be bad if you eat them immediately, they will just be amazing if you want a day.  The theory is that the juices from the filling soak back into the cookie to make an AMAZING cookie.

Raspberry Macarons like Laduree

Making the meringue

Finished meringue


My macaron template
adding almond flour to the meringue
macaronnage
we actually didn’t fold these enough.

Aren’t they pretty??

Raspberry Macarons like Laduree


Raspberry Macarons like Laduree

I just want to show you that I haven’t always been the best at making macarons!  Below you can see the first time I ever made macarons… they were poofy and not perfectly flat with little feet.  That’s okay… with practice I became better.  But guess what? The ones below still tasted the same as the ones above! So, if you don’t get it on your first shot, don’t worry!


For my favorite product recommendations for making such delicate cookies, check out my amazon store


SaveSave

Follow:

Macarons: Martha Stewart and ‘lette macaron review

We use affiliate links in our posts and our site. This means if you make a purchase using these links, we may earn a small commission. You don’t pay a cent more than you would otherwise! Our full disclosure is available under About.

Macarons… Part Deux. 

A Martha Stewart macarons magazine and ” ‘lette macaron” shop review!

My new issue of Martha Stewart arrived today, and to my delight macarons were featured on the cover!  Macarons are one of my favorite things, I wrote a whole post about macarons which you can see here.

First, Martha Stewart Magazine March 2014 issue:

Eye candy! 
Add caption

Of course, in Martha Stewart style, she makes her macarons from scratch. I mean, you blanch your own almonds and then grind them yourself.  I prefer to buy almond flour instead of make my own!  Macaron making is already difficult enough!

Below, she has suggestions for flavors and fillings.  She has (clockwise, from top left) chocolate hazelnut filling, espresso, rose raspberry, vanilla bean, and mint chocolate.

the different flavors

For the recipe, I recommend this recipe she has on her website, as you don’t have to make your own almond flour. 


After seeing this beautiful cover, it reminded me that I meant to write a review of ‘lette macarons.

‘lette macarons… a review. 

‘lette macarons is a macaron shop located in Southern California. They have several locations, the original in Beverly Hills.  They have another at Fashion Island in Newport Beach, one in Glendale, Larchmont Village, and Pasadena. 

official picture

I visited the shop at Fashion Island.  When you walk in your a greeted with a whole counter of macarons.  The store is cool… macarons will melt if it’s too hot!

fuzzy cell phone picture! 

 They have 12 flavors everyday with 3 seasonal flavors.  They of course box them up in cute boxes. For macaron cookies, presentation is half the joy!

left to right: earl grey, violet cassis, rose, pistachio, sweet wedding almond, raspberry

 The flavors I have tried:

  • Salted caramel:  Delicious. Definitely try this one! 
  • Lemon: Wish it tasted more lemony.
  • Sicilian pistachio: Good, wish there were bigger pistachio chunks in the filling, but that’s just my preference!
  • Earl Grey Tea: It was interesting.  It tasted like… Earl Grey.  It would be a good breakfast cookie!
  • Violet Cassis: the purple one, it was really really good. I had no idea what “violet cassis” would taste like, and I can’t really describe it.  It is worth trying!
  • Rose: didn’t really have much flavor. just tasted like a plain macaron to me.
  • Raspberry: Of course, raspberry macarons are delicious. Never had a bad one!
  • Sweet Wedding Almond: well, I love marzipan. And I love macarons. This was like a marzipan macaron. My favorite, but probably not for everyone. If you don’t like marzipan, skip this one.

Other flavors I have not tried: Caribbean chocolate, coconut, coffee, vanilla, passion fruit.

ok, so I ate two in the car.

 And here’s a picture from a different trip!

The salted caramel. It is DELICIOUS. My favorite one.

When you walk into the shop, they always have a macaron tower.  You can purchase a tower for a party.  I would… if I was going to host a party!

Or you could always get a huge pretty box!

 If you go, I would go in the morning. As the day goes along and they warm up, they don’t taste as good. Like most French desserts, they are fickle!

Thanks for stopping by.  If you’re in LA, check out ‘lette if you’re too lazy to make your own!

I’ve linked up with The Scoop!, Tablescape ThursdayWow us Wednesdays!Open House Party Feathered Nest FridaSeasonal Sundays & Oh the places I have been,  life of the party the style sistersFavorite Things Blog Hop, and What’s it Wednesdays. Be sure to check out all of these fabulous blogging parties! A big thank you to all of the wonderful hosts!

Follow:

From the Shop

I may earn a small commission if you purchase with these links

Caning Natural Tote Handbag - Universal Thread™
The Hustler High Waist Fray Hem Ankle Bootcut Jeans
Le Panier Pliage Raffia Crossbody Bag
Extra Large Le Pliage Panier Tresse Straw Tote
The Bennet Buttondown Shirt by Maeve
T Monogram Perforated Leather Bucket Bag
Mellow Stud Mule
Le Pliage Marinière Recycled Nylon Canvas Travel Bag
Unseen Sunscreen Broad Spectrum SPF 40 PA+++
Maxine Stripe Cotton Button-Up Shirt
Citizens of Humanity Charlotte High Rise Straight Jeans
Navy Equestrian Traversee M Linen Tote
Cream Carrie Blouse
Ellison Natural
Jolene High Rise Vintage Slim
Citizens of Humanity Blue Jolene Jeans
Charlotte High Rise Straight Jeans
Le Pliage Filet Top Handle Bag
Vintage cotton crewneck T-shirt
Air Heart Sunglasses
Le Pliage Torchon XS Top Handle Bag With Strap
Santorini Raffia Basket Bag
Chuck Taylor® All Star® Lift High Top Platform Sneaker
Please note that I use ShopSense, LIKETOKNOW.it, Shareasale and Amazon affiliate links on this site. This means using them for purchases won’t cost you extra but may earn me a small commission.  Our full disclosure is available for viewing under About in the disclosure policy.
All rights reserved. Our graphics, images and text are all subject to copyright protection.