My new Royal Crown Derby Donkey!

We use affiliate links in our posts and our site. This means if you make a purchase using these links, we may earn a small commission. You don’t pay a cent more than you would otherwise! Our full disclosure is available under About.

I received a wonderful Royal Crown Derby Donkey from my mother-in-law for my birthday!  How did she ever know that I would love such a thing?

Well, apparently my husband was so proud of my blogging that he shared it with his family… and they’ve been following my blog. *waves… hi!*

A while ago I wrote about Royal crown derby and my love for the donkey! And they hunted one down and bought it for me!  I couldn’t decide where to put him, then I ended up thinking of a little story.   Now time for some fun.  I wrote a little story.  I used to write stories… then I stopped.  

my new royal crown derby paperweight, a donkey I’ve named Dominick! 

Storytelling time. “The Adventures of Dominick the Donkey” by me. 

Dominick the Donkey had just traveled from England hoping to meet some new friends.

“Hey, Chingedy ching, hee-haw, hee-haw, I’m Dominick the Donkey” he sang to the cats.

The sleeping cats were not impressed and continued to ignore him.

The cats’ foul mood did not ruin Dominick’s, as across the way he spotted lavender.  So he hopped on over to the lavender field and pranced around.

All of the prancing around made Dominick thirsty.  He spotted a watering hole in the distance.

The watering hole turned out to be… a tulipiere? Well, Dominick was a high-class donkey after all, he has hairs painted out of gold. He can drink out of tulipieres!

drinking from the tulipiere, this is one fancy donkey!

Now refreshed, he looked out the window and spotted the beautiful blooming pink rose.

He decided to stop and smell the roses before headed to his final resting spot.

smelling the gertrude jekyll rose. You should go to the nursery and do the same!!

Tuckered out from his adventure from England and then around his new home, he decided to take a rest on master’s desk where he can watch all blogging activities.  He says, “now don’t go spreading rumors about me.”

don’t go about spreading rumors 

THE END.

Follow:

A French Pastry shop in LA

We use affiliate links in our posts and our site. This means if you make a purchase using these links, we may earn a small commission. You don’t pay a cent more than you would otherwise! Our full disclosure is available under About.

Bottega Louie

This is my review of Bottega Louie, a French pastry shop and cafe located in downtown L.A. here in Southern California!

French Patisserie

Now I LOVE French pastries.  We drove to Strasbourg, France from Germany (not too far away) just to eat a real French croissant and some real French pastries.

Frequently I am let down by the American attempts at French patisserie making.  This has led me to try to make my own.

At Bottega Louie, I was not let down!

This is what greets you at the entrance:

Bottega Louie macarons


Bottega Louie macarons
bottega louie macarons

Here is a look at some of their pretty cakes…

On one side of the wall, they have all of their gifts wrapped up in beautiful packaging.

It’s like I stepped into a real French patisserie in Paris!

Who wouldn’t love to receive one of these boxes as a gift?!

The architecture is French, naturally. And I love it.

French counter

A look inside their pastry case…

French pastries at Bottega Louie

Look at all of these mouth-watering pastries! How do you choose one? You can’t!

French pastries

This is what I came home with… a box of macarons…

They wrap it up in pretty packaging which I think is a must for a macaron.  They technically aren’t cookies, they are little pastries. Little pastries need cute little boxes!  One thing I love about the French is how much is put into the presentation of things. Here we just throw things into an ugly plain white bag.

macaron box

Here are the flavors I tried…

macarons

Raspberry macaron – the inside tasted like a raspberry gel. it was quite yummy.
Pistachio macaron – I think mine are better. shhh!
Chocolate orange- good.
Salted caramel – good. But I like my salted caramel ones better.
White chocolate cherry – HEAVENLY. Wow.

I like the Laduree recipe better for macarons as the Laduree recipe has a more almond taste.

Now, I will say I put the leftovers in the refrigerator and I think that Bottega Louie’s macarons tasted better the NEXT day.  I think they were probably made fresh and macarons shouldn’t be eaten for at least 24-48 hours after they were made.

Next up… the raspberry blueberry fruit tart.  It was GOOD. How could it not be?

fruit tart at bottega louie

Now onto my FAVORITE French dessert OF ALL TIME….

Le Frasier!!  If a pastry shop can make an excellent Frasier then they will always win me over.  I love Frasier cake so much, it was even my wedding cake (which is pictured on the header of my blog!)

Let’s take a look, do you see the little fleck of gold leaf on the top? A little crumble of pistachio, strawberries, chantilly cream, honey, and a soft light cake.

Le Frasier at Bottega Louie

The verdict: MAGNIFIQUE! The Frasier was so good. I can rave about it for days. It was simply divine. You need to try one.  I wish I were eating one now.

A last look in the pastry case…

French pastries

Now, I did not have the opportunity to eat at the cafe. The line was too long.  Instead we got some sandwiches to go.  I had the caprese sandwich/baguette. It was really good.  Their bread was perfectly done.  I did not get to try a croissant.  I will need to go back and try one.  If they can make a good croissant, then I will be super impressed as I have yet to have one that rivals Paris.

My final review:

Macarons not my favorite but they were pretty good. Their other pastries were really really good.  Their sandwiches were really really good.  I highly recommend going to Bottega Louie when you are missing Paris.


Follow:

Lemon Macarons Recipe!

We use affiliate links in our posts and our site. This means if you make a purchase using these links, we may earn a small commission. You don’t pay a cent more than you would otherwise! Our full disclosure is available under About.

Although I think “macaron citron” has a better ring to it!
This post may contain affiliate links. See my disclosure policy.
Today I’m sharing with you the recipe for lemon macarons! They are GOOD.

Ok. First we start with the basic macaron recipe I use Laduree’s recipe.

Materials needed:

  • a food scale (yes, you need this. I use this one)
  • a piping tip and piping bag (I like the ateco #806, I use these tips and piping bag
  • Food coloring (the gels or dry powder works best, not the liquid store stuff)
  • A macaron template (either make one or get one here or here. It makes piping easier)
  • food processor (for the cream filling, I use this one)

Laduree Macarons Recipe

275g ground almonds  

250g powdered sugar   

210g egg whites          

210g granulated sugar 

1.  Mix almond meal and the powdered sugar in a food processor. Be careful not to grind too long, otherwise it will form a paste.

2. Sift the almonds and powdered sugar. Set aside.

3. Weigh out granulated sugar.

4. Weigh the egg whites.  Beat them slowly on a low speed until foamy. SLOWLY add the granulated sugar to the egg whites as you beat.  Once all mixed, increase speed to medium and beat until a firm meringue forms.  You want a firm meringue with glossy peaks but not stiff peaks.  They should defy gravity and remain in the bowl if you turn it upside down.  If you tilt your bowl to the side and they are sliding out, keep beating.

5. Add the food coloring gel and mix.

6. Then fold in 1/3rd of the almond/sugar mixture into the meringue with a silicone spatula.  Once combined, add another third of the almond mixture. Add last bit.  This batter requires more deflation during this step since it creates such a poofy meringue.

7. Add the batter to a piping bag.  Pipe in rows using your template onto parchment paper.

8. Pick up the pan and beat until the counter.  The cookies need to rest on the counter between 30-60 minutes.  They are ready to go in the oven when they are dry to touch (the shell shouldn’t stick to your finger)

9.  Set the oven to 300F.

10. Bake the cookies for 13-15 minutes, one sheet at a time. They are done when they look kind of matte and seem firm when you lightly tap on them.  You can always rescue a slightly overcooked one with the maturation process that comes later, but you cannot rescue an undercooked one!!   

11. Remove from paper once completely cool. If they stick to the paper, they aren’t cool yet. Or you undercooked them.

For the lemon cream filling (also Laduree’s recipe, from the Sucre Book):

Ingredients for the Lemon Filling

  • 160g granulated sugar
  • zest of 1 lemon, grated (approx. 5 grams)
  • 5g cornstarch (cornflour)
  • 3 eggs
  • 110mL lemon juice (use fresh lemon juice)
  • 235g butter, softened

Directions


1. Prepare the lemon cream one day in advance.

2. In a bowl, mix together the sugar and lemon zest. Then add the cornstarch.

3. Add the eggs one at a time and then the lemon juice.

4. Pour this mixture into a saucepan and cook over low heat, stirring with a spatula until it simmers, allowing the cream to thicken.

5. Remove from heat.

6. Allow the cream to cool slightly for approx. 10 minutes so that is hot but not scalding (approx. 140 degrees Fahrenheit).

7. Add the softened butter.

8. In a blender or food processor, blend the butter and cream together until mixed.

9. Keep in airtight container for minimum of 12 hours so that the cream may become firm.

10. Add to the macarons. Let macarons sit in the fridge for at least 1 day until serving. It will taste better this way, I promise!!

the lemon cream filling

piped lemon shells

The finished product:

For my favorite product recommendations for making such delicate cookies, check out my amazon store

I’ve linked up with:The Scoop! at Confessions of a Plate Addict/Stone Gable, Metamorphosis Monday’s at Between Naps on the Porch, Inspire Me Tuesday at a Stroll Thru Life, Do Tell Tuesday at a Vintage Zest,  You’re Going to Love it Tuesday at Kathe with an E, Cottage Style Party at Lavender Garden Cottage  Wow us Wednesdays! at Savvy Southern Style, What’s it Wednesdays at Ivy & Elephants, Centerpiece Wednesdays at The Style Sisters Tablescape Thursday at Between Naps on the Porch, Oh the places I have been at the Tablescaper, Treasure Hunt Thursday at From My Front Porch To Yours, Feathered Nest Fridays at French Country Cottage, Seasonal Sundays at the Tablescaper, Sunday Best Showcase at Twigg Studios. And Tickle my Tastebuds Tuesdays Be sure to check out all of these fabulous blogging parties! A big thank you to all of the wonderful hosts!

Written by  http://peoniesandorangeblossoms.blogspot.com
this post may contain affiliate links

Follow:

Last Minute Memorial Day Dessert

We use affiliate links in our posts and our site. This means if you make a purchase using these links, we may earn a small commission. You don’t pay a cent more than you would otherwise! Our full disclosure is available under About.

Need a dessert to bring to a BBQ?  I’ve got you covered. It’s super easy, fast, and looks great!

Ingredients:

  • Red fruit. I used strawberries, but raspberries, cherries, or watermelon are a perfect alternative.
  • Something white: golden raspberries, pineapple, whipped cream, marshmallows, or white covered pretzels or raisins.
  • Blue fruit: blueberries or blackberries!

Directions: (only one!)
1. Arrange on a plate in the shape of the flag. This is perfect as a dessert OR as a side dish.

For a dessert, serve with ice cream or whipped cream!  Total prep time: 3 minutes.

Written at: http://peoniesandorangeblossoms.blogspot.com/

EDIT: This dessert was featured at:

Diane’s Vintage Zest!

I’ve linked up with:The Scoop! at Confessions of a Plate Addict/Stone Gable, Merry Mondays at my pinterventures, Inspire Me Tuesday at a Stroll Thru Life, Do Tell Tuesday at a Vintage Zest,  You’re Going to Love it Tuesday at Kathe with an E, Cottage Style Party at Lavender Garden Cottage  Wow us Wednesdays! at Savvy Southern Style, What’s it Wednesdays at Ivy & Elephants, Centerpiece Wednesdays at The Style Sisters Treasure Hunt Thursday at From My Front Porch To Yours, Feathered Nest Fridays at French Country Cottage, Sunday Best Showcase at Twigg Studios.  And Tickle my Tastebuds Tuesday Be sure to check out all of these fabulous blogging parties! A big thank you to all of the wonderful hosts!

Follow:

Sterling Silver Flatware Guide… Part 2

We use affiliate links in our posts and our site. This means if you make a purchase using these links, we may earn a small commission. You don’t pay a cent more than you would otherwise! Our full disclosure is available under About.

A few more hints about buying silver…

What affects the price of the piece I’m buying?
-Pattern: Certain patterns are worth more than others, despite the weight in Troy ounces being the same.
-Piece: Forks are worth more than teaspoons. Knives are usually worth less, and it’s because most are hollow.
-Sets: Sets go for more.
-Monograms: These go for less.
-Condition: this is obvious. Things in good condition go for more.

Other tips:

  • be wary of buying tarnished silver as it can hide obvious damage.
  • avoid pieces with a white appearance. It was most likely over cleaned with harsh chemicals.
  • Areas most susceptible to damage are rims and joints with handles, spouts, and feet.
  • When buying a set, look out for “marriages”.  This is when two or more pieces are combined to make a better set.  They can be really hard to catch sometimes, so be careful!
  • Be wary of modified items: sometimes spoons are cut to resemble a sugar spoon, or may have been pierced to look like a sifter.
  • The best way to care for silver is to use it.  Gentle hand wash it. 
  • Remember silver is a good conductor, so placing a silver serving spoon in a bowl of hot soup for a few minutes can make the spoon very hot. You have been warned.
  • Assume that if you are looking at vintage or antique silver and it does not have a sterling mark, it is silver plate.
  • Buy from reputable dealers to avoid forgery and fakes.  For deals, search eBay but be careful who you buy from.  

My #1 tip is: Buy something you love.  If you buy something that was a good bargain but you don’t really love it, you aren’t going to use it. So it’s just going to sit in the drawer.  So you shouldn’t have bought it in the first place.

My Favorite Sterling Silver Patterns!
I have been searching all over the internet trying to find patterns that I really like.  There are a ton of retired patterns that you are still able to purchase through eBay and other antique dealers.  I am sure there are more that will catch my eye, but I’ve narrowed the list down (but the list is still long).

If you missed the first part of my guide about sterling silver flatware (which contains info about what sterling silver is, how to care for it, etc…) click here.

Here we go! (In order of… most simple to most ornate)

“Malmaison” by Christofle. source: Christofle website

“Marly” by Christofle source: Christofle website

This happens to be my stainless pattern, so I wouldn’t want the same in sterling… but I still like it!

Couzon “Consul”  source: bloomingdale’s
“Williamsburg Shell” by Kirk Steiff
“Empire” by Ercuis
“Empire” by Gebrueder Reiner. source: arts table
“Ludwig XVI” by Koch and Bergfeld source: art’s table 
“Strassburger Empire” by Wilkens source: arts table

“Marie Antoinette” by Alvin source: antiquecupboard.com
“Empire” by Buccelati source: antiquecupboard.com
“Moilere Mascaron”by Emile Puiforcat source: puiforcat website
“Elysees by Puiforcat” source: puiforcat website
Audubon by Tiffany
“Royal” by Puiforcat source: puiforcat website
“Mascarons” by Puiforcat sourcE: rubylane.com
“Renaissance” by Tiffany  source: spencermarks.com
“Paris” by Gorham source: replacements ltd.
“Versailles” by Gorham source: rubylane

You may have noticed that I’m a little bit schizophrenic on my patterns.  They are either pretty simple or over-the-top.

Here’s why:  I think there’s a lot of elegance with the more simple patterns, however, if you’re going to eat with sterling silver, which I feel is a bit over-the-top anyway, then maybe you should be eating with an over-the-top fork!

What do you think? What one is your favorite?  Or is your favorite not listed?

I think my favorite is the Tiffany “Renaissance” pattern. A girl can dream!

I’m providing a link to a website that has a really nice overview of many patterns.  Check it out to see a whole bunch of patterns quickly!

Be Sure to check out part 1 of my Sterling Silver Guide!

Note: I am not a silver expert. I am just someone who is writing about silver for a fun hobby. You need to perform your own research before you go about buying silver.

I’ve linked up with:The Scoop! at Confessions of a Plate Addict/Stone Gable, Inspire Me Tuesday at a Stroll Thru Life, Do Tell Tuesday at a Vintage Zest,  You’re Going to Love it Tuesday at Kathe with an E,Wow us Wednesdays! at Savvy Southern Style, What’s it Wednesdays at Ivy & Elephants,  Treasure Hunt Thursday at From My Front Porch To Yours, Feathered Nest Fridays at French Country Cottage, Sunday Best Showcase at Twigg Studios. Be sure to check out all of these fabulous blogging parties! A big thank you to all of the wonderful hosts!

Written  at http://peoniesandorangeblossoms.blogspot.com

Follow:

Kitchen Carts

We use affiliate links in our posts and our site. This means if you make a purchase using these links, we may earn a small commission. You don’t pay a cent more than you would otherwise! Our full disclosure is available under About.

I’m on the hunt for a kitchen cart.  I need it to be able to go from the kitchen to the BBQ outside.  It should have at least two shelves so I can put dishes/silverware on one shelf, then another shelf for food.  It needs to have four wheels.  Two wheels isn’t the easiest thing to maneuver outside.

This is what I’ve found:

gold bar/kitchen cart, Cost Plus, $150

gold bar cart, Ballard Designs, $300
FLYTTA Kitchen cart IKEA Gives you extra storage, utility and work space. Lockable casters for high stability.
Flytta kitchen cart, $179 ikea
Jill Bar Cart
Jill Bar Cart, $349, Ballard Designs

GRUNDTAL Kitchen cart IKEA Gives you extra storage, utility and work space.
Grundtal kitchen cart, $149,  ikea

 wheeled wagon that is collapsible, $94, walmart

Vitale Bar Cart, Macy’s, POPULAR Seller!

Update: We actually ended up getting this cart here for $99.  We’ve had it for a few years and it has been working pretty well for indoor/outdoor function.

the cart we chose, get it here

The only thing that I wish is that the bottom shelf had some little wall around it because as you go over bumpy surfaces outside anything on the bottom shelf can rattle out and fall onto to the ground. 

We chose one with a cutting board so we had a prep area outside.  Which one would YOU choose?

linking up at: amaze me monday Heart and Home Monday The Scoop!  BNOTP Mon Inspire Me Tuesday  Wow us Wednesdays! Lehman Lane Moonlight and Mason Jars Share Your Style Thursday Favorite ThingsThoughts of Home Home Sweet Home Feathered Nest Fridays The DIY collective Craftberry Bush Foodie Friday & Everything Else Shabbylicious Friday Best of the Weekend Share it One More Time Sundays at Home Dishing it and Digging It

Written at http://peoniesandorangeblossoms.blogspot.com

You can also follow me by clicking on these: bloglovin, instagramtumblrtwitterpinterest, and google plus

Follow:

Salted Caramel Macarons

We use affiliate links in our posts and our site. This means if you make a purchase using these links, we may earn a small commission. You don’t pay a cent more than you would otherwise! Our full disclosure is available under About.

Fleur de Sel Macarons (aka Salted Caramel Macarons)

This post may contain affiliate links. See my disclosure policy.

This is part of my Macaron Mondays feature! I hope you’ve been inspired to make some macarons!

For the basic macaron recipe I use the Laduree macaron recipe.

FOR A PRINTABLE RECIPE, CLICK HERE!!
Materials needed:

  • a food scale (yes, you need this. I use this one)
  • a piping tip and piping bag (I like the ateco #806, I use these tips and piping bag
  • Food coloring (the gels or dry powder works best, not the liquid store stuff)
  • A macaron template (either make one or get one here or here. It makes piping easier)
  • food processor (for the cream filling, I use this one)

Laduree Macarons Recipe

275g ground almonds  

250g powdered sugar   

210g egg whites          

210g granulated sugar 

1.  Mix almond meal and the powdered sugar in a food processor. Be careful not to grind too long, otherwise it will form a paste.

2. Sift the almonds and powdered sugar. Set aside.

3. Weigh out granulated sugar.

4. Weigh the egg whites.  Beat them slowly on a low speed until foamy. SLOWLY add the granulated sugar to the egg whites as you beat.  Once all mixed, increase speed to medium and beat until a firm meringue forms.  You want a firm meringue with glossy peaks but not stiff peaks.  They should defy gravity and remain in the bowl if you turn it upside down.  If you tilt your bowl to the side and they are sliding out, keep beating.

5. Add the food coloring gel and mix.

6. Then fold in 1/3rd of the almond/sugar mixture into the meringue with a silicone spatula.  Once combined, add another third of the almond mixture. Add last bit.  This batter requires more deflation during this step since it creates such a poofy meringue.

7. Add the batter to a piping bag.  Pipe in rows using your template onto parchment paper.

8. Pick up the pan and beat until the counter.  The cookies need to rest on the counter between 30-60 minutes.  They are ready to go in the oven when they are dry to touch (the shell shouldn’t stick to your finger)

9.  Set the oven to 300F.

10. Bake the cookies for 13-15 minutes, one sheet at a time. They are done when they look kind of matte and seem firm when you lightly tap on them.  You can always rescue a slightly overcooked one with the maturation process that comes later, but you cannot rescue an undercooked one!!   

11. Remove from paper once completely cool. If they stick to the paper, they aren’t cool yet. Or you undercooked them.

Salted Caramel Filling Recipe
(makes 1.5 cups of caramel)
1 cup of cream
1.5 cups of granulated sugar
2 tsp coarse salt (or 1tsp for a less salty flavor)
1 cup unsalted butter

Instructions:
1. Chop butter into small cubes and set aside.
2. Pour cream into the pan and add the salt. Bring to a low boil while stirring and remove immediately. Do not scald the cream.
3. Place the sugar into a new pan. Cook over medium hit while stirring constantly.
4. Stir until sugar is melted and has caramelized into a rich color. Remove from heat.  Do not burn the sugar.  If your caramel starts to burn, throw it away. You cannot rescue it.
5. Pour and stir the hot cream into the caramel mixture. BE CAREFUL!!! Add the cream VERY SLOWLY.  The caramel will spit and boil up, so stir while incorporating the cream into the caramel.
6. Let the caramel cool to 115 degrees (about 5 minutes later).
7. Whisk in the cubes of butter into the mixture until melted and mixed.
8. Pour caramel into a shatter proof bowl and refrigerate until cold.

To use the caramel:
1. Remove from the fridge.
2. Whisk the caramel mixture to stiffen to more of a butter/cream consistency. Do not over-whisk as the caramel will separate.

Once all assembled, put them in an airtight container and let them mature (yes, that’s the scientific word for this process) in the refrigerator for 24-48 hours.  


Now, these cookies won’t be bad if you eat them immediately, they will just be amazing if you want a day.  The theory is that the juices from the filling soak back into the cookie to make an AMAZING cookie. 

YUM!

 This caramel tastes good on other things too, not just macarons!

For my favorite product recommendations for making such delicate cookies, check out my amazon store

I’ve linked up with:The Scoop! at Confessions of a Plate Addict/Stone Gable, Metamorphosis Monday’s at Between Naps on the Porch, Inspire Me Tuesday at a Stroll Thru Life, Do Tell Tuesday at a Vintage Zest,  You’re Going to Love it Tuesday at Kathe with an E, Cottage Style Party at Lavender Garden Cottage  Wow us Wednesdays! at Savvy Southern Style, What’s it Wednesdays at Ivy & Elephants, Centerpiece Wednesdays at The Style Sisters Tablescape Thursday at Between Naps on the Porch, Oh the places I have been at the Tablescaper, Treasure Hunt Thursday at From My Front Porch To Yours, Feathered Nest Fridays at French Country Cottage, Seasonal Sundays at the Tablescaper, Sunday Best Showcase at Twigg Studios. Be sure to check out all of these fabulous blogging parties! A big thank you to all of the wonderful hosts!

Written at http://peoniesandorangeblossoms.blogspot.com

Follow:

Sterling Silver Flatware guide… Part 1

We use affiliate links in our posts and our site. This means if you make a purchase using these links, we may earn a small commission. You don’t pay a cent more than you would otherwise! Our full disclosure is available under About.

As a collector of antiques, I have long been interested in sterling silver.  However, I know NOTHING about it.  I always eye the beautiful cases of sterling flatware, but don’t know where to begin nor do I even know what pattern I like!

Sterling Silver Flatware Guide

First things first, what is “sterling silver”?
In the United States, it only applies to an item which contains a minimum of 925 parts of silver out of 1000 parts.  The remaining 75 parts are an alloy of nickel, copper, or other metals.   Therefore, you get the mark of 0.925.  (Silver is too soft to be at 100% and therefore must have some other metal added to it).   No silver less than 0.925 can be labeled sterling, solid silver, sterling silver, silver or ster. If you are buying it from someone and they label it as Sterling and is in fact NOT, they are subject to federal fines from the National Gold and Silver Stamping Act.

The word “Sterling” first appears on American silver circa 1800.  Most silver items made through 1860 were actually 0.900 silver.  Silver flatware made before 1968 in the US will vary with the amount of silver included.  Sets made after 1968 will have the word “sterling”, “925-1000” or “.925” on it.

Note: all of these standards are referring to US made sterling.  Different countries have different standards.

What is silver plate?
It contains alloys and is NOT sterling silver.  I like to think of it as a microscopic level of silver over regular old stainless steel flatware pretending to be sterling.  Don’t buy this, I say go big or go home.

Settings and Pieces
Most are available in 5 piece settings.
5 piece: Salad fork, soup spoon, dinner fork, dinner knife, teaspoon.

What are the standard serving pieces?
A table serving spoon, pierced table spoon, cold meat fork, sugar spoon, master butter knife, and pie server.

There are MANY other types of serving pieces available.  For example, I own an asparagus server! haha!

How many place settings should I buy?
Buy at LEAST 8 full settings.  However, most purchase more.

Should I get my set monogrammed?
NO.  It will reduce the value of your sterling by 25-35%. No joke. This is also on the flipside, if you are buying vintage or antique sterling silver, if it has monogramming on it, it should be 25-35% cheaper than a pattern without a monogram.

Sterling flatware care:
You may put it in the dishwasher BUT handwashing is preferred.  Do not wash with stainless pieces as a reaction can occur and leave little black dots on it.
***Be careful if you do choose to use the dishwasher.  Most sterling silver knife handles are actually hollow and filled with plaster.  Putting the knives into the dishwasher can cause the plaster to melt and permanently damage the knife.  When you hand wash your knives, do not submerge them completely. Wash each individually under running water.  If you submerge them completely in water, the water can seep into the hollow part of the knife and also cause permanent damage to the knife.  We don’t want that!

To keep the silver shiny, you will need to polish it.  Store in protective felt cases. Keep away from direct light, as it will cause the silver to tarnish.  Do not store on wood directly as the wood contains acids that can ruin the silver.

How much is silver worth?
Silver is sold in troy ounces (31.10grams).  The ounce we think of is actually “ounce avoirduopois” (29.35grams).  If you are weighing silver at home, you will be weighing it in “ounce avoirdupois” and will need to convert it.  US prices in 2014 have been around $19.8 per troy ounce.

OK, I’m ready, I want to buy some sterling silver! What pattern?!
Well, I’ve included pictures of the top 10-20 patterns sold in the United States.  I have seen quite a few of these at estate sales and antique shows, but had no idea what the names were!

“Strasbourg” 
“Rose Point”
“Repouse”
“Fairfax”
“Francis I” 
“Grande Baroque”
“Old Master”
“Prelude”
“Buttercup”
“Chantilly” by Gorham

Here is also another website’s pictures of their top selling sterling silver patterns:

Alright!  Stay tuned as next week as I’ll be sharing my favorite sterling silver patterns with you all!

Sources
1. Sterling Silver what it is and is not. 
2. Sterling Silver info
3. Awesome sterling silver website
4. Best Flatware patterns (source of all of the pictures except the bottom one)
5. The Silverqueen

Note: I am not a silver expert. I am just someone who is writing about silver for fun. You need to perform your own research before you go about buying silver.

I’ve linked up with:The Scoop! at Confessions of a Plate Addict/Stone Gable, Metamorphosis Monday’s at Between Naps on the Porch, Inspire Me Tuesday at a Stroll Thru Life, Do Tell Tuesday at a Vintage Zest,  You’re Going to Love it Tuesday at Kathe with an E, Cottage Style Party at Lavender Garden Cottage  Wow us Wednesdays! at Savvy Southern Style, What’s it Wednesdays at Ivy & Elephants, Centerpiece Wednesdays at The Style Sisters Tablescape Thursday at Between Naps on the Porch, Oh the places I have been at the Tablescaper, Treasure Hunt Thursday at From My Front Porch To Yours, Feathered Nest Fridays at French Country Cottage, Seasonal Sundays at the Tablescaper, Sunday Best Showcase at Twigg Studios. Be sure to check out all of these fabulous blogging parties! A big thank you to all of the wonderful hosts!

Written at http://peoniesandorangeblossoms.blogspot.com

Follow:

Marionberry Macarons Recipe

We use affiliate links in our posts and our site. This means if you make a purchase using these links, we may earn a small commission. You don’t pay a cent more than you would otherwise! Our full disclosure is available under About.
Marionberry Macarons
This post may contain affiliate links. See my disclosure policy.


For how to make the macaron cookie shells,  I use the Laduree recipe.

Materials needed:

  • a food scale (yes, you need this. I use this one)
  • a piping tip and piping bag (I like the ateco #806, I use these tips and piping bag
  • Food coloring (the gels or dry powder works best, not the liquid store stuff)
  • A macaron template (either make one or get one here or here. It makes piping easier)
  • food processor (for the cream filling, I use this one)

Laduree Macarons Recipe GET THE PRINTABLE RECIPE HERE

275g ground almonds  

250g powdered sugar   

210g egg whites          

210g granulated sugar 

1.  Mix almond meal and the powdered sugar in a food processor. Be careful not to grind too long, otherwise it will form a paste.

2. Sift the almonds and powdered sugar. Set aside.

3. Weigh out granulated sugar.

4. Weigh the egg whites.  Beat them slowly on a low speed until foamy. SLOWLY add the granulated sugar to the egg whites as you beat.  Once all mixed, increase speed to medium and beat until a firm meringue forms.  You want a firm meringue with glossy peaks but not stiff peaks.  They should defy gravity and remain in the bowl if you turn it upside down.  If you tilt your bowl to the side and they are sliding out, keep beating.

5. Add the food coloring gel and mix.

6. Then fold in 1/3rd of the almond/sugar mixture into the meringue with a silicone spatula.  Once combined, add another third of the almond mixture. Add last bit.  This batter requires more deflation during this step since it creates such a poofy meringue.

7. Add the batter to a piping bag.  Pipe in rows using your template onto parchment paper.

8. Pick up the pan and beat until the counter.  The cookies need to rest on the counter between 30-60 minutes.  They are ready to go in the oven when they are dry to touch (the shell shouldn’t stick to your finger)

9.  Set the oven to 300F.

10. Bake the cookies for 13-15 minutes, one sheet at a time. They are done when they look kind of matte and seem firm when you lightly tap on them.  You can always rescue a slightly overcooked one with the maturation process that comes later, but you cannot rescue an undercooked one!!   

11. Remove from paper once completely cool. If they stick to the paper, they aren’t cool yet. Or you undercooked them.

Filling – for Marionberry Macarons

For these macarons, the easiest way for the filling is to buy seedless marionberry jam.  I used Harry & David seedless marionberry Jam. 

 Once the cookies are cool, add a dollop of your filling to one cookie and spread with a small knife, spoon, or icing spatula. 

Place the other cookie to your filling, press gently, and slightly twist the two together.

Once all assembled, put them in an airtight container and let them mature (yes, that’s the scientific word for this process) in the refrigerator for 24-48 hours.  

Now, these cookies won’t be bad if you eat them immediately, they will just be amazing if you want a day.  The theory is that the juices from the filling soak back into the cookie to make an AMAZING cookie. 


What is a Marionberry, you ask?

I realized that some people may not have had a marionberry.  The Marionberry is a type of blackberry, first bred by Oregon State University.  It was first grown in Marion County, Oregon (hence its name).  It is a little bit sweeter than the typical blackberry.  So in other words, it’s good.  Growing up in the Northwest, we would eat all kinds of berries.  They are seriously weeds up there. 


Marionberry macarons

Marionberry Macarons

Check back next week as I continue Macaron Mondays!


For my favorite product recommendations for making such delicate cookies, check out my amazon store

I’ve linked up with:
The Scoop! at Confessions of a Plate Addict/Stone Gable, Metamorphosis Monday’s at Between Naps on the Porch, Inspire Me Tuesday at a Stroll Thru Life, Do Tell Tuesday at a Vintage Zest,  You’re Going to Love it Tuesday at Kathe with an E, Cottage Style Party at Lavender Garden Cottage  Wow us Wednesdays! at Savvy Southern Style, What’s it Wednesdays at Ivy & Elephants, Centerpiece Wednesdays at The Style Sisters Tablescape Thursday at Between Naps on the Porch, Oh the places I have been at the Tablescaper, Treasure Hunt Thursday at From My Front Porch To Yours, Feathered Nest Fridays at French Country Cottage, Seasonal Sundays at the Tablescaper, Sunday Best Showcase at Twigg Studios. Be sure to check out all of these fabulous blogging parties! A big thank you to all of the wonderful hosts!


Written by Orange Blossom at http://peoniesandorangeblossoms.blogspot.com
This post my contain affiliate links.

Follow:

Wonderful White Kitchens

We use affiliate links in our posts and our site. This means if you make a purchase using these links, we may earn a small commission. You don’t pay a cent more than you would otherwise! Our full disclosure is available under About.

I’ve been dreaming of my ultimate kitchen.  Some day within the next 5 years, I will be building my dream kitchen!

For a dream kitchen, you have to start thinking early!

One of my favorite looks: white cabinets with a light counter top.  Sounds easy to pick out, right? I couldn’t have been more wrong.

So many questions…
what color of white? (husband says… there’s more than one color of white?)
do you want cabinets with this door or that?
do you like these door handles or those?
do you want the island to match?
do you want the appliances to be white?
What type of sink do you want?
and the list goes on…

Here is a collection of white kitchens that I like. Ready?  Better sit down, there are lots of pictures!

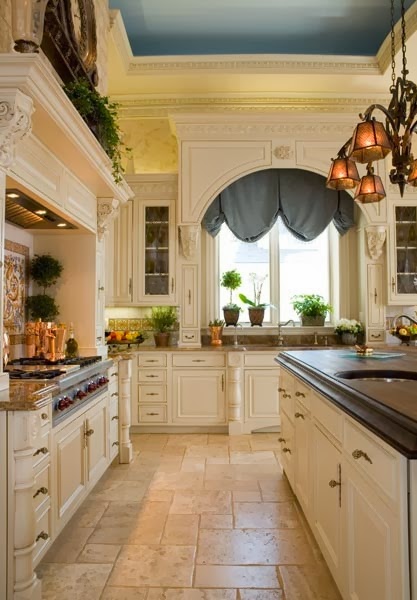
Now, below, I like these cabinets, the hardware, the marble top.  And of course, who doesn’t love a la cornue stove? It’s a dream, right?!

La Cornue dream White kitchen

This one the fridge matches the cabinets.  I also like the hood over the range as it has a mantel that I could decorate!  Like the countertops!
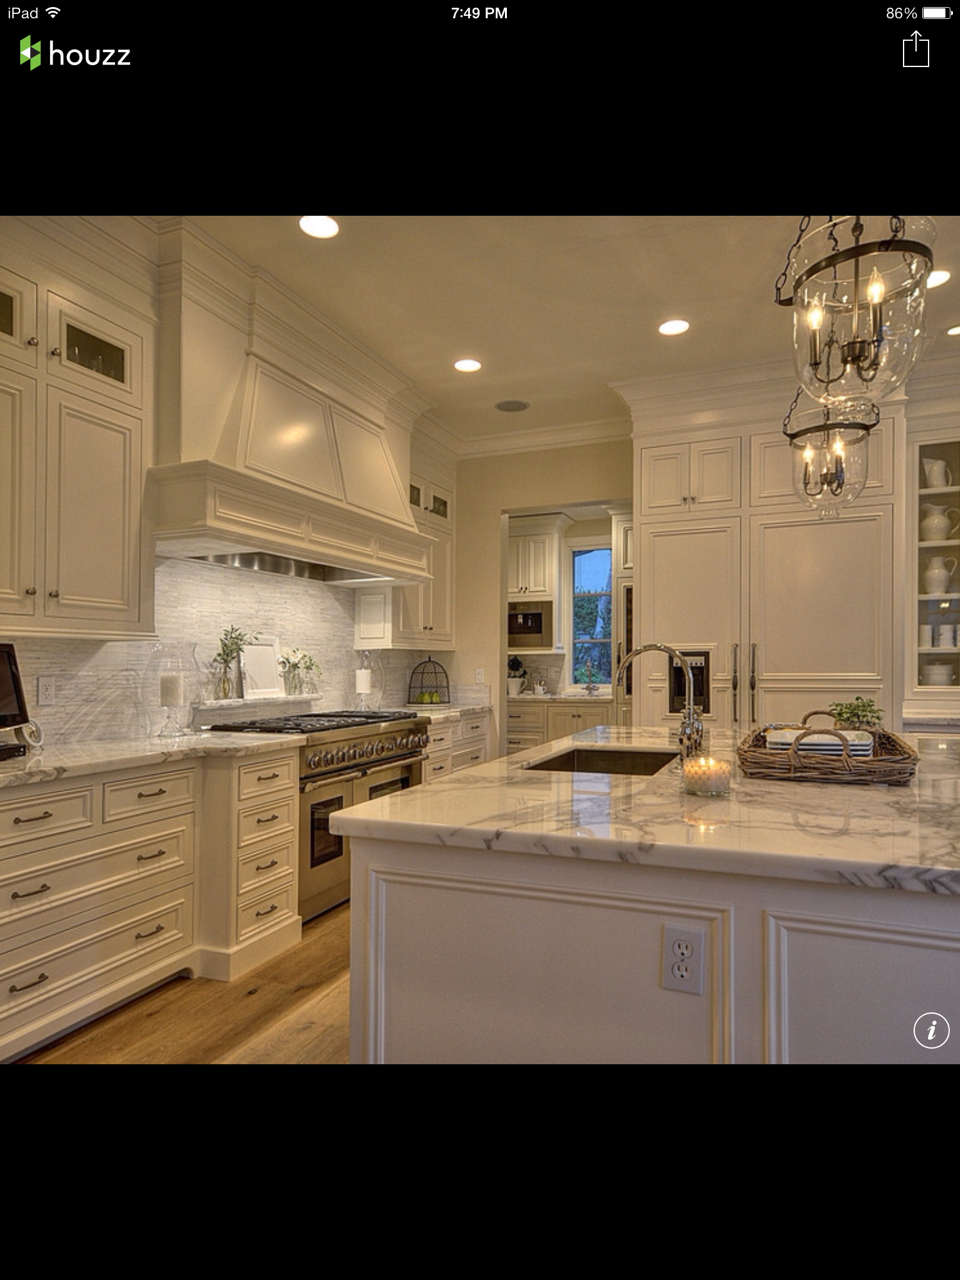
dream white kitchen

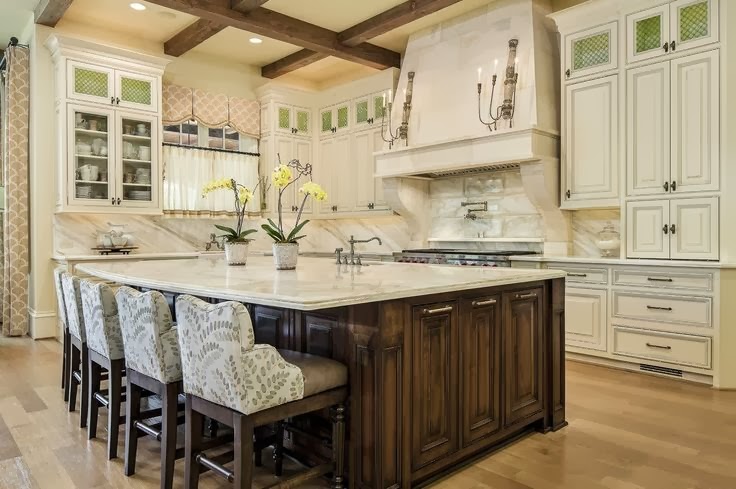
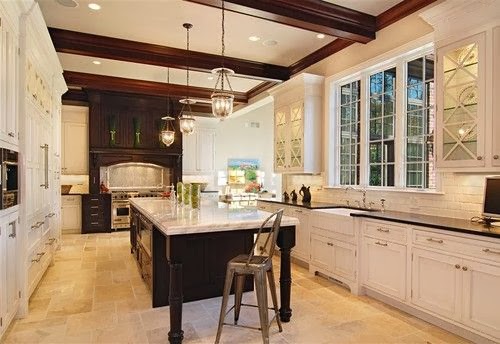
I like in this kitchen below is the fact that the bar is low enough to sit normal chairs. I also like the area over the range, but I think some space is lost for storage.

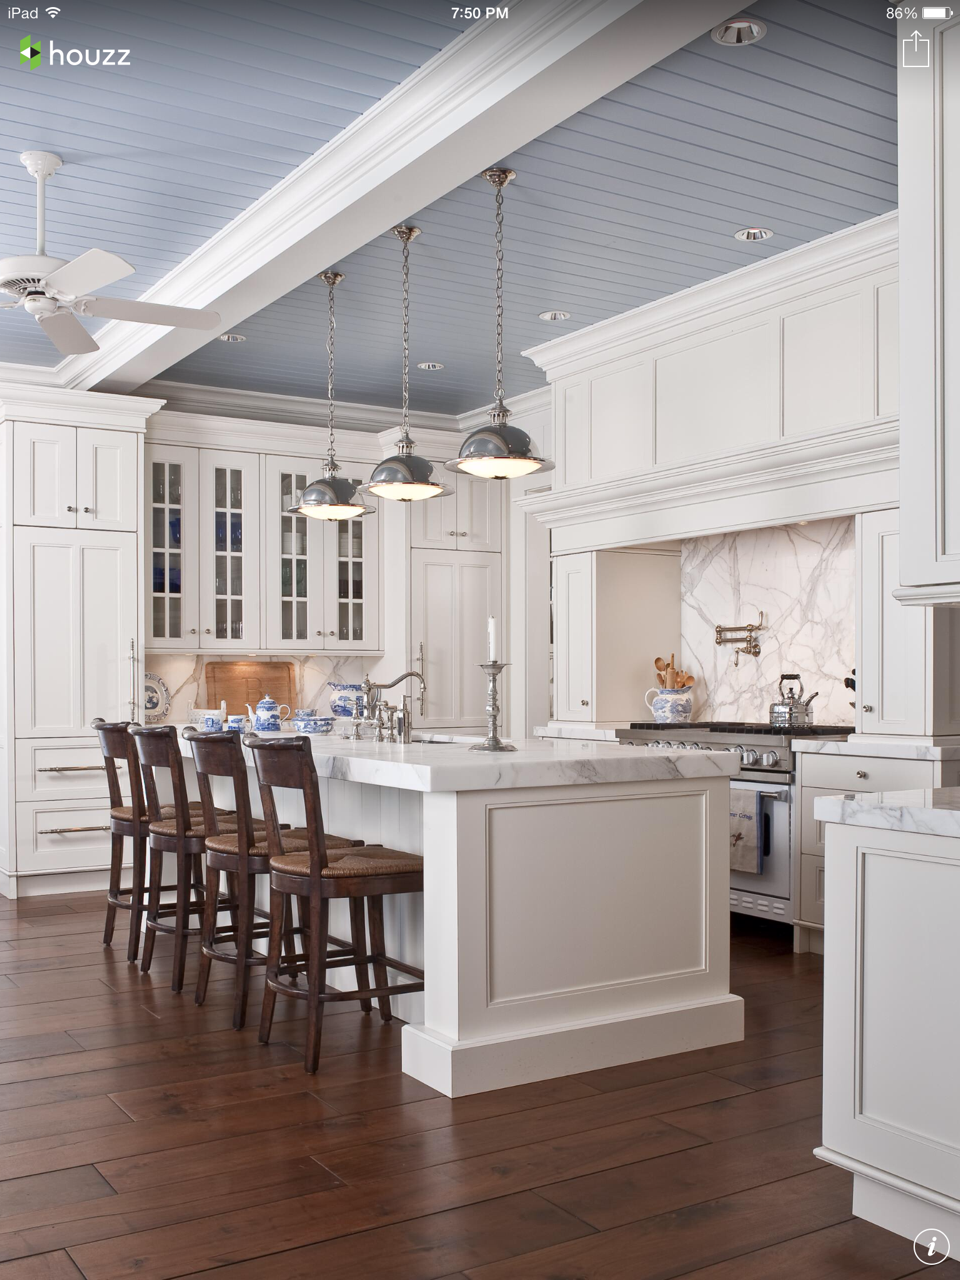
country white kitchen

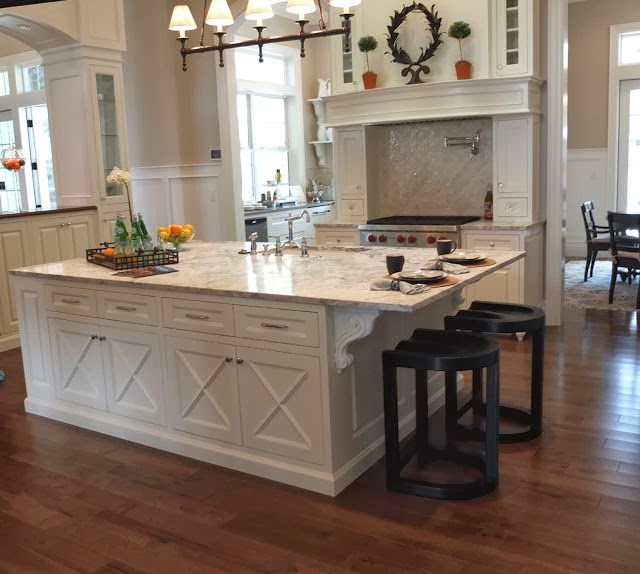
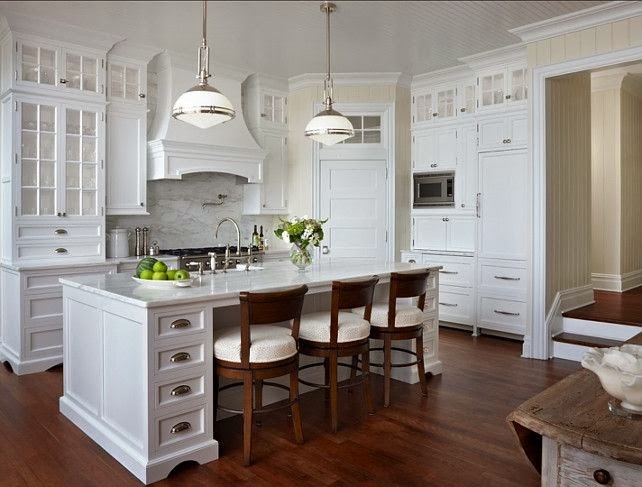
I like that the bar has a little sitting area that is table height.

white kitchen with a lower island in the middle for seating

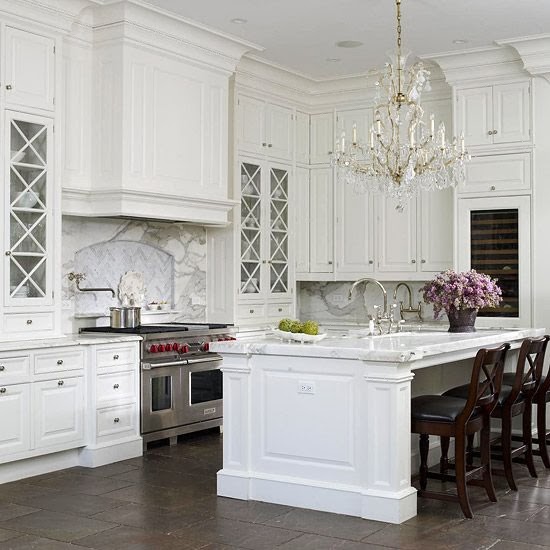
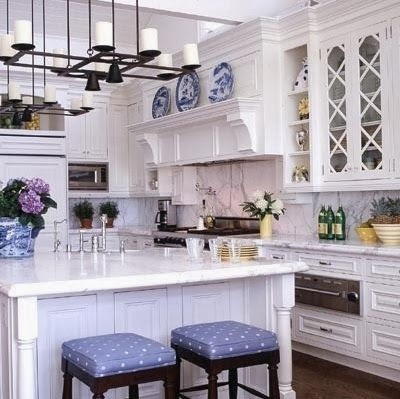
Love this whole corner in this white kitchen. The chandelier is pretty too!

corner bar
love this corner bar in a white kitchen from decor pad

I like the backsplash in this kitchen below, the island. The chandelier is nice, but maybe a little too foofy for me.  The see through glass doors look pretty, but I think I would want frosted glass so I can hide my junk!

dream white kitchen

This kitchen looks really French. I love it.

French white kitchen

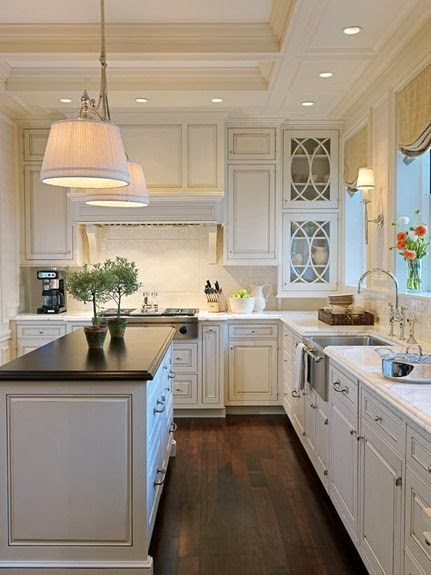
Below is one of my favorite kitchens. I love the area above the range. The only thing is I would change the island around and put the chairs on the long end instead of the short.  I also like the dark floors with it.

Love this white kitchen with the island from http://antiquestyle.blogspot.com

These cabinets aren’t super clean white, they are more of an aged white.  Now I’m getting confused on what white I like!

Ok, this kitchen checks all of the boxes. mantle thing above the range, light colored hardware, white cabinets with white countertops.

 I like the shades on this lamp below, makes the kitchen seem very soft!

classic white kitchen

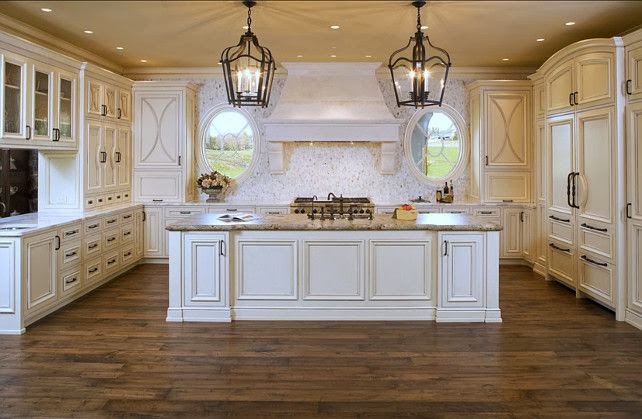
Earlier I though the chandeliers were too much, but I like these little ones!  Don’t care for the back splash though.  The floor is also weird in the one below.

pretty white kitchen

I like how the edge of the marble is on the island in this one.  The light green color is interesting to make as a color for the island.

pretty white kitchen

Isn’t this one below pretty?

pretty French white kitchen

I like the tile floor in this kitchen below,

French White kitchen

Wood on the island below is interesting. You could use the whole thing as a cutting board if you’d like!

classic white kitchen with wood counter

Again, I like the tile floors as below…

White kitchen

 I’m running out of things to say about pretty kitchens…

white kitchen with Viking Range

The range below has white doors and knobs… interesting. Don’t know how I feel about it.

Country White kitchen

 Don’t like the range hood, but other than that… mostly white appliances. Silver or white? That’s the question!

white kitchen with white appliances

I think this green granite looks quite pretty with the white.

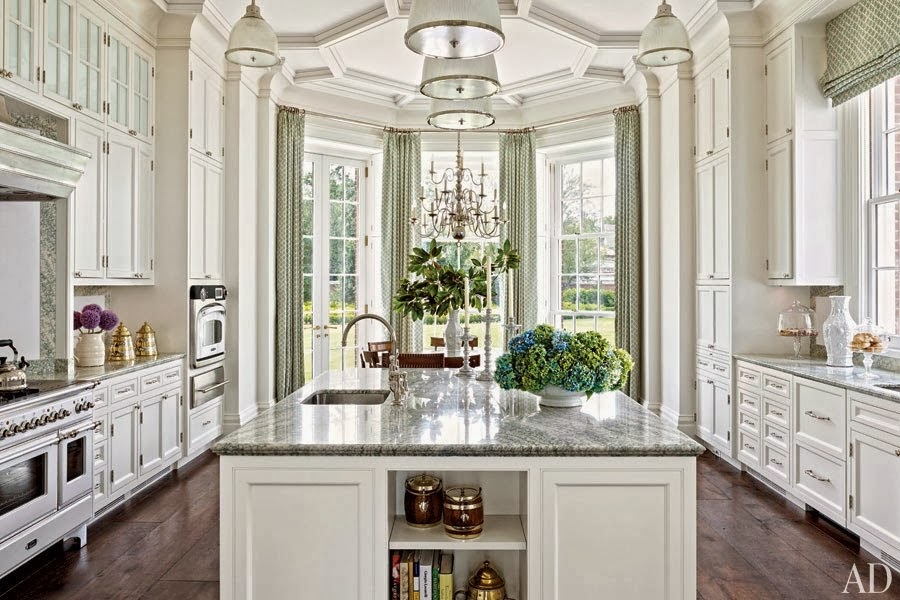
white kitchen with green granite

Then I found the kitchen below.  Hmm… maybe I like colored cabinets… uh oh.

Tom Brady’s kitchen from AD. 

To see more white kitchens,

Follow my white kitchens board on pinterest!
Also, Follow my French kitchen’s Board on pinterest!

Picture sources: pinterest, houzz.

I’ve linked up with:
The Scoop! at Confessions of a Plate Addict/Stone Gable, Metamorphosis Monday’s at Between Naps on the Porch, Inspire Me Tuesday at a Stroll Thru Life, Do Tell Tuesday at a Vintage Zest,  You’re Going to Love it Tuesday at Kathe with an E, Cottage Style Party at Lavender Garden Cottage  Wow us Wednesdays! at Savvy Southern Style, What’s it Wednesdays at Ivy & Elephants, Centerpiece Wednesdays at The Style Sisters Tablescape Thursday at Between Naps on the Porch, Oh the places I have been at the Tablescaper, Treasure Hunt Thursday at From My Front Porch To Yours, Feathered Nest Fridays at French Country Cottage, Seasonal Sundays at the Tablescaper, Sunday Best Showcase at Twigg Studios. Be sure to check out all of these fabulous blogging parties! A big thank you to all of the wonderful hosts!

Written by Orange Blossom at http://peoniesandorangeblossoms.blogspot.com

Follow:

Raspberry Macarons with recipes!

We use affiliate links in our posts and our site. This means if you make a purchase using these links, we may earn a small commission. You don’t pay a cent more than you would otherwise! Our full disclosure is available under About.

Raspberry Macarons like Laduree

The recipe I used to make macarons (mah-ka-rohn) is from Laduree.  It’s from this fabulous book: Laduree: The Sweet Recipes.  Let’s get started.

Raspberry Macarons like Laduree

Materials needed:

  • a food scale (yes, you need this. I use this one)
  • a piping tip and piping bag (I like the ateco #806, I use these tips and piping bag)
  • Food coloring (the gels or dry powder works best, not the liquid store stuff)
  • A macaron template (either make one or get one here or here. It makes piping easier)
  • food processor (for the cream filling, I use this one)


Laduree Macarons Recipe – printable recipe HERE

275g ground almonds

250g powdered sugar

210g egg whites

210g granulated sugar


1.  Mix almond meal and the powdered sugar in a food processor. Be careful not to grind too long, otherwise it will form a paste.

2. Sift the almonds and powdered sugar. Set aside.

3. Weigh out granulated sugar.

4. Weigh the egg whites.  Beat them slowly on a low speed until foamy. SLOWLY add the granulated sugar to the egg whites as you beat.  Once all mixed, increase speed to medium and beat until a firm meringue forms.  You want a firm meringue with glossy peaks but not stiff peaks.  They should defy gravity and remain in the bowl if you turn it upside down.  If you tilt your bowl to the side and they are sliding out, keep beating.

5. Add the food coloring gel and mix.

6. Then fold in 1/3rd of the almond/sugar mixture into the meringue with a silicone spatula.  Once combined, add another third of the almond mixture. Add last bit.  This batter requires more deflation during this step since it creates such a poofy meringue.

7. Add the batter to a piping bag.  Pipe in rows using your template onto parchment paper.

8. Pick up the pan and beat until the counter.  The cookies need to rest on the counter between 30-60 minutes.  They are ready to go in the oven when they are dry to touch (the shell shouldn’t stick to your finger)

9.  Set the oven to 300F.

10. Bake the cookies for 13-15 minutes, one sheet at a time. They are done when they look kind of matte and seem firm when you lightly tap on them.  You can always rescue a slightly overcooked one with the maturation process that comes later, but you cannot rescue an undercooked one!!

11. Remove from paper once completely cool. If they stick to the paper, they aren’t cool yet. Or you undercooked them.

Filling – for Raspberry Macarons

1. For these macarons, the easiest way for the filling is to buy seedless raspberry jam.  I used Harry & David seedless Raspberry Jam.


2. Once the cookies are cool, add a dollop of your filling to one cookie and spread with a small knife, spoon, or icing spatula.


3. Place the other cookie to your filling, press gently, and slightly twist the two together.


4. Once all assembled, put them in an airtight container and let them mature (yes, that’s the scientific word for this process) in the refrigerator for 24-48 hours.


Now, these cookies won’t be bad if you eat them immediately, they will just be amazing if you want a day.  The theory is that the juices from the filling soak back into the cookie to make an AMAZING cookie.

Raspberry Macarons like Laduree

Making the meringue

Finished meringue


My macaron template
adding almond flour to the meringue
macaronnage
we actually didn’t fold these enough.

Aren’t they pretty??

Raspberry Macarons like Laduree


Raspberry Macarons like Laduree

I just want to show you that I haven’t always been the best at making macarons!  Below you can see the first time I ever made macarons… they were poofy and not perfectly flat with little feet.  That’s okay… with practice I became better.  But guess what? The ones below still tasted the same as the ones above! So, if you don’t get it on your first shot, don’t worry!


For my favorite product recommendations for making such delicate cookies, check out my amazon store


SaveSave

Follow:

European Flower Window Boxes!

We use affiliate links in our posts and our site. This means if you make a purchase using these links, we may earn a small commission. You don’t pay a cent more than you would otherwise! Our full disclosure is available under About.

European Flower Window Boxes

If you’ve ever been to Germany, Switzerland, or Austria you will have noticed something… many of the houses and buildings have window boxes full of beautiful flowers.  Other European countries have mastered the window box, but not quite like those living in the Alpine region!

They are also called balcony flowers, as seen below on the balconies:

European Flower Window Boxes - Peonies and Orange Blossoms
in Tirol, Austria

Aren’t they beautiful?  I took all of these pictures on my trip to Germany, Switzerland, and Austria in 2013.

World's Largest Cuckoo clock
the world’s largest cuckoo clock!

The flowers in the boxes are typically geraniums and ivy.

There are several types of “balcony geraniums”.  The ones below are part of the “minicascade” type of geraniums.  They trail about 2 feet and bloom like crazy.

Balcony Geraniums in European Window Boxes - Peonies and Orange Blossoms
in Austria

The ones featured below appear to be part of the “midcascade” type.  They are a little bit fluffier than the ones above!

Balcony Geraniums in European Window Boxes - Peonies and Orange Blossoms
in Strasbourg, France

The ones below are part of the Balcon series.  They are large, up to 4 feet!  As you can see, they create huge masses of color!

Balcony Geraniums in European Window Boxes - Peonies and Orange Blossoms
isn’t this house super cute? It is in Bavaria.

I love how every little window gets a planter box!  It takes a house from drab to fab!

Balcony Geraniums in European Window Boxes - Peonies and Orange Blossoms
Bavaria

Red is the favorite color, but sometimes people plant other colors.  Pink is below!

Balcony Geraniums in European Window Boxes - Peonies and Orange Blossoms
in Triberg, Germany

The great part about these balcony geraniums is that they survive the heat of Summer when others can’t.

Balcony Geraniums in European Window Boxes - Peonies and Orange Blossoms
in Austria

I wish more houses in America would have planter boxes in front of every window!

Balcony Geraniums in European Window Boxes - Peonies and Orange Blossoms
in Germany
Balcony Geraniums in European Window Boxes - Peonies and Orange Blossoms
in Germany

I love the double layer of flowers on this building below


Balcony Geraniums in European Window Boxes - Peonies and Orange Blossoms

The hotel we stayed at in Austria even had balcony flowers for every room!  I still can’t believe I visited this place!

Balcony Geraniums in European Window Boxes at the Internalpen Hotel in Austria- Peonies and Orange Blossoms
Interalpen Hotel, Austria

I found this pretty house on houzz, which is a modern interpretation of French Provencal style.  I love that it incorporates everything that I love… French style, German window boxes, European working shutters, AND it is single story!

You can’t find these special geraniums at every nursery.  You have to do a special search for them.  Look for “balcon geraniums”, “cascade geraniums”, or “alpine geraniums”

European Flower Boxes

SaveSave

SaveSave

Follow:

From the Shop

I may earn a small commission if you purchase with these links

Caning Natural Tote Handbag - Universal Thread™
The Hustler High Waist Fray Hem Ankle Bootcut Jeans
Le Panier Pliage Raffia Crossbody Bag
Extra Large Le Pliage Panier Tresse Straw Tote
The Bennet Buttondown Shirt by Maeve
T Monogram Perforated Leather Bucket Bag
Mellow Stud Mule
Le Pliage Marinière Recycled Nylon Canvas Travel Bag
Unseen Sunscreen Broad Spectrum SPF 40 PA+++
Maxine Stripe Cotton Button-Up Shirt
Citizens of Humanity Charlotte High Rise Straight Jeans
Navy Equestrian Traversee M Linen Tote
Cream Carrie Blouse
Ellison Natural
Jolene High Rise Vintage Slim
Citizens of Humanity Blue Jolene Jeans
Charlotte High Rise Straight Jeans
Le Pliage Filet Top Handle Bag
Vintage cotton crewneck T-shirt
Air Heart Sunglasses
Le Pliage Torchon XS Top Handle Bag With Strap
Santorini Raffia Basket Bag
Chuck Taylor® All Star® Lift High Top Platform Sneaker
Please note that I use ShopSense, LIKETOKNOW.it, Shareasale and Amazon affiliate links on this site. This means using them for purchases won’t cost you extra but may earn me a small commission.  Our full disclosure is available for viewing under About in the disclosure policy.
All rights reserved. Our graphics, images and text are all subject to copyright protection.