Lemon Macarons Recipe!

We use affiliate links in our posts and our site. This means if you make a purchase using these links, we may earn a small commission. You don’t pay a cent more than you would otherwise! Our full disclosure is available under About.

Although I think “macaron citron” has a better ring to it!
This post may contain affiliate links. See my disclosure policy.
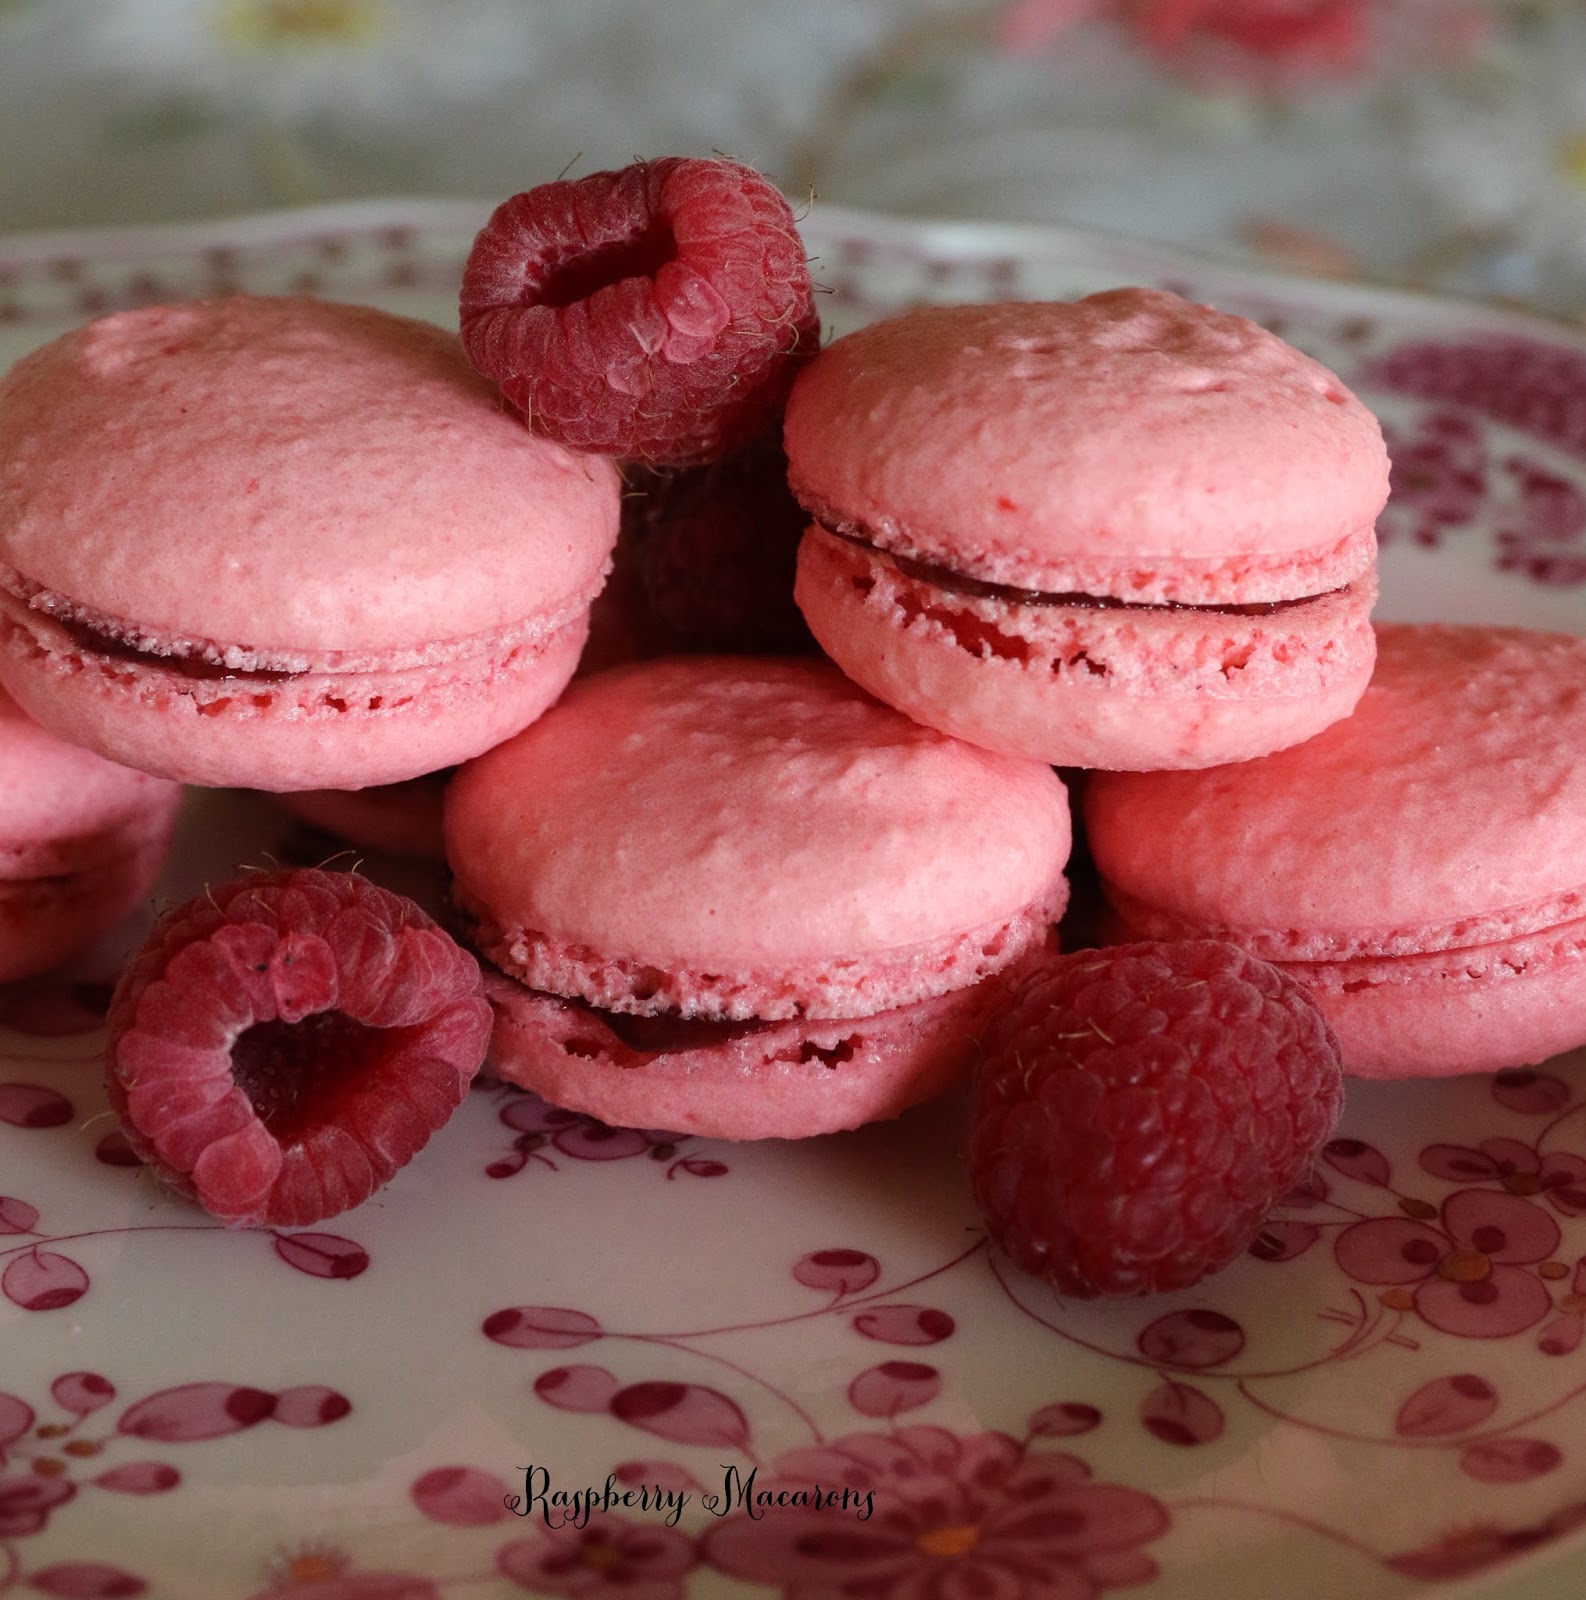
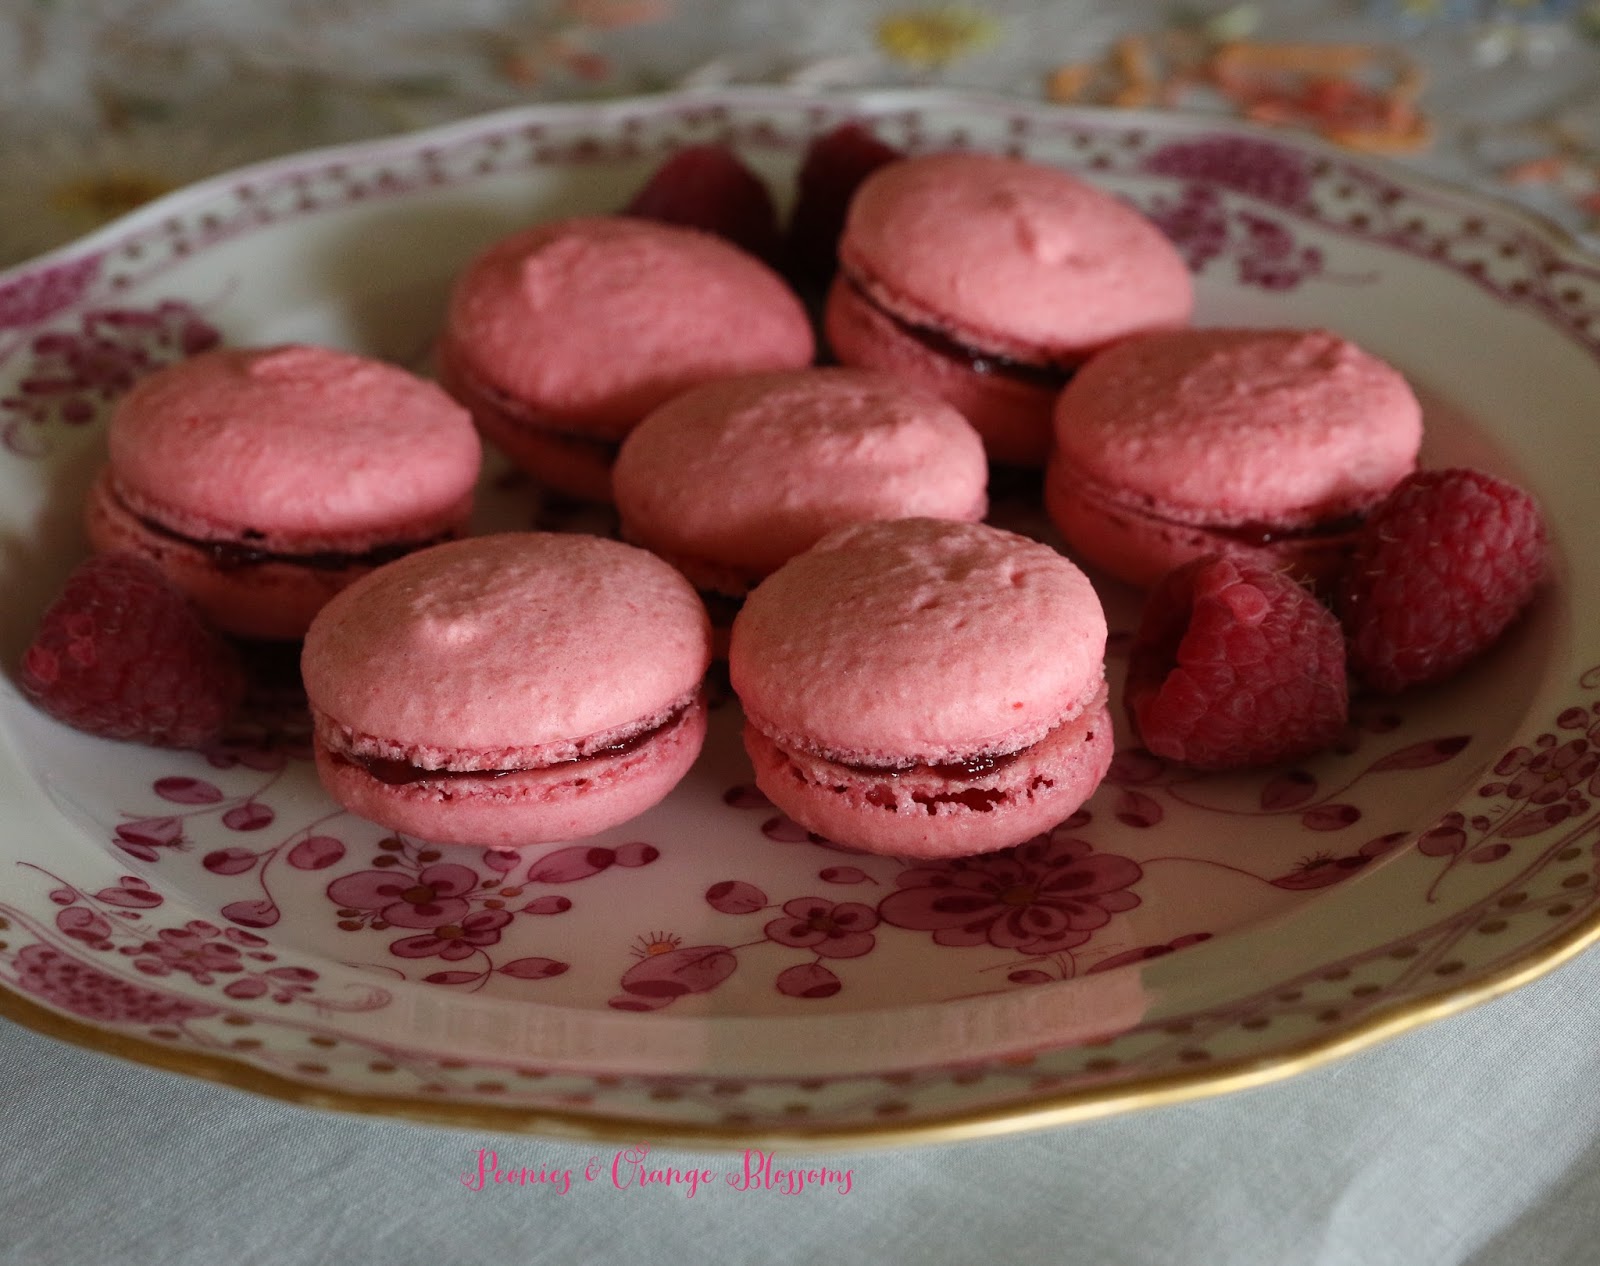
Today I’m sharing with you the recipe for lemon macarons! They are GOOD.

Ok. First we start with the basic macaron recipe I use Laduree’s recipe.

Materials needed:

  • a food scale (yes, you need this. I use this one)
  • a piping tip and piping bag (I like the ateco #806, I use these tips and piping bag
  • Food coloring (the gels or dry powder works best, not the liquid store stuff)
  • A macaron template (either make one or get one here or here. It makes piping easier)
  • food processor (for the cream filling, I use this one)

Laduree Macarons Recipe

275g ground almonds  

250g powdered sugar   

210g egg whites          

210g granulated sugar 

1.  Mix almond meal and the powdered sugar in a food processor. Be careful not to grind too long, otherwise it will form a paste.

2. Sift the almonds and powdered sugar. Set aside.

3. Weigh out granulated sugar.

4. Weigh the egg whites.  Beat them slowly on a low speed until foamy. SLOWLY add the granulated sugar to the egg whites as you beat.  Once all mixed, increase speed to medium and beat until a firm meringue forms.  You want a firm meringue with glossy peaks but not stiff peaks.  They should defy gravity and remain in the bowl if you turn it upside down.  If you tilt your bowl to the side and they are sliding out, keep beating.

5. Add the food coloring gel and mix.

6. Then fold in 1/3rd of the almond/sugar mixture into the meringue with a silicone spatula.  Once combined, add another third of the almond mixture. Add last bit.  This batter requires more deflation during this step since it creates such a poofy meringue.

7. Add the batter to a piping bag.  Pipe in rows using your template onto parchment paper.

8. Pick up the pan and beat until the counter.  The cookies need to rest on the counter between 30-60 minutes.  They are ready to go in the oven when they are dry to touch (the shell shouldn’t stick to your finger)

9.  Set the oven to 300F.

10. Bake the cookies for 13-15 minutes, one sheet at a time. They are done when they look kind of matte and seem firm when you lightly tap on them.  You can always rescue a slightly overcooked one with the maturation process that comes later, but you cannot rescue an undercooked one!!   

11. Remove from paper once completely cool. If they stick to the paper, they aren’t cool yet. Or you undercooked them.

For the lemon cream filling (also Laduree’s recipe, from the Sucre Book):

Ingredients for the Lemon Filling

  • 160g granulated sugar
  • zest of 1 lemon, grated (approx. 5 grams)
  • 5g cornstarch (cornflour)
  • 3 eggs
  • 110mL lemon juice (use fresh lemon juice)
  • 235g butter, softened

Directions


1. Prepare the lemon cream one day in advance.

2. In a bowl, mix together the sugar and lemon zest. Then add the cornstarch.

3. Add the eggs one at a time and then the lemon juice.

4. Pour this mixture into a saucepan and cook over low heat, stirring with a spatula until it simmers, allowing the cream to thicken.

5. Remove from heat.

6. Allow the cream to cool slightly for approx. 10 minutes so that is hot but not scalding (approx. 140 degrees Fahrenheit).

7. Add the softened butter.

8. In a blender or food processor, blend the butter and cream together until mixed.

9. Keep in airtight container for minimum of 12 hours so that the cream may become firm.

10. Add to the macarons. Let macarons sit in the fridge for at least 1 day until serving. It will taste better this way, I promise!!

the lemon cream filling

piped lemon shells

The finished product:

For my favorite product recommendations for making such delicate cookies, check out my amazon store

I’ve linked up with:The Scoop! at Confessions of a Plate Addict/Stone Gable, Metamorphosis Monday’s at Between Naps on the Porch, Inspire Me Tuesday at a Stroll Thru Life, Do Tell Tuesday at a Vintage Zest,  You’re Going to Love it Tuesday at Kathe with an E, Cottage Style Party at Lavender Garden Cottage  Wow us Wednesdays! at Savvy Southern Style, What’s it Wednesdays at Ivy & Elephants, Centerpiece Wednesdays at The Style Sisters Tablescape Thursday at Between Naps on the Porch, Oh the places I have been at the Tablescaper, Treasure Hunt Thursday at From My Front Porch To Yours, Feathered Nest Fridays at French Country Cottage, Seasonal Sundays at the Tablescaper, Sunday Best Showcase at Twigg Studios. And Tickle my Tastebuds Tuesdays Be sure to check out all of these fabulous blogging parties! A big thank you to all of the wonderful hosts!

Written by  http://peoniesandorangeblossoms.blogspot.com
this post may contain affiliate links

Follow:

Last Minute Memorial Day Dessert

We use affiliate links in our posts and our site. This means if you make a purchase using these links, we may earn a small commission. You don’t pay a cent more than you would otherwise! Our full disclosure is available under About.

Need a dessert to bring to a BBQ?  I’ve got you covered. It’s super easy, fast, and looks great!

Ingredients:

  • Red fruit. I used strawberries, but raspberries, cherries, or watermelon are a perfect alternative.
  • Something white: golden raspberries, pineapple, whipped cream, marshmallows, or white covered pretzels or raisins.
  • Blue fruit: blueberries or blackberries!

Directions: (only one!)
1. Arrange on a plate in the shape of the flag. This is perfect as a dessert OR as a side dish.

For a dessert, serve with ice cream or whipped cream!  Total prep time: 3 minutes.

Written at: http://peoniesandorangeblossoms.blogspot.com/

EDIT: This dessert was featured at:

Diane’s Vintage Zest!

I’ve linked up with:The Scoop! at Confessions of a Plate Addict/Stone Gable, Merry Mondays at my pinterventures, Inspire Me Tuesday at a Stroll Thru Life, Do Tell Tuesday at a Vintage Zest,  You’re Going to Love it Tuesday at Kathe with an E, Cottage Style Party at Lavender Garden Cottage  Wow us Wednesdays! at Savvy Southern Style, What’s it Wednesdays at Ivy & Elephants, Centerpiece Wednesdays at The Style Sisters Treasure Hunt Thursday at From My Front Porch To Yours, Feathered Nest Fridays at French Country Cottage, Sunday Best Showcase at Twigg Studios.  And Tickle my Tastebuds Tuesday Be sure to check out all of these fabulous blogging parties! A big thank you to all of the wonderful hosts!

Follow:

Salted Caramel Macarons

We use affiliate links in our posts and our site. This means if you make a purchase using these links, we may earn a small commission. You don’t pay a cent more than you would otherwise! Our full disclosure is available under About.

Fleur de Sel Macarons (aka Salted Caramel Macarons)

This post may contain affiliate links. See my disclosure policy.

This is part of my Macaron Mondays feature! I hope you’ve been inspired to make some macarons!

For the basic macaron recipe I use the Laduree macaron recipe.

FOR A PRINTABLE RECIPE, CLICK HERE!!
Materials needed:

  • a food scale (yes, you need this. I use this one)
  • a piping tip and piping bag (I like the ateco #806, I use these tips and piping bag
  • Food coloring (the gels or dry powder works best, not the liquid store stuff)
  • A macaron template (either make one or get one here or here. It makes piping easier)
  • food processor (for the cream filling, I use this one)

Laduree Macarons Recipe

275g ground almonds  

250g powdered sugar   

210g egg whites          

210g granulated sugar 

1.  Mix almond meal and the powdered sugar in a food processor. Be careful not to grind too long, otherwise it will form a paste.

2. Sift the almonds and powdered sugar. Set aside.

3. Weigh out granulated sugar.

4. Weigh the egg whites.  Beat them slowly on a low speed until foamy. SLOWLY add the granulated sugar to the egg whites as you beat.  Once all mixed, increase speed to medium and beat until a firm meringue forms.  You want a firm meringue with glossy peaks but not stiff peaks.  They should defy gravity and remain in the bowl if you turn it upside down.  If you tilt your bowl to the side and they are sliding out, keep beating.

5. Add the food coloring gel and mix.

6. Then fold in 1/3rd of the almond/sugar mixture into the meringue with a silicone spatula.  Once combined, add another third of the almond mixture. Add last bit.  This batter requires more deflation during this step since it creates such a poofy meringue.

7. Add the batter to a piping bag.  Pipe in rows using your template onto parchment paper.

8. Pick up the pan and beat until the counter.  The cookies need to rest on the counter between 30-60 minutes.  They are ready to go in the oven when they are dry to touch (the shell shouldn’t stick to your finger)

9.  Set the oven to 300F.

10. Bake the cookies for 13-15 minutes, one sheet at a time. They are done when they look kind of matte and seem firm when you lightly tap on them.  You can always rescue a slightly overcooked one with the maturation process that comes later, but you cannot rescue an undercooked one!!   

11. Remove from paper once completely cool. If they stick to the paper, they aren’t cool yet. Or you undercooked them.

Salted Caramel Filling Recipe
(makes 1.5 cups of caramel)
1 cup of cream
1.5 cups of granulated sugar
2 tsp coarse salt (or 1tsp for a less salty flavor)
1 cup unsalted butter

Instructions:
1. Chop butter into small cubes and set aside.
2. Pour cream into the pan and add the salt. Bring to a low boil while stirring and remove immediately. Do not scald the cream.
3. Place the sugar into a new pan. Cook over medium hit while stirring constantly.
4. Stir until sugar is melted and has caramelized into a rich color. Remove from heat.  Do not burn the sugar.  If your caramel starts to burn, throw it away. You cannot rescue it.
5. Pour and stir the hot cream into the caramel mixture. BE CAREFUL!!! Add the cream VERY SLOWLY.  The caramel will spit and boil up, so stir while incorporating the cream into the caramel.
6. Let the caramel cool to 115 degrees (about 5 minutes later).
7. Whisk in the cubes of butter into the mixture until melted and mixed.
8. Pour caramel into a shatter proof bowl and refrigerate until cold.

To use the caramel:
1. Remove from the fridge.
2. Whisk the caramel mixture to stiffen to more of a butter/cream consistency. Do not over-whisk as the caramel will separate.

Once all assembled, put them in an airtight container and let them mature (yes, that’s the scientific word for this process) in the refrigerator for 24-48 hours.  


Now, these cookies won’t be bad if you eat them immediately, they will just be amazing if you want a day.  The theory is that the juices from the filling soak back into the cookie to make an AMAZING cookie. 

YUM!

 This caramel tastes good on other things too, not just macarons!

For my favorite product recommendations for making such delicate cookies, check out my amazon store

I’ve linked up with:The Scoop! at Confessions of a Plate Addict/Stone Gable, Metamorphosis Monday’s at Between Naps on the Porch, Inspire Me Tuesday at a Stroll Thru Life, Do Tell Tuesday at a Vintage Zest,  You’re Going to Love it Tuesday at Kathe with an E, Cottage Style Party at Lavender Garden Cottage  Wow us Wednesdays! at Savvy Southern Style, What’s it Wednesdays at Ivy & Elephants, Centerpiece Wednesdays at The Style Sisters Tablescape Thursday at Between Naps on the Porch, Oh the places I have been at the Tablescaper, Treasure Hunt Thursday at From My Front Porch To Yours, Feathered Nest Fridays at French Country Cottage, Seasonal Sundays at the Tablescaper, Sunday Best Showcase at Twigg Studios. Be sure to check out all of these fabulous blogging parties! A big thank you to all of the wonderful hosts!

Written at http://peoniesandorangeblossoms.blogspot.com

Follow:

Marionberry Macarons Recipe

We use affiliate links in our posts and our site. This means if you make a purchase using these links, we may earn a small commission. You don’t pay a cent more than you would otherwise! Our full disclosure is available under About.
Marionberry Macarons
This post may contain affiliate links. See my disclosure policy.


For how to make the macaron cookie shells,  I use the Laduree recipe.

Materials needed:

  • a food scale (yes, you need this. I use this one)
  • a piping tip and piping bag (I like the ateco #806, I use these tips and piping bag
  • Food coloring (the gels or dry powder works best, not the liquid store stuff)
  • A macaron template (either make one or get one here or here. It makes piping easier)
  • food processor (for the cream filling, I use this one)

Laduree Macarons Recipe GET THE PRINTABLE RECIPE HERE

275g ground almonds  

250g powdered sugar   

210g egg whites          

210g granulated sugar 

1.  Mix almond meal and the powdered sugar in a food processor. Be careful not to grind too long, otherwise it will form a paste.

2. Sift the almonds and powdered sugar. Set aside.

3. Weigh out granulated sugar.

4. Weigh the egg whites.  Beat them slowly on a low speed until foamy. SLOWLY add the granulated sugar to the egg whites as you beat.  Once all mixed, increase speed to medium and beat until a firm meringue forms.  You want a firm meringue with glossy peaks but not stiff peaks.  They should defy gravity and remain in the bowl if you turn it upside down.  If you tilt your bowl to the side and they are sliding out, keep beating.

5. Add the food coloring gel and mix.

6. Then fold in 1/3rd of the almond/sugar mixture into the meringue with a silicone spatula.  Once combined, add another third of the almond mixture. Add last bit.  This batter requires more deflation during this step since it creates such a poofy meringue.

7. Add the batter to a piping bag.  Pipe in rows using your template onto parchment paper.

8. Pick up the pan and beat until the counter.  The cookies need to rest on the counter between 30-60 minutes.  They are ready to go in the oven when they are dry to touch (the shell shouldn’t stick to your finger)

9.  Set the oven to 300F.

10. Bake the cookies for 13-15 minutes, one sheet at a time. They are done when they look kind of matte and seem firm when you lightly tap on them.  You can always rescue a slightly overcooked one with the maturation process that comes later, but you cannot rescue an undercooked one!!   

11. Remove from paper once completely cool. If they stick to the paper, they aren’t cool yet. Or you undercooked them.

Filling – for Marionberry Macarons

For these macarons, the easiest way for the filling is to buy seedless marionberry jam.  I used Harry & David seedless marionberry Jam. 

 Once the cookies are cool, add a dollop of your filling to one cookie and spread with a small knife, spoon, or icing spatula. 

Place the other cookie to your filling, press gently, and slightly twist the two together.

Once all assembled, put them in an airtight container and let them mature (yes, that’s the scientific word for this process) in the refrigerator for 24-48 hours.  

Now, these cookies won’t be bad if you eat them immediately, they will just be amazing if you want a day.  The theory is that the juices from the filling soak back into the cookie to make an AMAZING cookie. 


What is a Marionberry, you ask?

I realized that some people may not have had a marionberry.  The Marionberry is a type of blackberry, first bred by Oregon State University.  It was first grown in Marion County, Oregon (hence its name).  It is a little bit sweeter than the typical blackberry.  So in other words, it’s good.  Growing up in the Northwest, we would eat all kinds of berries.  They are seriously weeds up there. 


Marionberry macarons

Marionberry Macarons

Check back next week as I continue Macaron Mondays!


For my favorite product recommendations for making such delicate cookies, check out my amazon store

I’ve linked up with:
The Scoop! at Confessions of a Plate Addict/Stone Gable, Metamorphosis Monday’s at Between Naps on the Porch, Inspire Me Tuesday at a Stroll Thru Life, Do Tell Tuesday at a Vintage Zest,  You’re Going to Love it Tuesday at Kathe with an E, Cottage Style Party at Lavender Garden Cottage  Wow us Wednesdays! at Savvy Southern Style, What’s it Wednesdays at Ivy & Elephants, Centerpiece Wednesdays at The Style Sisters Tablescape Thursday at Between Naps on the Porch, Oh the places I have been at the Tablescaper, Treasure Hunt Thursday at From My Front Porch To Yours, Feathered Nest Fridays at French Country Cottage, Seasonal Sundays at the Tablescaper, Sunday Best Showcase at Twigg Studios. Be sure to check out all of these fabulous blogging parties! A big thank you to all of the wonderful hosts!


Written by Orange Blossom at http://peoniesandorangeblossoms.blogspot.com
This post my contain affiliate links.

Follow:

Raspberry Macarons with recipes!

We use affiliate links in our posts and our site. This means if you make a purchase using these links, we may earn a small commission. You don’t pay a cent more than you would otherwise! Our full disclosure is available under About.

Raspberry Macarons like Laduree

The recipe I used to make macarons (mah-ka-rohn) is from Laduree.  It’s from this fabulous book: Laduree: The Sweet Recipes.  Let’s get started.

Raspberry Macarons like Laduree

Materials needed:

  • a food scale (yes, you need this. I use this one)
  • a piping tip and piping bag (I like the ateco #806, I use these tips and piping bag)
  • Food coloring (the gels or dry powder works best, not the liquid store stuff)
  • A macaron template (either make one or get one here or here. It makes piping easier)
  • food processor (for the cream filling, I use this one)


Laduree Macarons Recipe – printable recipe HERE

275g ground almonds

250g powdered sugar

210g egg whites

210g granulated sugar


1.  Mix almond meal and the powdered sugar in a food processor. Be careful not to grind too long, otherwise it will form a paste.

2. Sift the almonds and powdered sugar. Set aside.

3. Weigh out granulated sugar.

4. Weigh the egg whites.  Beat them slowly on a low speed until foamy. SLOWLY add the granulated sugar to the egg whites as you beat.  Once all mixed, increase speed to medium and beat until a firm meringue forms.  You want a firm meringue with glossy peaks but not stiff peaks.  They should defy gravity and remain in the bowl if you turn it upside down.  If you tilt your bowl to the side and they are sliding out, keep beating.

5. Add the food coloring gel and mix.

6. Then fold in 1/3rd of the almond/sugar mixture into the meringue with a silicone spatula.  Once combined, add another third of the almond mixture. Add last bit.  This batter requires more deflation during this step since it creates such a poofy meringue.

7. Add the batter to a piping bag.  Pipe in rows using your template onto parchment paper.

8. Pick up the pan and beat until the counter.  The cookies need to rest on the counter between 30-60 minutes.  They are ready to go in the oven when they are dry to touch (the shell shouldn’t stick to your finger)

9.  Set the oven to 300F.

10. Bake the cookies for 13-15 minutes, one sheet at a time. They are done when they look kind of matte and seem firm when you lightly tap on them.  You can always rescue a slightly overcooked one with the maturation process that comes later, but you cannot rescue an undercooked one!!

11. Remove from paper once completely cool. If they stick to the paper, they aren’t cool yet. Or you undercooked them.

Filling – for Raspberry Macarons

1. For these macarons, the easiest way for the filling is to buy seedless raspberry jam.  I used Harry & David seedless Raspberry Jam.


2. Once the cookies are cool, add a dollop of your filling to one cookie and spread with a small knife, spoon, or icing spatula.


3. Place the other cookie to your filling, press gently, and slightly twist the two together.


4. Once all assembled, put them in an airtight container and let them mature (yes, that’s the scientific word for this process) in the refrigerator for 24-48 hours.


Now, these cookies won’t be bad if you eat them immediately, they will just be amazing if you want a day.  The theory is that the juices from the filling soak back into the cookie to make an AMAZING cookie.

Raspberry Macarons like Laduree

Making the meringue

Finished meringue


My macaron template
adding almond flour to the meringue
macaronnage
we actually didn’t fold these enough.

Aren’t they pretty??

Raspberry Macarons like Laduree


Raspberry Macarons like Laduree

I just want to show you that I haven’t always been the best at making macarons!  Below you can see the first time I ever made macarons… they were poofy and not perfectly flat with little feet.  That’s okay… with practice I became better.  But guess what? The ones below still tasted the same as the ones above! So, if you don’t get it on your first shot, don’t worry!


For my favorite product recommendations for making such delicate cookies, check out my amazon store


SaveSave

Follow:

The Best Chocolate Chip Cookie Recipe EVER!

We use affiliate links in our posts and our site. This means if you make a purchase using these links, we may earn a small commission. You don’t pay a cent more than you would otherwise! Our full disclosure is available under About.

No, really. It is. It is the ONLY chocolate chip cookie recipe you will ever need to know from now on. Trust me. I can’t believe these cookies came out of my kitchen. They give the Girl Scouts a run for their money.

The BEST chocolate chip cookie recipe in the world!! 

printable recipe version here

  • 2 cups minus 2 Tbsp. cake flour (8 1/2 oz)
  • 1 2/3 cups bread flour (8 1/2 oz)
  • 1 ¼ tsp. baking soda
  • 1 ½ tsp. baking powder
  • 1 ½ tsp. coarse salt, such as kosher
  • 2 ½ sticks (1 ¼ cups; 10 oz.) unsalted butter, softened
  • 1 ¼ cups (10 oz.) light brown sugar
  • 1 cup plus 2 Tbsp. (8 oz.) granulated sugar
  • 2 large eggs
  • 2 tsp. vanilla extract
  • 1 ¼ pounds bittersweet chocolate chips, preferably about 60% cacao content, such as Ghirardelli (although I made mine with semi-sweet and they were still delicious)
  • Sea salt or kosher salt for garnishing

1. Combine flours, baking soda, baking powder, and salt in a bowl. Set aside.


2. Using a mixer fitted with paddle attachment, cream butter and sugars until very light and fluffy, about 3 to 5 minutes. Add the eggs, one at a time, mixing well after each addition. Mix in the vanilla. 


3. Reduce the mixer speed to low; then add dry ingredients, and mix until just combined, 5-10 seconds. Add the chocolate chips, and mix briefly to incorporate. Press plastic wrap against the dough, and refrigerate.  He recommends for 24 to 36 hours. The dough may be used in batches, and can be refrigerated for up to 72 hours.


4. When you’re ready to bake, preheat oven to 350°F. Line a baking sheet with parchment paper or a nonstick baking mat.


5. Scoop about 1/3 cup of six mounds of dough (golf-ball size) onto the baking sheet, making sure to space them evenly. Sprinkle lightly with sea salt, and bake until light golden brown but still soft, 15 to 20 minutes. 


6. Transfer the baking sheet to a wire rack for 10 minutes, then transfer the cookies onto the rack to cool a bit more.


Yield: 1.5 dozen 5 inch cookies.
Recipe from: NY Times Chocolate Chip Cookies


Tips:

  • Use the cake flour and all purpose flour. I honestly think this is the big difference between this cookie and normal chocolate chip cookie recipes.
  • Chill the dough.  As a scientist, I don’t buy the difference between 24-36 hours, and actually for that fact more than several hours.  Places I’ve read it says it allows the flavors to “hydrate the dry products and allow flavors to mix”. Frankly, if you’ve mixed it well with the mixer, chemically speaking, it is mixed.  I think chilling the dough just allows the batter to set-up, so when it’s time to bake it starts from a cooler temperature.  I chilled mine for 4 hours and 30 hours. I can’t taste the difference between the two.
  • These make bakery worthy sized cookies. Making them smaller I think would dry them out.
  • They taste better if you sprinkle the salt on it.
  • As with most cookies, take them out before they are completely done.  They will continue to cook on the pan. If you take them out when they’re done, they will be overdone by the time they are done cooling!   

unbaked dough on the pan

 Some cookies may not have survived the photography session. RIP in my stomach.

Update: This post was featured at Wow Us Wednesdays on 4/1/14!
Savvy Southern Style

I’ve linked up with The Scoop!, Tablescape ThursdayWow us Wednesdays!Open House Party Feathered Nest FridaysSeasonal Sundays & Oh the places I have been,  life of the party the style sistersFavorite Things Blog Hop, and What’s it Wednesdays. Tasty Tuesday’s! Be sure to check out all of these fabulous blogging parties! A big thank you to all of the wonderful hosts!

Written by Orange Blossom at http://peoniesandorangeblossoms.blogspot.com

Follow:

Addictive Candy Cane Truffles

We use affiliate links in our posts and our site. This means if you make a purchase using these links, we may earn a small commission. You don’t pay a cent more than you would otherwise! Our full disclosure is available under About.

Addictive Candy Cane Truffles

AKA Candy cane joe-joe truffles, peppermint joe joe truffles, candy cane oreo truffles, or peppermint oreo truffles. 

How can one truffle have so many names?! I don’t know.  

Here’s what I do know: they taste like candy cane and they are addictive.

I had my first Oreo truffle a few years ago from a friend.  Then it occurred to me… what if… what if I took Candy Cane Joe-Joes and used that as a base for the Oreo truffle?

So what happened?

THIS happened:

It’s good. Really good. Addictive good.

So let me share the recipe with you.

Ingredients: (makes about 24 truffles) – PRINTABLE RECIPE HERE

  • 1 box Candy Cane Joe-Joes (only found at Trader Joe’s!)
  • 1 8 ounce block of cream cheese
  • Either 1 pack of white, dark, or milk chocolate chips.  (I used white and milk chocolate chips.)
  • Crushed peppermint candies for decorating the top, if desired.

Directions:
1. Add entire box of Candy Cane Joe-Joes to food processor and grind away until it is a fine powder.

Step 1.

2. Add the cream cheese. I cut it into smaller chunks so the food processor would have an easier time at mixing it all.

3. Roll into 1 inch balls. Place onto wax/parchment paper.

1 inch balls.

4. Place the tray of the balls into the freezer for 15-20 minutes.

5. Melt your chocolate.  I use the simple microwave method.  Place your chocolate chips into the microwave. Microwave on half power in 15-20 second intervals.  Stir in between intervals. Heat until melted. DO NOT OVERHEAT.  Burnt chocolate is bad chocolate. If it burns, throw it away and try again.

6. THE SECRET STEP: To make your chocolate easier to dip in and to produce a nice surface color every time, add about 1 tablespoon of vegetable oil to the melted chocolate.  The vegetable oil will not affect the taste at all.

7. Take balls out of the freezer, several at a time, and dip in chocolate. Place on wax paper, add toppings if desired (like the crushed peppermint candies).

8. Let the chocolate harden, about 1 hour. Enjoy!

Candy Cane Joe-Joe’s are my FAVORITE Christmas cookie.  Trader Joe’s always sell out of them so fast!  Never had them before? Well don’t wait another second, go to Trader Joe’s RIGHT NOW and get some.

So you don’t eat all of truffles prepare them for your next holiday party!  They will go fast!

I’ve linked up with The Scoop! Visit Confessions of a Plate Addict blog,Tablescape Thursday at ‘Between Naps on the Porch’, Wow us Wednesdays! at Savvy Southern Style, Open House Party at no minimalist here,Feathered Nest Friday at French Country Cottage, Seasonal Sundays & Oh the places I have been at The Tablescaper, and a stroll through life inspire me tuesday’s. 

Follow:

From the Shop

I may earn a small commission if you purchase with these links

Caning Natural Tote Handbag - Universal Thread™
The Hustler High Waist Fray Hem Ankle Bootcut Jeans
Le Panier Pliage Raffia Crossbody Bag
Extra Large Le Pliage Panier Tresse Straw Tote
The Bennet Buttondown Shirt by Maeve
T Monogram Perforated Leather Bucket Bag
Mellow Stud Mule
Le Pliage Marinière Recycled Nylon Canvas Travel Bag
Unseen Sunscreen Broad Spectrum SPF 40 PA+++
Maxine Stripe Cotton Button-Up Shirt
Citizens of Humanity Charlotte High Rise Straight Jeans
Navy Equestrian Traversee M Linen Tote
Cream Carrie Blouse
Ellison Natural
Jolene High Rise Vintage Slim
Citizens of Humanity Blue Jolene Jeans
Charlotte High Rise Straight Jeans
Le Pliage Filet Top Handle Bag
Vintage cotton crewneck T-shirt
Air Heart Sunglasses
Le Pliage Torchon XS Top Handle Bag With Strap
Santorini Raffia Basket Bag
Chuck Taylor® All Star® Lift High Top Platform Sneaker
Please note that I use ShopSense, LIKETOKNOW.it, Shareasale and Amazon affiliate links on this site. This means using them for purchases won’t cost you extra but may earn me a small commission.  Our full disclosure is available for viewing under About in the disclosure policy.
All rights reserved. Our graphics, images and text are all subject to copyright protection.