Antique Velvet Picture Frames

We use affiliate links in our posts and our site. This means if you make a purchase using these links, we may earn a small commission. You don’t pay a cent more than you would otherwise! Our full disclosure is available under About.

I recently found this cute velvet picture frame made of velvet and metal thread.  It reminded me a lot of the antique velvet picture frames.  The problem with the antique velvet frames is that most of them have faded or have damage.

The nice thing about this new one I found is that it is in perfect condition!

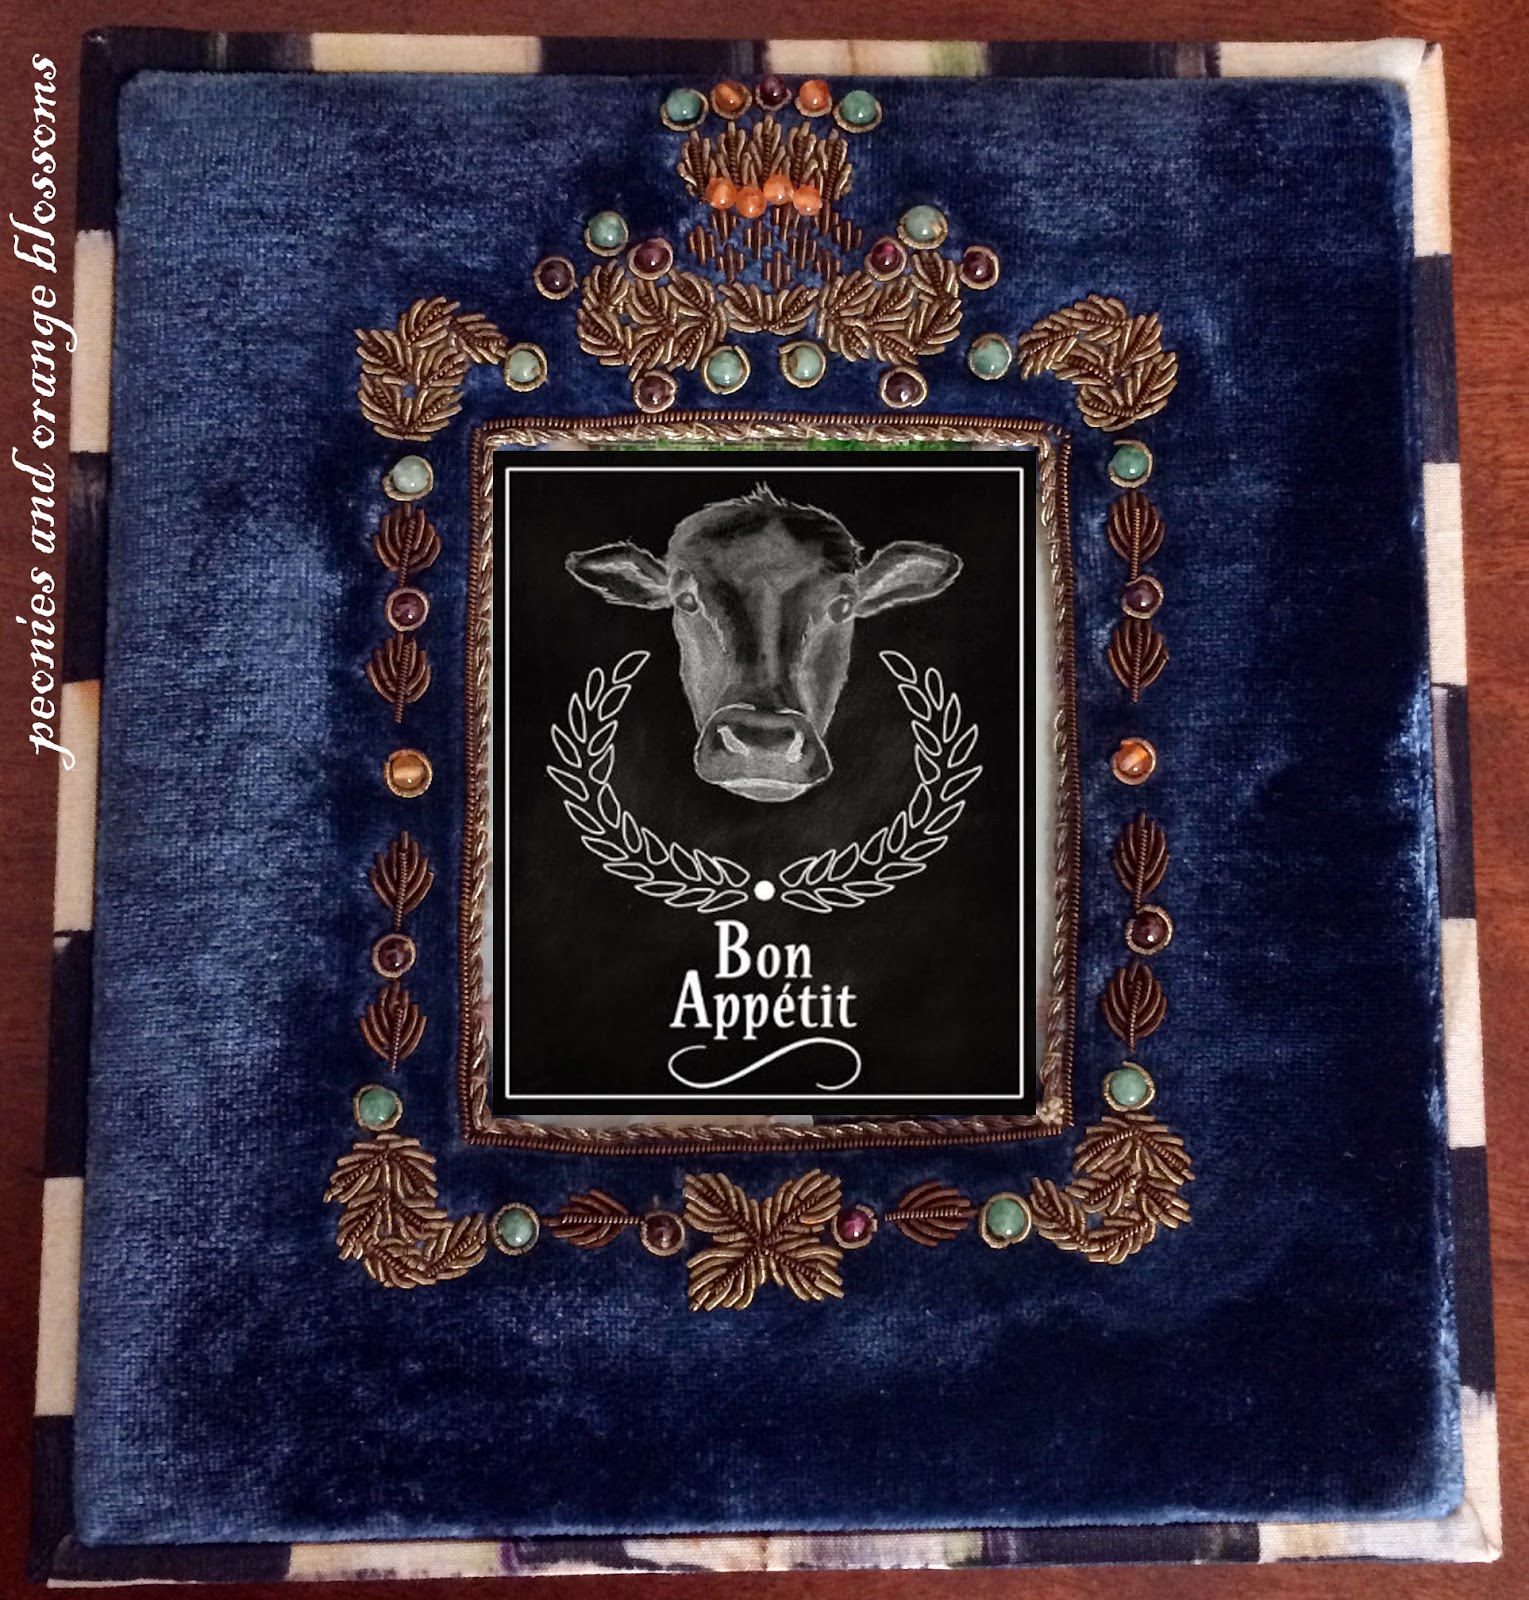
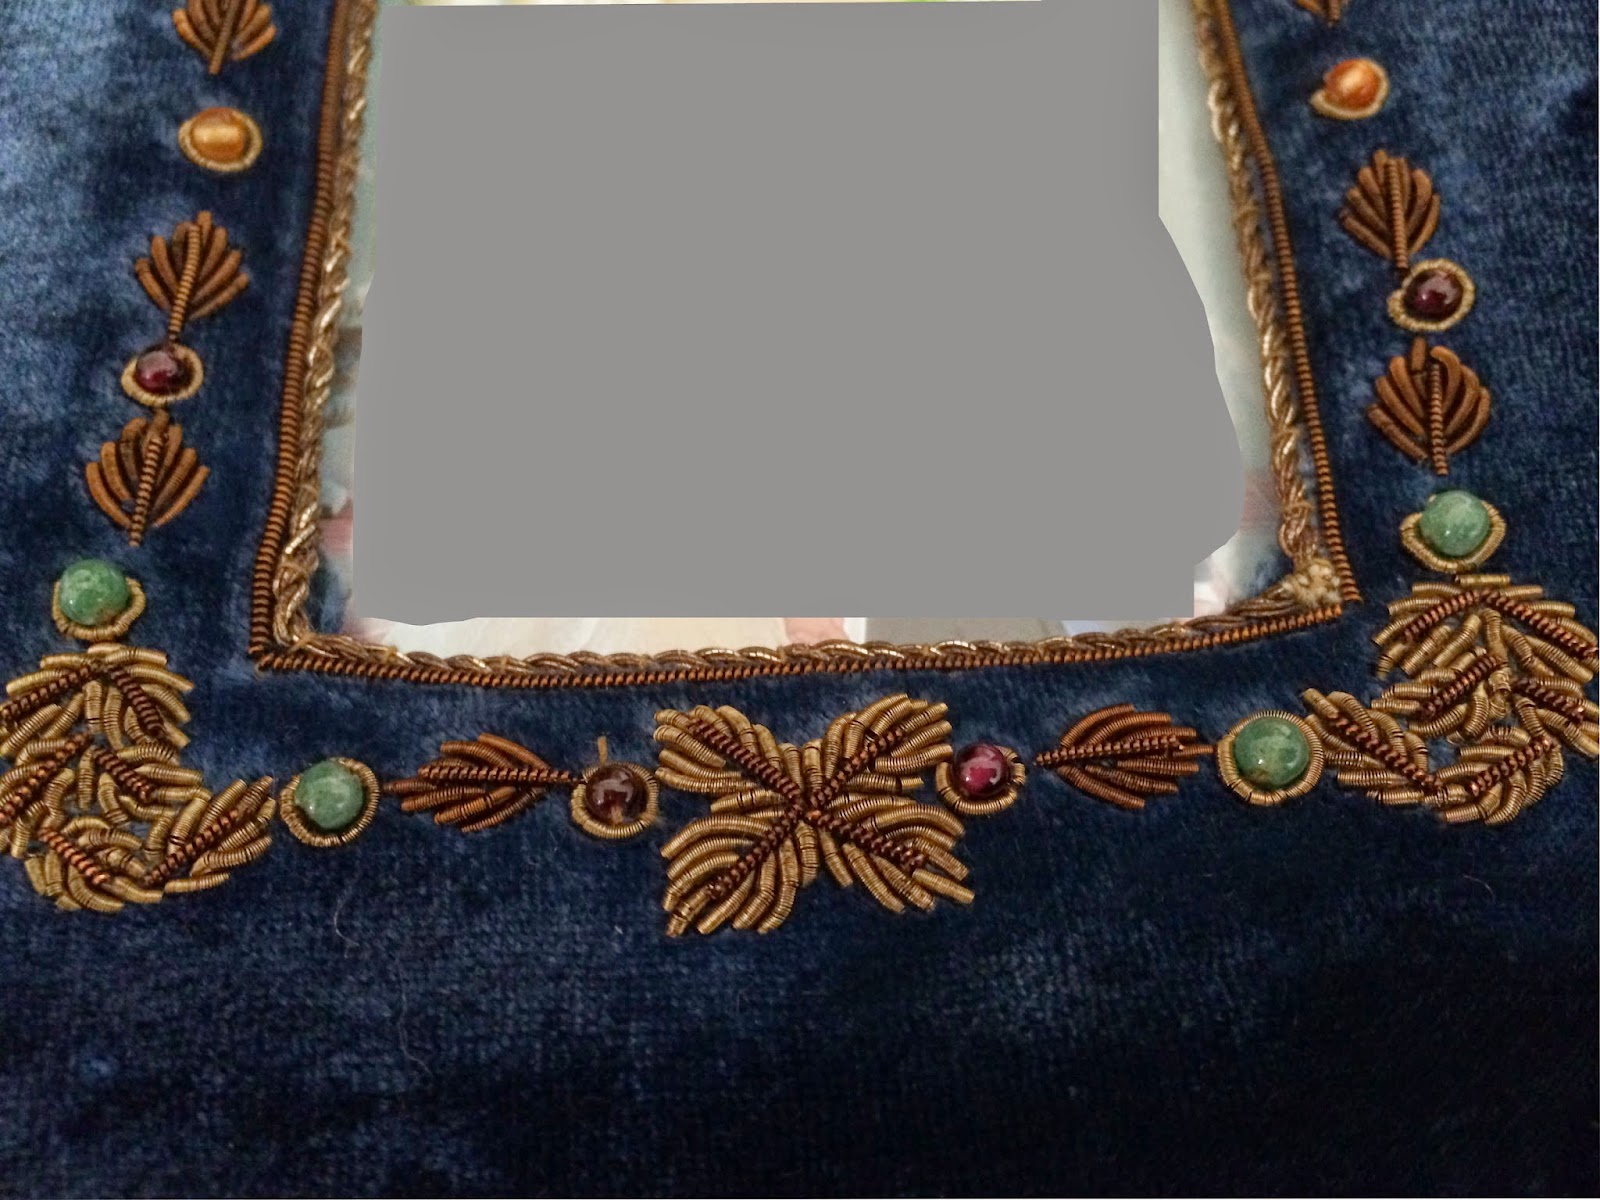
Let’s take a closer look at the details… It is real velvet with silver covered copper threads. So yes, it will tarnish over time.

excuse the poor photoshopping; I am internet shy and don’t want my face everywhere!

It’s hard to find new picture frames that are made of such quality. When I saw it I knew that I had to take it home with me!

It reminded me a lot of the old velvet picture frames… let me share.  This beautiful French picture frame is made with velvet.  It contains a painted picture as photography hadn’t quite caught on yet!

Antique French 1800’s Neoclassical Ormalu (bronze Dore) Velvet Shield Frame Picture Frames photo
1800s French velvet ormalu frame source

When photos became accessible to the “mainstream” thanks to Kodak in the 1880s, people wanted to display their pictures.  Remember though, that pictures were still really expensive to take.  An expensive picture needs an expensive frame!

1800s hand embroidered photo frame source

Then came along the fancy photo albums from the Victorian era.  Check out this one below… You fold it down to reveal a whole book!  It’s interesting how much the velvet has faded over time.

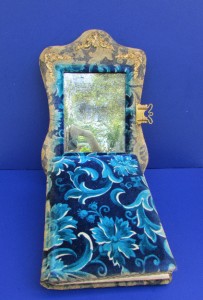
look at how it faded! source

Here’s the photo album opened:
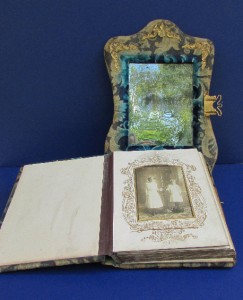
how cool is that?

A pair of velvet French frames from the Napoleon era…

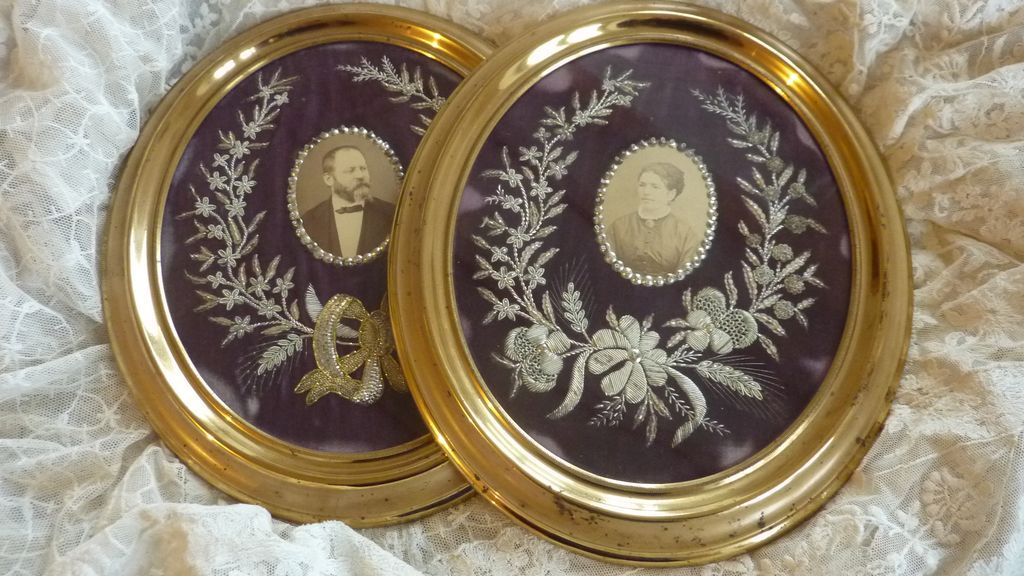
Napoleon era French embroidered frames source

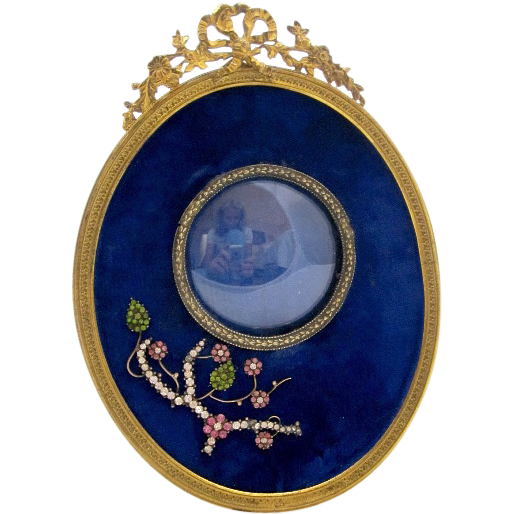
I like the metal on this velvet frame…

french brocante velvet-frame
19th century French velvet frame source

I like the beading on this velvet frame.  What’s unusual is how little damage there is to the velvet.

1800s French velvet frame source

Now, this is a clutch below.  But it reminded me a lot of the picture frame as it is a velvet clutch with silver thread!

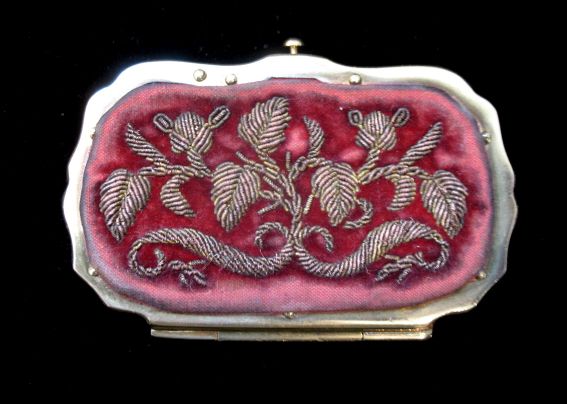
1850s Napoleon era velvet French coin purse source

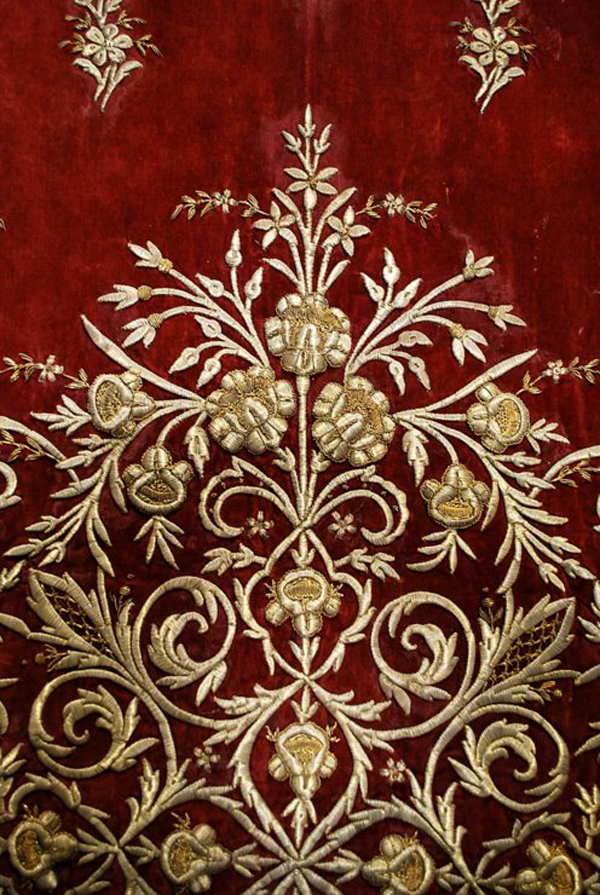
… Then I got side tracked.  The company for the picture source below takes old embroidery and turns it into pillows!  I love this metal embroidery!!

old metal embroidery tapestry turned into a pillow source

The thistles on my picture frame remind me a little bit of Queen Elizabeth’s coronation gown.  On the right you can see some thistles, representing Scotland.

the thistles on my picture frame are reminiscent of the Queen’s coronation gown source

The metal thread also reminds me of some of this handiwork:

Antique Ottoman Gold Thread Densely Embroidered Large Panel On Burgundy Velvet
Ottoman period silver and gold thread source

While trying to find pictures of velvet picture frames I ran into this wonderful hand embroidered metal thread sheep on velvet!  How cute!!

sheep

And then I found this wonderful embroidered Eagle!
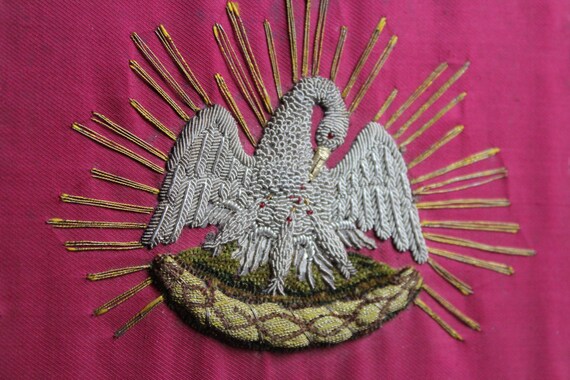
Eagle

Well, I got a little side tracked at the end with the eagle and sheep.  But, I love my new picture frame!!
Written at http://peoniesandorangeblossoms.blogspot.com

Linking up with these fabulous link parties: The Scoop! Inspire Me Tuesday,Do Tell Tuesday Wow us Wednesdays! What’s it Wednesdays Creative Ways, Treasure Hunt ThursdayHome Sweet Home Feathered Nest Fridays,

Follow:

Nespresso Maragogype

We use affiliate links in our posts and our site. This means if you make a purchase using these links, we may earn a small commission. You don’t pay a cent more than you would otherwise! Our full disclosure is available under About.

So This past weekend we went to the Nespresso shop to get some more of our favorite Arpeggio purple pods. On display however was some fancy box below:

Not knowing anything about the box and seduced purely by its packaging, I added this to our order. (Way to go Nespresso marketing!)
Then I heard to sales people all ooh and aah about how wonderful it was.
Apparently it’s made from some super rare bean that’s like twice the size as a normal coffee bean and produces very little fruit. They kept mumbling the name super fast. I still can’t say the name.
Oops. We already paid for it. I had no idea how much it was. But I did know it was going to be more expensive as everyone drooled about it. Shopping 101 mistake, buying without a price.. Which turned out not to be a mistake at all!
I tried it this morning. My goodness, it is super duper good! While I can’t say the name of them, my husband and I have dubbed these as the “nespresso magic beans.”
They are really tasty. I finally looked up how much… $2 a pod instead of $0.70! Oh. I guess I better squander my one box away.
Here’s nespressos info on the magic beans http://www.nespresso.com/us/en/product/maragogype-coffee
I recommend you go try these magic beans. They are very tasty. Sweet. Nice flavor. Still much cheaper than starbucks! Hope you enjoyed my review of the marogogype beans.
PS- it’s pronounced mare-ah-go-jip-ay. And I did not get paid for this post… But I’ll some accept Maragogype beans for my kind review, Nespresso! I

Follow:

Healthy Cauliflower Mashed Potatoes

We use affiliate links in our posts and our site. This means if you make a purchase using these links, we may earn a small commission. You don’t pay a cent more than you would otherwise! Our full disclosure is available under About.

With Thanksgiving just around the corner, I’ve been looking for some healthier alternatives to Thanksgiving Dinner.  While I LOVE mashed potatoes, I know they are full of carbs and fat.  I have been playing around with some cauliflower mashed potato recipes and came up with one that I think is really good AND could fool your guests too!!

Healthy Cauliflower Mashed Potato Recipe

I think the secret to this mashed cauliflower recipe is that it actually includes potato with the mashed cauliflower.  So many of the recipes that contain only cauliflower don’t quite taste right.

Ingredients:

  • 1 small head cauliflower that is trimmed, cored, and cut into small florets.
  • 1-2 small red or golden potatoes, chopped
  • 1 tbsp fat free sour cream
  • 2 tbsp skim milk
  • 1-2 tbsp light butter
  • salt and pepper to taste

Directions
1. Bring a pot of water to boil.  Add the cauliflower and potato to the water.
2. Reduce heat to a simmer. Cover and cook for approximately 20 minutes until vegetables are cooked through.
3. Drain well and move to your food processor. Process until smooth.
4. Return the cauliflower/potato puree to a hot pan on medium high heat.  Stirring frequently, you will need to cook off the excess liquid. This takes about 5 minutes or so.  Once excess water has evaporated, stir in the sour cream, milk, and butter.
5. Add salt and pepper to taste.  Then garnish with green onions, rosemary, or thyme! Enjoy!

My husband wasn’t too keen on this “faux” mashed potato recipe when we were making it.  Then he ended up liking it when we were done!  The great part it is that it tastes good and you won’t feel guilty with seconds!

Linking up with these fabulous link parties: The Scoop!,   Inspire Me Tuesday,Wow us Wednesdays!Foodie Friday

written at http://peoniesandorangeblossoms.blogspot.com

Follow:

Dreaming of E Dehillerin in Paris

We use affiliate links in our posts and our site. This means if you make a purchase using these links, we may earn a small commission. You don’t pay a cent more than you would otherwise! Our full disclosure is available under About.

As I start to think about all of the holiday baking that lies ahead, I find myself daydreaming about my trip to Paris next Spring.

Yes! I’m headed to Paris! Yippeeeeeeeeeeeee!! I am so very excited to head to my favorite city in the whole world.  The last time I was there was in 2003. Practically pre-internet days, especially in Europe. This time though, I am armed with the knowledge of the internet and have added many little shops to my to do list that I previously didn’t know about!

One store I’m particularly excited to go to is E. Dehillerin in Paris.  It’s a store that famously sold Julia Child her copper pans.  The name is pronounced “Uh-duh-il’rin”

E. Dehillerin
*the* store pic source

The shop is the oldest cooking shop in Paris… over 200 years old!  They are famous for their large bounty of products from Mauviel copper to knives to pans to every type of mold ever needed!

They have things like… a butter curler! TSA doesn’t approve but I do!

I think I will be picking up a madeleine pan here so that I may start my madeleine baking journey next year. I think I’ve mastered the macaron. On to something new…

2013-05-211
madeleine pan from France j’adore… source

Don’t you just want to take all of this home?

love this copper Coq source
A copper tatin mold for the perfect tarte tatin 
from their website
I will also need to pick up a few of these little pans so that I can bake the remaining recipes in Laduree’s Sweet book…
2
tart molds, loaf pans, financier molds! source

Maybe some silicone molds… At least I know these could go on the plane! 


Source

 E. Dehillerin is at 18 rue Coquillère, 75001 Paris … which is only a 10 minute walk from where we’ll be staying.  How convenient! 

I thought this blog post here had a nice tour of the store. 

Have you been to E. Dehillerin in Paris?  What did you buy?! Leave me a comment, I have some planning to do! 

If you’ve missed a Paris post, catch them ALL RIGHT HERE on my new Paris Trip Round-Up!

Written at http://peoniesandorangeblossoms.blogspot.com

Follow:

Oh My, Apple Pie!

We use affiliate links in our posts and our site. This means if you make a purchase using these links, we may earn a small commission. You don’t pay a cent more than you would otherwise! Our full disclosure is available under About.

We went apple picking not too long ago.  The intention was to pick apples and then use the apples to bake an apple pie.  Well… there were no baking apples left!  Apple pickin’ in Southern California is not like apple pickin’ in Washington (remember… Washington is a major apple growing state!).

So… we settled for store bought apples.

Check out our masterpiece:

The Best Apple Pie Recipe!

My husband and I have NEVER made an apple pie before.  Can you believe we made this??
We used a recipe from Williams Sonoma.  I copied the recipe here with the alterations we made:

The BEST apple pie recipe: (printable version here)

For the dough:

  • 2 1/2 cups all-purpose flour
  • 1 tsp. salt
  • 2 tsp. granulated sugar
  • 16 Tbs. (2 sticks) cold unsalted butter, cut into 1/2-inch dice
  • 3 to 4 Tbs. ice water

For the filling:

  • 2 lb. Granny Smith apples, peeled, cored and cut into slices 1/4 inch
      thick
  • 2 lb. Honey Crisp apples, peeled, cored and cut into slices 1/4 inch thick
  • 1/2 cup firmly packed light brown sugar
  • 1/4 cup granulated sugar
  • 1/2 tsp. ground cinnamon
  • 1/4 tsp. salt
  • 1/4 tsp. freshly grated nutmeg
  • 4 tsp. cornstarch
  • 1 Tbs. fresh lemon juice
  • 1 egg white, beaten with 1 tsp. water
  • 2 tsp. granulated sugar

Directions:

To make the dough, in a food processor, pulse the flour, salt, and granulated sugar together until combined, about 5 pulses. Add the butter and process until the mixture resembles coarse meal, about 10 pulses. Add 3 Tbs. of the ice water and pulse 2 or 3 times. The dough should hold together when squeezed with your fingers but should not be sticky. If it is crumbly, add more water 1 tsp. at a time, pulsing twice after each addition. Turn the dough out onto a work surface, divide in half and shape each half into a disk. Wrap the disks separately in plastic wrap and refrigerate for at least 2 hours or up to overnight.

On a lightly floured work surface, roll out half of the dough into a 12-inch round about 1/8 inch thick. Fold the dough in half and then into quarters and transfer it to a 9-inch deep-dish pie dish. Unfold and gently press the dough into the bottom and sides of the dish. Trim the edges flush with the rim of the dish. Refrigerate for 30 minutes.

On a large sheet of lightly floured parchment paper, roll out the remaining dough disk into a 12-inch round about 1/8 inch thick. Using leaf pie cutters, make rows of cutouts in the dough, spacing them 1/2 inch apart and leaving a 1-inch border along the edges, to create a lattice appearance. Reserve the cutouts for decorating. Reroll the dough scraps to make more cutouts. Refrigerate the lattice top and cutouts for 30 minutes.

Meanwhile, make the filling: In a large Dutch oven, stir together the apples, brown sugar, granulated sugar, cinnamon, salt, nutmeg and cornstarch. Set over medium heat, cover and cook, stirring occasionally, until the apples are just tender but not mushy, about 20 minutes. Uncover and cook until the liquid has thickened and become glossy, 5 to 7 minutes more. Remove from the heat, stir in the lemon juice and let cool to room temperature, about 30 minutes.

Position a rack in the lower third of an oven, place a baking sheet on the rack and preheat the oven to 400°F.

Let the pie shell, lattice top and leaf cutouts stand at room temperature for 5 minutes. Transfer the apple filling to the pie shell, then gently invert the lattice top over the pie. Trim the edges flush with the rim of the dish and press the top and bottom crusts together to seal. Brush the underside of the leaf cutouts with egg wash and gently press them onto the edges of the piecrust, overlapping the leaves slightly. Decorate as desired with the remaining leaves. Brush the entire top crust with egg wash and sprinkle with the granulated sugar.

Place the pie dish on the preheated baking sheet. Bake until the crust is crisp and golden brown, about 1 hour, covering the edges with aluminum foil if they become too dark. Transfer the pie to a wire rack and let cool for at least 1 1/2 hours before serving. Serves 8.
Williams-Sonoma Kitchen.
Action shots:
Here is our lattice top.  Here is a link to the cut outs WS sells this year: here and here

 The cut outs:

The Masterpiece:

 Closer look at the edge of our pie:

Now top with some vanilla ice cream and enjoy!

Written at http://peoniesandorangeblossoms.blogspot.com

Linking up with these fabulous link parties: The Scoop!,  Metamorphosis Monday’sInspire Me Tuesday,Wow us Wednesdays! What’s it WednesdaysCenterpiece WednesdaysCreative Ways Treasure Hunt ThursdayHome Sweet Home Feathered Nest Fridays, Foodie Friday

best apple pie recipe
#applepie
williams sonoma apple pie recipe

Follow:

Autumn Roasted Carrots

We use affiliate links in our posts and our site. This means if you make a purchase using these links, we may earn a small commission. You don’t pay a cent more than you would otherwise! Our full disclosure is available under About.

I was shopping at Trader Joe’s and came across these beautiful multicolored carrots in the produce section.  I knew I had to take them home and make something yummy with them.

Autumn Roasted carrots- perfect for Thanksgiving

This recipe is nice and simple.  These carrots would work really well as a side dish for Thanksgiving or other meals this Fall.

Ingredients

  • Carrots, approx 3 per person 
  • 1tbsp Honey
  • Butter
  • Thyme or Rosemary

Directions

  1. Peel the carrots. Cut the carrots in half, length wise.   You can leave the green on them if you want; I chose to cut mine off.
  2. Place a pan over high heat with a little bit of water covering the bottom of the pan.
  3. Add the carrots with a little bit of butter into the pan (the amount of butter depends on your personal tastes. I probably added 1 tbsp for 8 carrots).
  4. Add 1 tbsp of honey to the pan (I sort of drizzled it over the carrots)
  5. Cover the pan and let the carrots simmer until tender.
  6. Cook until water almost gone and the carrots look glazed with the butter and honey.
  7. Sprinkle some thyme or rosemary on top and prepare to serve

Tips
I used the multi-colored carrots because they look prettier.  You can make this recipe with the regular orange carrots as well.  The different colored carrots each have a slightly different taste.

Written at http://peoniesandorangeblossoms.blogspot.com

Linking up with these fabulous link parties: The Scoop!,   Inspire Me TuesdayWow us Wednesdays!  Foodie Friday

Follow:

Thanksgiving Tablescape with Juliska and Pumpkins

We use affiliate links in our posts and our site. This means if you make a purchase using these links, we may earn a small commission. You don’t pay a cent more than you would otherwise! Our full disclosure is available under About.

Can you believe that it’s November?!  I am about ready to pull out my Christmas decor, but I didn’t want to throw out my cute mini pumpkins I purchased earlier.

I decided to add them to my table.

I like the white pumpkins on top of the plates.

Then I thought, oh! I could fold the napkin and set the pumpkin on top. Which way do you like better?

Then I played around and added an orange pumpkin. Orange seems more Halloween-y.  I prefer the white.

About time I say good bye to Fall and hello to Christmas decor!  So long, pumpkins! (Except for pumpkin pie for Thanksgiving, of course!)

Linking up with these fabulous link parties: The Scoop! Inspire Me Tuesday, Wow us Wednesdays!Tablescape ThursdayHome Sweet Home Feathered Nest Fridays,

written at http://peoniesandorangeblossoms.blogspot.com

Follow:

Upcoming for November 2014

We use affiliate links in our posts and our site. This means if you make a purchase using these links, we may earn a small commission. You don’t pay a cent more than you would otherwise! Our full disclosure is available under About.

This month I’m going to be sharing with you some recipes for Thanksgiving.

They include things like….

  • Autumn Roasted Carrots.
  • The BEST apple pie.
  • Healthy Cauliflower Mashed Potatoes
  • Cheese Gougeres
  • …and more! 
Thanksgiving recipes

Stay tuned!

Follow:

Halloween 2014 Recap

We use affiliate links in our posts and our site. This means if you make a purchase using these links, we may earn a small commission. You don’t pay a cent more than you would otherwise! Our full disclosure is available under About.

Halloween Recap 2014

Here is a fabulous pumpkin festival 

I shared this year’s Halloween Tablescape!

We saw some wonderful decorations outdoors with pumpkins

I made this delicious German Pumpkin Soup

The owls landed for the Fall

I made these Scary Cat Chocolate Macarons 

My Halloween Table

Then lastly, I shared my Halloween Home Tour

…Now go and raid your kids’ candy tonight.  I heard the Snickers are poisonous and need to be tested…

Thanks for stopping by!  

Follow:

Pumpkin Chocolate Chip Cookies

We use affiliate links in our posts and our site. This means if you make a purchase using these links, we may earn a small commission. You don’t pay a cent more than you would otherwise! Our full disclosure is available under About.

I had been hankering for something pumpkin-y that was not a latte.  I finally found a recipe on pinterest that I decided to try. And it was SO GOOD I just had to share it again with you all.

pumpkin chocolate chip cookies

The nice (for my tongue, not my waist) part of these cookies is that they aren’t TOO sweet. Which means you can eat more. Gulp.

I’m munching on these as I type this. Better wipe my crumbs of the keyboard…
The recipe is NOT mine. To be a curteous blogger, I will not post the full recipe here.  You will have to check out Sally’s Baking Addiction for the full recipe.  She made them. She deserves all of the praise. I just had to share them with everyone.

Some tips:

  • definitely chill these before you bake them.
  • let them cool down before you eat.  They get BETTER with age. Whaaat?
  • You can eat three. If you make them small enough they’re only like 80-100 calories each. So they’re practically healthy, right??
Pumpkin chocolate chip cookies

Be sure to check out Sally’s Baking Addiction for the full recipe! 

Linking up with these fabulous link parties: Linking up with these fabulous link parties: The Scoop!,  Inspire Me TuesdayWow us Wednesdays!

Follow:

Fall and Halloween Decor around the House

We use affiliate links in our posts and our site. This means if you make a purchase using these links, we may earn a small commission. You don’t pay a cent more than you would otherwise! Our full disclosure is available under About.

There are a few other things I have around the house with that go with the Fall and Halloween theme!

One is this beautiful cat topiary I picked up at one of my favorite stores, Roger’s Gardens. 

The Martha Stewart pumpkin vase found it’s way out of the closet again. Filled with mums!  

 I picked up this pumpkin wreath at  Homegoods this year.  I think it’s pretty cute and fun!

Then I have my owls out, which were shared in an earlier post! 

My scary cat Halloween table is still looking the same!

Still have my Halloween table set as well! 

I just love decorating for Fall, don’t you?

Written at http://peoniesandorangeblossoms.blogspot.com

Linking up with these fabulous link parties: The Scoop! Inspire Me Tuesday, Wow us Wednesdays! What’s it WednesdaysCenterpiece WednesdaysCreative Ways,Treasure Hunt ThursdayHome Sweet Home Feathered Nest Fridays,G’day Saturdays,

Follow:

Halloween Table

We use affiliate links in our posts and our site. This means if you make a purchase using these links, we may earn a small commission. You don’t pay a cent more than you would otherwise! Our full disclosure is available under About.

I’ve decorated my buffet table with a Halloween theme.  I have pumpkins, mums, scary black cats, and a friendly pumpkin bear.

In the background you can see the vintage Halloween postcards.

I like how these scary black cats mimic the shape of the scary black cat in the postcard behind them! I’ve placed mums in the tulipiere.

These are real pumpkins.  Frankly, for $1 each, I think they are the best looking pumpkins around.  Fake pumpkins typically look… fake. They are pretty pricey too!

I hope you enjoyed my little Halloween table!

Written at http://peoniesandorangeblossoms.blogspot.com

Linking up with these fabulous link parties: The Scoop! Inspire Me Tuesday, Wow us Wednesdays! What’s it WednesdaysCenterpiece WednesdaysCreative Ways,Tablescape ThursdayTreasure Hunt ThursdayHome Sweet Home Feathered Nest Fridays,G’day Saturdays,

Follow:

Chocolate Hazelnut Cat Macarons

We use affiliate links in our posts and our site. This means if you make a purchase using these links, we may earn a small commission. You don’t pay a cent more than you would otherwise! Our full disclosure is available under About.

As you know, I LOVE macarons.  Earlier this year I did a feature, Macaron Mondays, for a few months.  For this upcoming Halloween, I created some scary cat chocolate hazelnut macarons!

The recipe is adapted from Laduree’s Sucre book.

scary cat chocolate hazelnut macarons

Materials needed:

  • a food scale (yes, you need this. I use this one)
  • a piping tip and piping bag (I like the ateco #806, I use these tips and piping bag)
  • Food coloring (the gels or dry powder works best, not the liquid store stuff)
  • A macaron template (either make one or get one here or here. It makes piping easier)
  • food processor (for the cream filling, I use this one)
  • Googly food eyes
  • Food marker

Chocolate Macaron Shell – CLICK HERE FOR A PRINTABLE RECIPE

260g almond flour

250g powdered sugar

15g cocoa powder

210g granulated sugar

210g egg whites

1.  Mix almond meal, cocoa powder, and the powdered sugar in a food processor. Be careful not to grind too long, otherwise it will form a paste.

2. Sift the almonds, cocoa powder, and powdered sugar. Set aside.

3. Weigh out granulated sugar.

4. Weigh the egg whites.  Beat them slowly on a low speed until foamy. SLOWLY add the granulated sugar to the egg whites as you beat.  Once all mixed, increase speed to medium and beat until a firm meringue forms.  You want a firm meringue with glossy peaks but not stiff peaks.  They should defy gravity and remain in the bowl if you turn it upside down.  If you tilt your bowl to the side and they are sliding out, keep beating.

5. Add the food coloring gel and mix.  To make mine a richer brown color, I used “chocolate brown” food coloring.

6. Then fold in 1/3rd of the almond/sugar mixture into the meringue with a silicone spatula.  Once combined, add another third of the almond mixture. Add the last bit.  This batter requires more deflation during this step since it creates such a poofy meringue.

7. Add the batter to a piping bag.  Pipe in rows using your template onto parchment paper.  To add the cat ears, pipe a tiny bit and use the flick of your wrist to make it point at the tip.  This takes some practice.  I piped half the rows with cat ears and the other half as regular circles.  This way when you assemble the cookies you have the cat on one side and a regular circle on the other.

8. Pick up the pan and beat until the counter.  The cookies need to rest on the counter between 30-60 minutes.  They are ready to go in the oven when they are dry to touch (the shell shouldn’t stick to your finger)

9.  Set the oven to 300F.

10. Bake the cookies for 13-15 minutes one sheet at a time. They are done when they look kind of matte and seem firm when you lightly tap on them.  You can always rescue a slightly overcooked one with the maturation process that comes later, but you cannot rescue an undercooked one!!

11.  Remove from paper once completely cool. If they stick they stick to the paper, they aren’t cool yet. Or you undercooked them.

Assembly and filling:Ingredients for the filling

•Chocolate Hazelnut filling (I cheated and used Nutella!)

•googly eyes

•food markers

•flat circles for the nose (I used some sprinkles from decorating sugar cookies)

•small tube of frosting (to glue the eyes to the cat)


1. Once your cookies have cooled, draw a cat’s face with the black food marker.

2. Pipe two circles on the cat’s face and attach the googly eyes.

3.  Fill the inside with a small amount of Nutella and twist the back on.

4.  Store inside the refrigerator for approximately 24 hours before enjoying… trust me, it will taste better!

chocolate cat macarons
Chocolate Cat Macarons!
getting the cat ears right takes practice!

I had fun taking pictures of these cute little cookies!

scary cat chocolate hazelnut macaron


Follow:

Delicious German Pumpkin Soup Recipe

We use affiliate links in our posts and our site. This means if you make a purchase using these links, we may earn a small commission. You don’t pay a cent more than you would otherwise! Our full disclosure is available under About.

Ever since I went to that fabulous pumpkin festival in Germany that I keep talking about, I have been just dying for some pumpkin soup.  The pumpkin soup I had there was the BEST pumpkin soup I’ve ever had.  I have been searching for months trying to find an authentic German recipe that I think was very similar to the soup I fell in love with.  I read recipes in German and English.  I came up with my own, which is a combination of about 10 recipes I read!

German Pumpkin Soup Recipe
*THE* pumpkin soup I’ve been dying to eat.  Guess I need to go back to Germany??

German Pumpkin Soup Recipe

German Pumpkin Soup recipe, authentic Kürbissuppe rezept
Get the PRINTABLE recipe here


Ingredient

  • 1-2 small baking pumpkins*** (see notes)
  • 1 large potato, cubed largely about 1×1 inch
  • 1 large onion, large cubes as well
  • 2 tbsp salted butter
  • 1 liter water
  • 4 cube vegetable broth bouillon
  • 1/2 tsp pumpkin pie spice
  • 5 twists of cracker pepper
  • 1 tsp salt
  • 1/2 cup heavy cream (optional)
  • pumpkin seed oil****
  • pumpkin seeds

Directions

  1. Cut off both ends of the pumpkin. Then slice pumpkins in half and scoop out the seeds.  If it is too tough to cut, we microwaved each half in the microwave for approx. 3 minutes until the pumpkin was cooked.  You will only need to do this if your pumpkin skin is inedible or too tough to cut.
  2. Take butter and melt in pan or stock pot. Place sliced potatoes and onion inside the pan. Place lid on pan and cook on medium heat for 15 minutes. 
  3. In a separate pot, add the the liter of water with 4 vegetable broth bouillon cubes and bring to a boil. 
  4. Add pumpkin to the potato and onion. Next, add the pumpkin pie spice, salt, and pepper. Stir together, then allow to cook for 5 minutes. 
  5. The water should be boiling now.  Once it is boiling, pour into the already cooking vegetable mixture. 
  6. Cook on medium heat for 30 minutes, stirring occasionally.
  7. Purée your soup either in a normal blender or a handheld immersion blender. 
  8. Stir in cream. 
  9. Top with pumpkin seed oil (this really makes the dish).  Garnish with pumpkin seeds. 

***Notes on pumpkins
The Germans tend to cook with Hokkaido pumpkins, which are readily available there.  The nice thing about that pumpkin is you can eat the skin.  Here, I hadn’t found any Hokkaido pumpkins.  I did find a golden nugget squash, which appeared very similar.  It tasted about the same.  Regular baking pumpkins should be fine too.  Just remember, if it’s a “pie pumpkin”, it may be a little bit sweeter.  I have not tried this recipe with canned pumpkin.

About our specific pumpkins used in this recipe: Each pumpkin uncooked was 1 pound. We used two golden nugget squash.  The skin was very tough and we had to microwave the pumpkin halves in order to slice them.

The Hokkaido pumpkin, AKA red kuri squash
the golden nugget squash, AKA Oriental pumpkin

****Notes on Pumpkin Seed Oil 

This REALLY makes this dish in my opinion.  You NEED to get some.  Here’s where I got my Pumpkin Seed Oil and I can say it is delicious.  This is not something you can easily find here in the US.  I searched 6 grocery stores (specialty ones included) and had no luck.  It is hard to get here because it is grown and made in a very specific region in Austria.  It’s everywhere in Germany and Austria… but not here! Boo!

the amazing Pumpkin Seed Oil!
 

This soup isn’t like your American version of pumpkin soup. It’s WAY better. I don’t really even like pumpkin soup… but this is delicious. Especially with that pumpkin seed oil!

German Pumpkin Soup Recipe
Authentic German Pumpkin Soup Recipe
German Pumpkin Soup Recipe
Oh SO delicious!! 

Linking up with these fabulous link parties: The Scoop!,  Metamorphosis Monday’sInspire Me Tuesday,Wow us Wednesdays! What’s it WednesdaysCenterpiece WednesdaysCreative Ways Treasure Hunt ThursdayHome Sweet Home Feathered Nest FridaysG’day SaturdaysFoodie Friday
Written at http://peoniesandorangeblossoms.blogspot.com

Follow:

Halloween Tablescape

We use affiliate links in our posts and our site. This means if you make a purchase using these links, we may earn a small commission. You don’t pay a cent more than you would otherwise! Our full disclosure is available under About.

I’ve had fun this year setting up my tablescape for this Fall and Halloween 2014.

New additions to the table setting include these wonderful napkins that my Mom made!  She got a new fancy sewing machine that allows her to do this fancy embroidery on it!  I picked the fabric out when I was 600 miles away from home… I think I did a good job guessing which purple would go best with the plates and goblets!

Look how great these napkins look!

Also found a set of new chargers from Homegoods.  I’m loving the look of everything with my velvet pumpkins, pumpkin napkin rings, and pumpkin plates!

Here’s a look of the pumpkins that are all in the center without any distractions of plates in the way!

I wanted to show a close up of one the plates… they are by Juliska.  There are four different scenes.  The one I focused on today for the Halloween table has witches dancing in the center.

Plates and goblets – Juliska

Charger – Homegoods

Napkins – MBM (made by Mom!)

Velvet pumpkins – Hot Skwash

Burlap placemats – etsy

Napkin rings – Pier 1 (they still have them there this year)

Linking up with these fabulous link parties: The Scoop! Inspire Me Tuesday, Wow us Wednesdays! What’s it WednesdaysCenterpiece WednesdaysCreative Ways,Tablescape ThursdayTreasure Hunt ThursdayHome Sweet Home Feathered Nest Fridays,G’day Saturdays,

Written at http://peoniesandorangeblossoms.blogspot.com/

Follow:

From the Shop

I may earn a small commission if you purchase with these links

Caning Natural Tote Handbag - Universal Thread™
The Hustler High Waist Fray Hem Ankle Bootcut Jeans
Le Panier Pliage Raffia Crossbody Bag
Extra Large Le Pliage Panier Tresse Straw Tote
The Bennet Buttondown Shirt by Maeve
T Monogram Perforated Leather Bucket Bag
Mellow Stud Mule
Le Pliage Marinière Recycled Nylon Canvas Travel Bag
Unseen Sunscreen Broad Spectrum SPF 40 PA+++
Maxine Stripe Cotton Button-Up Shirt
Citizens of Humanity Charlotte High Rise Straight Jeans
Navy Equestrian Traversee M Linen Tote
Cream Carrie Blouse
Ellison Natural
Jolene High Rise Vintage Slim
Citizens of Humanity Blue Jolene Jeans
Charlotte High Rise Straight Jeans
Le Pliage Filet Top Handle Bag
Vintage cotton crewneck T-shirt
Air Heart Sunglasses
Le Pliage Torchon XS Top Handle Bag With Strap
Santorini Raffia Basket Bag
Chuck Taylor® All Star® Lift High Top Platform Sneaker
Please note that I use ShopSense, LIKETOKNOW.it, Shareasale and Amazon affiliate links on this site. This means using them for purchases won’t cost you extra but may earn me a small commission.  Our full disclosure is available for viewing under About in the disclosure policy.
All rights reserved. Our graphics, images and text are all subject to copyright protection.